Old Tractor 15 – Farmington, UT – Fujifilm X-H1 – “Analog Monochrome”
This film simulation recipe began as an attempt to fulfill a need. You see, there are many Fujifilm cameras (like the X-H1) that are not capable of saving the White Balance Shift within Custom Presets, but there’s a solution: if each Custom Preset uses a different White Balance type, the camera will remember one White Balance Shift per type, and you won’t have to remember to adjust the shift when switching presets. This makes the camera experience more enjoyable.
The problem is that most film simulation recipes use the Auto, Daylight, or Kelvin White Balance types, and you have seven Custom Preset slots. The remaining White Balance types have a limited number of choices. Prior to this recipe, Incandescent had only one option: Eterna Bleach Bypass. Now, if you are using this solution, you can choose either this Analog Monochrome recipe or the Eterna Bleach Bypass recipe—one color and one B&W—for one of your C1-C7 slots.
Doll – Bountiful, UT – Fujifilm X-H1 – “Analog Monochrome”
I didn’t model this Analog Monochrome recipe after any specific film. Instead, I simply set out to create some settings that look good. This recipe has nice contrast with deep blacks, and whites that are bright yet don’t easily clip. I set Grain to Weak for a clean look, but feel free to try Strong for a grittier look. I feel that it has a very nice classic B&W film aesthetic that some of you will really appreciate.
Acros+G Dynamic Range: DR400 Highlight: +1 Shadow: +3 Noise Reduction: -4 Sharpening: -1 Grain Effect: Weak White Balance: Incandescent, -8 Red & -8 Blue ISO: Auto up to ISO 12800 Exposure Compensation: +1/3 to +2/3 (typically)
Example photographs, all camera-made JPEGs captured using this “Analog Monochrome” film simulation recipe on my Fujifilm X-H1:
Minolta SRT303b – Farmington, UT – Fujifilm X-H1
Car Console – Farmington, UT – Fujifilm X-H1
Jon Smiling for the Camera – Farmington, UT – Fujifilm X-H1
Joy Laughing at a Funny Message – Farmington, UT – Fujifilm X-H1
Horse Close Up – Farmington, UT – Fujifilm X-H1
You Shall Not Pass – Layton, UT – Fujifilm X-H1
Jesus Loves You! – Farmington, UT – Fujifilm X-H1
Friendly Neighborhood Snowman – Farmington, UT – Fujifilm X-H1
Winter Walking Path – Farmington, UT – Fujifilm X-H1
Farmington Creek in Winter – Farmington, UT – Fujifilm X-H1
Three Ducks in the Creek – Farmington, UT – Fujifilm X-H1
Snow and Creek – Farmington, UT – Fujifilm X-H1
Winter Tree – Farmington, UT – Fujifilm X-H1
Stump In Snow – Farmington, UT – Fujifilm X-H1
Wild Grass in Snow – Farmington, UT – Fujifilm X-H1
Melting Snow In The Tall Grass – Farmington, UT – Fujifilm X-H1
Nobody pays me to write the content found on fujixweekly.com. There’s a real cost to operating and maintaining this site, not to mention all the time that I pour into it. If you appreciated this article, please consider making a one-time gift contribution. Thank you!
And hard work it was! Anders sent me a lengthy note on his process to create this recipe, and I want to share with you a short snippet just so you get an idea of the effort put into this. “I checked the spectrum sensitivity chart and looked for any significant bumps in the wavelengths,” he wrote. “For the largest bump, I checked what color it represents to try to match it as close as possible with the white balance shift. This recreated the bump in the recipe to make the simulation a bit extra sensitive to that specific color.” This was point four of seven in his process, and shows the kind of effort that can go into creating film simulation recipes.
Ilford Pan F 50 Plus is a low-ISO, contrasty, sharp, detailed, fine-grain, black-and-white negative film. It has the punchiness of a mid-ISO film, but is very clean, and can be printed large and still appear crisp and fine-detailed. Of course, how a film is exposed, developed, scanned and/or printed will affect the exact aesthetic. Ilford Pan F 50 Plus is one of the best black-and-white films you can buy today, and this recipe is a pretty darn good facsimile of it.
Sugar House Traffic District – Salt Lake City, UT – Fujifilm X100V – “Ilford Pan F Plus 50”
“This one needs some care,” Anders wrote of this recipe, “and really soft light is recommended for portraits, but the reward is wonderful! If you’re looking for drama, this is it. Great in studio where lighting can be controlled, but can sometimes also work nicely for certain kinds of street photography. High contrast with a really classic black and white look, emphasis on the black.”
I modified Anders recipe a little. His version calls for Shadows to be +2 and Clarity set to 0, but he says that +2 Shadow can sometimes be too strong, and that +1 is not always strong enough, but +1.5 (for those cameras that are capable) is probably just right. I wanted to use this recipe on my Fujifilm X100V, which isn’t capable of .5 Shadow adjustments, so I set Shadow to +1 and Clarity to +2 (to increase the contrast, similar to what +1.5 Shadow might be)… alternatively, Shadow +2 and Clarity -2 is an option, too, but I didn’t like it quite as much. Because of Clarity, I decreased Sharpening to 0 from +1 (what the original recipe calls for). Instead of -3, I set Noise Reduction to -4, which is my preference. If you want to use Anders full recipe, set Shadow to +2 (or +1.5 if your camera is capable), Clarity to 0, Sharpness to +1, and Noise Reduction to -3. Otherwise, you’ll find my slightly modified version below. This recipe is compatible with the Fujifilm X-Pro3, X100V, X-T4, X-S10, X-E4 and X-T30 II cameras.
Monochrome Dynamic Range: DR100 Highlight: 0 Shadow: +1 Noise Reduction: -4 Sharpening: 0 Clarity: +2 Grain Effect: Weak, Large Color Chrome Effect: Off Color Chrome Effect Blue: Off White Balance: Daylight, +1 Red & -6 Blue ISO: Auto, up to ISO 6400 (for best results, try to limit the ISO to 1600 and lower when able) Exposure Compensation: -1/3 to +1/3 (typically)
Example photographs, all camera-made JPEGs using this “Ilford Pan F Plus 50” film simulation recipe on my Fujifilm X100V:
Item Number – Bountiful, UT – Fujifilm X100V
Snow on Seat – Salt Lake City, UT – Fujifilm X100V
Wheelchair Shopping – Farmington, UT – Fujifilm X100V
Face Masks For Everyone – Farmington, UT – Fujifilm X100V
This film simulation recipe is called “Fujicolor NPH” because it is inspired by that film. Actually, I was attempting a Fujicolor Pro 400H recipe. I had a couple already: Fujicolor Pro 400H for X-Trans III and Fujicolor Pro 400H Overexposed for X-Trans IV. This was originally an Early-Access recipe on the Fuji X Weekly App, and App Patrons have had access to it for nearly a year; however, it’s been replaced by a different Early-Access recipe, so now it’s available to everyone! Since the time that I originally published this, I’ve made a new Fujicolor Pro 400H recipe that I’m quite happy with. This recipe is similar to Pro 400H film, but it’s actually closer to Fujicolor NPH 400, which was the predecessor to Pro 400H. Those two emulsions were similar, with only small differences, but in my opinion this recipe is closer to NPH 400, so that’s why I named it after that film.
Because this film simulation recipe requires Clarity and Color Chrome FX Blue, it’s compatible with the Fujifilm X-Pro3, X100V, X-T4, X-S10, X-E4, and X-T30 II cameras. I believe those who own a newer GFX camera, such as the GFX 100S and GFX 50S II, can use it, too, although results will be slightly different. If you don’t want to use Clarity because it slows down the camera, you could alternatively use a diffusion filter (such as 1/8 Black Pro Mist or 5% CineBloom) instead.
Provia Dynamic Range: DR100 Highlight: -1 Shadow: 0 Color: 0 Noise Reduction: -4 Sharpening: 0 Clarity: -3 Grain Effect: Weak, Large Color Chrome Effect: Strong Color Chrome Effect Blue: Strong White Balance: 5250K, -3 Red & -4 Blue ISO: Auto, up to ISO 6400 Exposure Compensation: +1/3 to +2/3 (typically)
Example photographs, all camera-made JPEGs using this Fujicolor NPH film simulation recipe on my Fujifilm X-E4 & Fujifilm X100V cameras:
Weber River in Winter – Weber Canyon, UT – Fujifilm X100V
Honey Salmon – Salt Lake City, UT – Fujifilm X100V
Cold Tires – Farmington, UT – Fujifilm X-E4
Sprinkler – Farmington, UT – Fujifilm X-E4
Post – Farmington, UT – Fujifilm X-E4
Frozen Pond – Farmington, UT – Fujifilm X-E4
760 Sign – Farmington, UT – Fujifilm X100V
Blue Sky Reeds – Farmington, UT – Fujifilm X-E4
Old Pepsi Machine – Farmington, UT – Fujifilm X-E4
Stepping Into the Night Circle – Sunset, UT – Fujifilm X100V
Nobody pays me to write the content found on fujixweekly.com. There’s a real cost to operating and maintaining this site, not to mention all the time that I pour into it. If you appreciated this article, please consider making a one-time gift contribution. Thank you!
Ice Cold Pepsi – Farmington, UT – Fujifilm X-E4 – “Kodak Max 800”
The Fuji X Weekly App is free, yet becoming a Fuji X Weekly Patron unlocks the best App experience! One benefit of being a Patron is you get early access to some new film simulation recipes. These Early-Access Recipes will eventually become available free to everyone in time, including this new one. In fact, many Early-Access Recipes have been publicly published on this blog and the App, so now everyone can use them! Patrons help support Fuji X Weekly and, really, without them there would be no App. So I want to give a special “thank you” to all of the Patrons!
This new Patron Early-Access Recipe is modeled after some prints I found in a box that I thought looked interesting. I didn’t initially know what film had been used, but after locating the negatives I discovered it was something called Kodak GT 800-3, and I had no idea what that was. After much sleuthing, I found out it was Kodak Max Zoom 800, also known as Max 800. The film was shot in 2006 (I believe by my wife), and it was the third and final iteration of the emulsion (this version was introduced in 2000). Max Zoom 800 was replaced in 2006 by the similar Max Versatility Plus 800 (which was around for five or six years before its discontinuation).
Kodak made Max 800 film for point-and-shoot and disposable cameras—specifically, they marketed it for point-and-shot cameras with a zoom lens, which exaggerated camera shake. It was a cheap high-ISO consumer color negative film intended for the novice. It had a large latitude for underexposure and (especially) overexposure, but color reproduction was a little different (some have said bland or weird) when compared to other Kodak films. Kodak intended the film to be printed on Ektacolor Edge paper, but my samples were printed on Fujicolor Crystal Archive paper (which certainly affects the aesthetic)—this recipe is modeled after my samples.
Winter Greenhouse – Farmington, UT – Fujifilm X-E4 – “Kodak Max 800”
This Kodak Max 800 Patron Early-Access Recipe is compatible with the Fujifilm X-Pro3, X100V, X-T4, X-S10, X-E4, and X-T30 II cameras. If you are a Fuji X Weekly Patron, it’s available to you right now on the Fuji X Weekly App! If you don’t have the App, download it for free today.
Example photographs, all camera-made JPEGs captured using this “Kodak Max 800” film simulation recipe on my Fujifilm X-E4:
Frozen Ponds at a Bird Refuge – Farmington, UT – Fujifilm X-E4
Winter Gate – Farmington, UT – Fujifilm X-E4
Open Gate – Farmington, UT – Fujifilm X-E4
Icy Marshland – Farmington, UT – Fujifilm X-E4
What Remains of Summer – Farmington, UT – Fujifilm X-E4
Winter Water – Farmington, UT – Fujifilm X-E4
Frozen Marsh Pond – Farmington, UT – Fujifilm X-E4
Nature Trail – Farmington, UT – Fujifilm X-E4
Green Truck – Farmington, UT – Fujifilm X-E4
Santa’s Sled – Farmington, UT – Fujifilm X-E4
Neighborhood Path in Winter – Farmington, UT – Fujifilm X-E4
Trail Closed – Farmington, UT – Fujifilm X-E4
No Shooting Past the Fence – Farmington, UT – Fujifilm X-E4
Pallets – Farmington, UT – Fujifilm X-E4
Inside Abandoned Shed – Farmington, UT – Fujifilm X-E4
Walking Tunnel – Farmington, UT – Fujifilm X-E4
Farm in the City – Farmington, UT – Fujifilm X-E4
Barnes & Noble Window – Farmington, UT – Fujifilm X-E4
Building Top in Last Light – Farmington, UT – Fujifilm X-E4
In this “SoundBite” (as we’re calling it) from Episode 05 of SOOC, Fujifilm X-Photographer Nathalie Boucry and I discuss three film simulation recipes that are good for urban photography. This is a short snippet from the show, and it gives you an idea of the type of content that’s found in a SOOC broadcast. If you missed Episode 05 and/or Episode 06, I’ve included them below.
If you’ve never watched, SOOC is a monthly live video series that’s interactive. It’s a collaboration between Nathalie and I. We discuss film simulation recipes, camera settings, and answer your questions. Basically, we’re trying to help you master your Fujifilm camera, with a focus on simplifying your photographic workflow.
If you have a Fujifilm camera and don’t have the Fuji X Weekly App on your phone or tablet, be sure to download it now! The App is free, but becoming a Patron unlocks the best App experience, so consider becoming an App Patron today.
Let’s countdown the last 10 recipes that brought us to 200:
Which of these ten recipes are your favorites? Let me know in the comments!
There are actually more than 200 Fuji X Weekly film simulation recipes! Unfortunately, I’m not able to include in the App the ones that require double exposures because they’re more complicated and the format doesn’t allow it. So when I published Retro Gold Low Contrast, that was actually the 200th Fuji X Weekly film simulation recipe. The recipes below are ones you won’t find in the App, and are in addition to the 200 that are there.
Evergreen Tops – Farmington, UT – Fujifilm X-E4 – “Kodak High Definition Plus 200”
This Kodak High Definition Plus 200 film simulation recipe was a fun one to make. My wife, Amanda, was looking through an old box of pictures when she came across a group of prints that she thought looked interesting, so she showed them to me. The images were captured in the Sierra Nevada mountains, largely in the Sequoia National Forest, in 2006. I had no idea what film I used, but after locating the negatives, I discovered it was Kodak High Definition Plus 200. The pictures were printed on Fujicolor Crystal Archive paper. Not surprisingly, Fujifilm paper produces a different aesthetic than Kodak paper, so if this film had been printed on Kodak paper the pictures would look a little different. Back then, the rule of thumb for best results was that Kodak negatives should be printed on Kodak paper, Fujifilm negatives should be printed on Fujifilm paper, etc., but obviously I broke that “rule” with these travel pictures.
Kodak High Definition Plus 200 was a color negative film that was also sold under the name Kodak Royal Supra 200. At the time, Kodak claimed that it was the sharpest and finest-grained ISO 200 color negative film on the market. Originally there were ISO 100, 200, 400 and 800 varieties, but since this film line was introduced right at the beginning of the decline of film, it didn’t take Kodak long to discontinue all but the ISO 200 and 400 versions, and even those didn’t last all that long. I shot a few rolls of the film, and after digging through that photo box, I found two sets of negatives, both exposed around that same timeframe. I honestly don’t remember all that much from the experience, but it was fun to rediscover these long-forgotten pictures and recreate the aesthetic on my Fujifilm X-E4 camera.
A picture of Kodak High Definition Plus negatives, captured with this recipe.
A picture of Kodak High Definition Plus 200 prints, captured with this recipe.
A poor quality scan of one of the prints. Sorry. I really need to buy a better scanner.
For ISO 200 color negative film, Kodak High Definition Plus 200 was indeed pretty sharp and fine-grained. It was moderately vibrant (just a little above “true to life”) and contrasty but not overly contrasty. From what I can tell, it didn’t have as large of an exposure latitude as some of Kodak’s other color negative films. It was warm, but seemed to lean more towards green than red when printed on Fujicolor paper. Obviously, how the film is shot, developed, printed and/or scanned will affect how it looks (I apologize for my poor quality scan above, which doesn’t do the picture justice whatsoever, but I wanted to share it anyway). This recipe mimics how I shot the film in 2006, printed on Fujicolor paper. It is compatible with the Fujifilm X-Pro3, X100V, X-T4, X-S10, X-E4, and X-T30 II cameras.
Classic Chrome Dynamic Range: DR400 Highlight: 0 Shadow: +1 Color: +2 Noise Reduction: -4 Sharpening: 0 Clarity: -3 Grain Effect: Weak, Small Color Chrome Effect: Weak Color Chrome Effect Blue: Weak White Balance: 4800K, -2 Red & -7 Blue ISO: Auto, up to ISO 6400 Exposure Compensation: +1/3 to +2/3 (typically)
Example photographs, all camera-made JPEGs using this Kodak High Definition Plus 200 film simulation recipe on my Fujifilm X-E4 & Fujifilm X100V:
Walking Bridge – Farmington, UT – Fujifilm X-E4
Hollow Building – Bountiful, UT – Fujifilm X100V
Leaves that Left – Farmington, UT – Fujifilm X100V
Flag & Evergreen – Layton, UT – Fujifilm X-E4
Green Pine Needles – Farmington, UT – Fujifilm X100V
Red Roof – Farmington, UT – Fujifilm X-E4
Lonely Table – Orem, UT – Fujifilm X100V
Night Shopping Carts – Draper, UT – Fujifilm X100V
Pillow on Couch – Farmington, UT – Fujifilm X100V
Fake Succulent – Farmington, UT – Fujifilm X-E4
Evening Clouds Over Wasatch Mountains – Farmington, UT – Fujifilm X-E4
Disappearing Light on Francis Peak – Farmington, UT – Fujifilm X-E4
Nobody pays me to write the content found on fujixweekly.com. There’s a real cost to operating and maintaining this site, not to mention all the time that I pour into it. If you appreciated this article, please consider making a one-time gift contribution. Thank you!
Winter Neighborhood at Sunset – Farmington, UT – Fujifilm X-T1 – “Winter Slide”
This recipe began with a weather forecast. It had been unusually dry and warm here in Utah, but cold temperatures and plenty of snow was on the way. At this time of year I get asked regularly which film simulation recipes are best for snow—there are plenty that will work well, but not many that are specifically made for it. A camera like the Fujifilm X-T1, which is weather-sealed, is great for these type of conditions, so I thought, with the forecasted wintry weather, I’d create a good-for-snow recipe for X-Trans II cameras that I could use on my X-T1. When the snow finally came, I’d be ready!
The initial inspiration for this recipe was Agfa Precisa CT 100 color slide film, which I read was one of the best film options for winter situations. I wasn’t having good luck recreating the aesthetic of it, but, in the process, I made some settings that I thought might be good for snow. So I failed at mimicking Agfa Precisa CT 100, but I succeeded at what I set out to do, which was a film simulation recipe that works well in snow. Interestingly, when I created the recipe, it wasn’t yet snowy, so I wasn’t completely sure how it would do. Luckily, it did every bit as well as I had hoped it would.
Two Cold Horses – Farmington, UT – Fujifilm X-T1 – “Winter Slide”
The trick to snow photography is to overexpose (based on what the meter says) because the camera sees a lot of white and wants to make it grey. So if you follow the meter, you’ll get a lot of dark pictures. By increasing the exposure compensation, you’ll get brighter pictures—I found myself often using +1 exposure compensation. If you are using this recipe when it’s not wintry white, you won’t have to increase the exposure compensation quite as much, and +1/3 to +2/3 will likely be better. This film simulation recipe is compatible with all X-Trans II cameras.
Provia/STD Dynamic Range: DR200 Highlight: 0 (Standard) Shadow: +2 (Hard) Color: -2 (Low) Sharpness: -1 (Medium-Soft) Noise Reduction: -2 (Low) White Balance: 5000K, -1 Red & -3 Blue ISO: Auto up to ISO 3200 Exposure Compensation: +1/3 to +1 1/3 (typically)
Example photographs, all camera-made JPEGs captured on my Fujifilm X-T1 using this “Winter Slide” film simulation recipe:
Ice Cold Red – Farmington, UT – Fujifilm X-T1
Winter Red Berries – Farmington, UT – Fujifilm X-T1
Snow on Branch – Farmington, UT – Fujifilm X-T1
Snow on Tree Trunk – Farmington, UT – Fujifilm X-T1
Winter Tree – Farmington, UT – Fujifilm X-T1
Winter Bush with Red Berries – Farmington, UT – Fujifilm X-T1
Snow on a Bush – Farmington, UT – Fujifilm X-T1
Winter Girl – Farmington, UT – Fujifilm X-T1
White House in Snow – Farmington, UT – Fujifilm X-T1
Lamp with Bow – Farmington, UT – Fujifilm X-T1
Winter Blue Home – Farmington, UT – Fujifilm X-T1
One Light in a Tree – Farmington, UT – Fujifilm X-T1
Nobody pays me to write the content found on fujixweekly.com. There’s a real cost to operating and maintaining this site, not to mention all the time that I pour into it. If you appreciated this article, please consider making a one-time gift contribution. Thank you!
Freightliner – Farmington, UT – Fujifilm X-H1 – “Ilford XP2 Super 400”
I was asked to create a film simulation recipe for Ilford XP2 Super 400 monochrome film. This is a currently-available black-and-white negative film that’s designed to be in developed in color negative (C41) chemistry. While this is unusual it’s definitely not unique. I’ve shot with some of these films before (namely Kodak BW400CN), and they’re surprisingly good, but a disadvantage is their archival characteristics. While I’ve used many Ilford films in the past (Delta 100 and Delta 400 were my two favorites back in the day), I’ve never shot with XP2 Super, and so I have no firsthand experience with it. Thankfully, I was able to find some good sample images (and other information) to help with the process. The film is somewhat contrasty and bright with fairly fine grain. It can be shot anywhere from ISO 50 to ISO 800, although ISO 400 is what Ilford suggests to shoot it at; whatever ISO you choose will affect the exact outcome.
I wasn’t having good luck with this recipe at first, but as I experimented, I stumbled into what I believe is a fairly accurate facsimile to the film. The White Balance settings (combined with Acros+R) turned out to be the key. Getting the exposure correct can sometimes be tricky, depending on the light and scene, so that’s why the “typical” exposure compensation is such a wide range.
Farmington Train Station – Farmington, UT – Fujifilm X-H1 – “Ilford XP2 Super 400”
This “Ilford XP2 Super 400” film simulation recipe is compatible with all X-Trans III cameras, plus the X-T3 and X-T30. If you have a newer X-Trans IV camera, you can use this recipe, but you’ll have to decide on the Grain size (I suggest Small).
Acros+R Dynamic Range: DR400 Highlight: -1 Shadow: +4 Noise Reduction: -4 Sharpening: -2 Grain Effect: Strong White Balance: 10000K, +7 Red & +7 Blue ISO: Auto up to ISO 12800 Exposure Compensation: -2/3 to +2/3 (typically)
Example photographs, all camera-made JPEGs captured using this “Ilford XP2 Super 400” film simulation recipe on my Fujifilm X-H1:
Francis Peak on a Sunny Day – Farmington, UT – Fujifilm X-H1
Waterway – Farmington, UT – Fujifilm X-H1
Reed by the Lake – Farmington, UT – Fujifilm X-H1
Swan Season Closed – Farmington, UT – Fujifilm X-H1
Do Not Block Access – Farmington, UT – Fujifilm X-H1
Boat Launch Area – Farmington, UT – Fujifilm X-H1
Littering Prohibited – Farmington, UT – Fujifilm X-H1
Long Road to Nowhere – Farmington, UT – Fujifilm X-H1
Rural Tractor – Farmington, UT – Fujifilm X-H1
Cat & Honey Bucket – Farmington, UT – Fujifilm X-H1
Caterpillar – Farmington, UT – Fujifilm X-H1
Tractor – Farmington, UT – Fujifilm X-H1
Lamp & Side Mirrors – Farmington, UT – Fujifilm X-H1
A Y – Farmington, UT – Fujifilm X-H1
Empty Benches – Farmington, UT – Fujifilm X-H1
Tracks with no Train – Farmington, UT – Fujifilm X-H1
Nobody pays me to write the content found on fujixweekly.com. There’s a real cost to operating and maintaining this site, not to mention all the time that I pour into it. If you appreciated this article, please consider making a one-time gift contribution. Thank you!
Large Stone & Tall Grass – Farmington, UT – Fujifilm X-H1 – “Vintage Kodacolor”
The Fuji X Weekly App is free, yet becoming a Fuji X Weekly Patron unlocks the best App experience! One benefit of being a Patron is you get early access to some new film simulation recipes. These early-access recipes will eventually become available free to everyone in time, including this new one. In fact, many early-access recipes have already been publicly published on this blog and the App, so now everyone can use them. Patrons help support Fuji X Weekly and, really, without them there would be no App. So I want to give a special “thank you” to all of the Patrons!
This new Patron early-access recipe is called Vintage Kodacolor. I was inspired by some old Kodacolor puzzles that I stumbled across (did you know that Kodak made jigsaw puzzles?). I’m not completely certain which Kodacolor film was used for these puzzles—possibly Kodacolor II—or how much the printing process affected the aesthetic, or even how much the colors have faded and shifted over time. Whatever the case, this recipe does a pretty good job emulating it, and produces a warm vintage-like aesthetic that’s easy to appreciate. There’s some similarities between this and my Kodacolor II 126 recipe. This “Vintage Kodacolor” recipe is fully compatible with all X-Trans III cameras, plus the Fujifilm X-T3 and X-T30. Those with newer X-Trans IV cameras can use it, too, but you’ll have to decide on Grain size.
If you are a Fuji X Weekly Patron, it’s available to you right now on the App!
Example photographs, all camera-made JPEGs captured using this “Vintage Kodacolor” film simulation recipe on my Fujifilm X-H1:
Vintage Phragmites – Farmington, UT – Fujifilm X-H1
Evening Reeds and Sky – Farmington, UT – Fujifilm X-H1
Three Brown Leaves – Farmington, UT – Fujifilm X-H1
Don’t Approach the Great Blue Heron – Farmington, UT – Fujifilm X-H1
Safe Zone – Farmington, UT – Fujifilm X-H1
Sunset Through The Grass – Farmington, UT – Fujifilm X-H1
Evening Light on the Wood – Farmington, UT – Fujifilm X-H1
Flowers No More – Farmington, UT – Fujifilm X-H1
Metal Door – Farmington, UT – Fujifilm X-H1
Cardboard Architect – Farmington, UT – Fujifilm X-H1
Holiday Horse Rider – Farmington, UT – Fujifilm X-H1
The Winter Solstice is fast approaching, and for those like me in the Northern Hemisphere, the days are getting shorter and the nights are longer. I find this to be a good opportunity for after-sunset or pre-sunrise photography, but there aren’t very many film simulation recipes for X-Trans III cameras that are specifically intended for this situation—in fact, there’s only one: CineStill 800T (although several others will still do well enough). So I set out to create another night film simulation recipe, because it’s good to have choices.
Unlike the CineStill 800T recipe, I didn’t model this one after any specific film, although it has some fairly close similarities to Fujicolor NPL 160 Pro Tungsten color negative film, which Fujifilm produced from 2000 through 2004. NPL 160 was specifically made for long exposures under artificial light. While I didn’t intend to mimic that film, you wouldn’t know it based on just how close of a match it is. I never used NPL 160 myself, as it wasn’t available in 35mm format, but I did some research on it for this article. It was available in 120 film (also, 4×5 sheets), which could be captured in three ratios (depending on the camera), including square, but 3:2 wasn’t one of those options. You could use 3:2 like I did, or more accurately shoot in the 1:1 ratio, or crop after-the-fact to whatever shape you prefer.
Blue Light Tree – Farmington, UT – Fujifilm X-H1 – “Fujicolor NPL 160 Tungsten”
This Fujicolor NPL 160 Tungsten recipe is compatible with all X-Trans III cameras, so if you have a Fujifilm X-Pro2, X100F, X-E3, X-T20, X-T20, or X-H1, this recipe is for you! It’s also compatible with the X-T3 and X-T30—simply set Color Chrome Effect to Off, and limit the maximum ISO to 6400. For those with newer X-Trans IV cameras, consider using Grain size Small and Clarity set to 0 or even -2. Those with a GFX 50S and GFX 50R can use this recipe, too, although it will look very slightly different. For night photography, I most commonly set exposure compensation to -1/3 or 0, and for daylight photography I most commonly set exposure compensation to +1/3 to +2/3.
PRO Neg. Std Dynamic Range: DR400 Highlight: -2 Shadow: 0 Color: -2 Sharpening: -1 Noise Reduction: -4 Grain: Weak White Balance: Fluorescent 3, -6 Red & -3 Blue ISO: Auto up to ISO 12800 Exposure Compensation: -1/3 to +2/3 (typically)
Example photographs, all camera-made JPEGs captured using this “Fujicolor NPL 160 Tungsten” film simulation recipe on my Fujifilm X-H1:
Sunset Afterglow on Building – Farmington, UT – Fujifilm X-H1
Waffled – Farmington, UT – Fujifilm X-H1
Christmas Tree Outside A Mall – Farmington, UT – Fujifilm X-H1
Lights Wrapped Around A Trunk – Farmington, UT – Fujifilm X-H1
Girl at a Lighted Fountain – Farmington, UT – Fujifilm X-H1
Survivor – Salt Lake City, UT – Fujifilm X-H1
Headless Lampshade – Farmington, UT – Fujifilm X-H1
Stored Clothes – Farmington, UT – Fujifilm X-H1
Crowd Around the Tree – Salt Lake City, UT – Fujifilm X-H1
German Night – Salt Lake City, UT – Fujifilm X-H1
Krampus – Salt Lake City, UT – Fujifilm X-H1
Christkindlmarkt – Salt Lake City, UT – Fujifilm X-H1
Carolers – Farmington, UT – Fujifilm X-H1
ZCMI – Salt Lake City, UT – Fujifilm X-H1
Soaring Over a Neighborhood – Farmington, UT – Fujifilm X-H1
Nobody pays me to write the content found on fujixweekly.com. There’s a real cost to operating and maintaining this site, not to mention all the time that I pour into it. If you appreciated this article, please consider making a one-time gift contribution. Thank you!
The Fuji X Weekly App originally launched on iOS one year ago today! Later, in the spring, it launched on Android. And, less than a week ago, an update was released that made it even better! There’s more coming, too, that will further improve the App. I’m always adding new film simulation recipes, and it’s approaching the 200 mark rather quickly.
It’s been an amazing 12 months!
The Fuji X Weekly App has been downloaded over 180,000 times! Now, some people might have the App on more than one device, or they switched devices and downloaded the App more than once. So I’m not sure how many individuals have downloaded it, but it is absolutely mind-blowing that it has been downloaded that many times! There are about 45,000 active users (meaning, individuals that have used the App at least once in the last month). By far, the vast majority of people use the free version, yet the best App experience is unlocked by becoming a Patron, so if you’re not a Patron, you’re missing out on some great features. Also, Patrons help support the App and other great things within the Fujifilm community. Without the support of Patrons there would be no App, so I want to give a big “Thank You” to all the Fuji X Weekly App subscribers!
If you own a Fujifilm camera, you should have the Fuji X Weekly App on your phone and/or tablet. If you don’t, download it for free today!
Autumn on Kodachrome – Layton, UT – Fujifilm X-E4 – “Kodachrome 25”
The Kodachrome name has been used for many different films over the years. The first Kodachrome product was a two-glass-plate color negative that was introduced in 1915. Like all other color photography methods of its time, the results weren’t particularly good and the product not especially successful.
In 1935, Kodak released its next Kodachrome product: a positive color transparency film. This Kodachrome was the first film that produced reasonably accurate colors, and, because of that, was the first commercially successful color film. It became the standard film for color photography for a couple decades, and was even Ansel Adams’ preferred choice for color work. The December 1946 issue of Arizona Highways, which was the first all-color magazine in the world, featured Barry Goldwater’s Kodachrome images. While the most popular Kodachrome during this time was ISO 10, Kodak also produced an ISO 8 version, as well as a Tungsten option in the 1940s.
Kodak made significant improvements to Kodachrome, and in 1961 released Kodachrome II. This film boasted more accurate colors, sharper images, finer grain, and a faster ISO of 25. While it was still somewhat similar to the previous Kodachrome, it was better in pretty much every way. A year later Kodachrome-X was introduced, which had an ISO of 64, and produced more saturation and increased contrast, but was grainier.
Golden Red Berries – Farmington, UT – Fujifilm X-E4 – “Kodachrome 25”
In 1974, because Kodak created a less-toxic development process, Kodachrome II was replaced by Kodachrome 25 and Kodachrome-X was replaced by Kodachrome 64. This generation of Kodachrome is what most people think of when they picture (pun intended) the film, gracing the pages of magazines like National Geographic. Due to Kodachrome’s sharpness, grain, color, contrast, and archival characteristics, it was a great all-around option that worked well in most circumstance. Steve McCurry, who is perhaps the best-known photographer to extensively use this era of Kodachrome, said of the film, “It has almost a poetic look with beautiful colors that were vibrant and true to what you were shooting.”
This film simulation recipe is intended to mimic Kodachrome 25 color transparency film. I was fortunate to shoot a few rolls of Kodachrome 25. It was a beautiful film, and probably the sharpest color film ever made, but its low ISO made it difficult to use. Kodachrome 64, which was still a low-ISO film, was about 1 2/3 stops faster. The major differences between the two Kodachrome emulsions is that the ISO 25 version was sharper and less grainy, while the ISO 64 version was more contrasty, vibrant and a hair warmer. Both were very similar, though, and it would be hard to spot the differences without a close inspection. Some people preferred the slightly more subtle tones and finer detail of Kodachrome 25, and some preferred the faintly punchier pictures rendered on Kodachrome 64. I liked Kodachrome 64 a little more, and so that’s what I most often used.
Below are a couple examples of this Kodachrome 25 recipe compared to my Kodachrome 64 recipe:
Kodachrome 25 recipe
Kodachrome 64 recipe
Kodachrome 25 recipe
Kodachrome 64 recipe
In the example below, I made massive crops so that you could more easily see the subtle differences in sharpness and grain between the two Kodachrome recipes. The differences in warmth are also more obvious. If the Kodachrome 25 recipe could have a .25 adjustment warmer, and if the Kodachrome 64 recipe could have a .25 adjustment cooler, it would likely be more accurate, but alas we’re limited by what Fujifilm gives us. In the case of this recipe, a Color Chrome FX Blue Medium would be a nice option, but it doesn’t exist.
Kodachrome 25 recipe
Kodachrome 25 crop
Kodachrome 64 crop
When Kodak discontinued Kodachrome in 2009, it shocked the photographic community; however, the deeper blow was that Kodak discontinued the chemicals required to develop it. Even if you had an old roll of the film (which I did), you couldn’t develop it, except as a black-and-white film from a specialty lab. By the end of 2010, the Kodachrome era was officially over for good. Fortunately, if you have a Fujifilm camera, the spirit of Kodachrome still lives.
This Kodachrome 25 recipe is only compatible with the Fujifilm X-T4, X-S10, X-E4, and X-T30 II cameras. You can modify this for the X-Pro3 and X100V by setting Highlight to 0 and Shadow to -1 instead of what it calls for—I don’t like it quite as much, but it’s pretty similar.
Classic Chrome Dynamic Range: DR400 Highlight: +0.5 Shadow: -0.5 Color: +1 Noise Reduction: -4 Sharpening: +3 Clarity: +3 Grain Effect: Off Color Chrome Effect: Strong Color Chrome Effect Blue: Strong White Balance: Daylight, +2 Red & -4 Blue ISO: Auto, up to ISO 1600 Exposure Compensation: 0 to +2/3 (typically)
Example photographs, all camera-made JPEGs using this new Kodachrome 25 film simulation recipe on my Fujifilm X-E4:
Pedestrian Bridge – Farmington, UT – Fujifilm X-E4
Empty Stairs – Farmington, UT – Fujifilm X-E4
Red Box – Farmington, UT – Fujifilm X-E4
Locked Fire Box – Farmington, UT – Fujifilm X-E4
Three Bike Boxes – Farmington, UT – Fujifilm X-E4
Trains Can’t Stop – Farmington, UT – Fujifilm X-E4
Ceiling Conduit – Farmington, UT – Fujifilm X-E4
Delivering Boxes – Roy, UT – Fujifilm X-E4
Josh in Shadow – Farmington, UT – Fujifilm X-E4
Orange Leaves – Layton, UT – Fujifilm X-E4
Path Through A Fall Forest – Farmington, UT – Fujifilm X-E4
Golden Light on Mountain – Farmington, UT – Fujifilm X-E4
Last Light on Francis Peak – Farmington, UT – Fujifilm X-E4
Nobody pays me to write the content found on fujixweekly.com. There’s a real cost to operating and maintaining this site, not to mention all the time that I pour into it. If you appreciated this article, please consider making a one-time gift contribution. Thank you!
Cotton On – Farmington, UT – Fujifilm X100V – “Fujicolor Analog”
The Fuji X Weekly App is free, yet becoming a Fuji X Weekly Patron unlocks the best App experience! One benefit of being a Patron is you get early access to some new film simulation recipes. These early-access recipes will eventually become available free to everyone in time, including this new one. In fact, many early-access recipes have already been publicly published on this blog and the App, so now everyone can use them. Patrons help support Fuji X Weekly and, really, without them there would be no App. So I want to give a special “thank you” to all of the Patrons!
This new Patron early-access recipe is called Fujicolor Analog. I was asked to recreate the look of a certain photographer, and I noticed that a lot of their photographs had a Classic Negative aesthetic, so I thought it would be easy to mimic. It turns out that this person shoots a lot of film, including (but not limited to) Fujicolor C200 and various Superia emulsions, as well as digital (but not Fujifilm, as far as I can tell), using RNI and perhaps some other filters or presets. Nothing said what each picture had been captured with, so it became difficult to recreate. After a little frustration, I decided to select only pictures with a certain aesthetic to attempt to emulate. I believe these might have been captured on a Superia emulsion, but they might not have been—they might not even be film! I think I was able to create a pretty close facsimile to this person’s aesthetic… at least one of the many various (but still somewhat similar) looks that this photographer has.
One film can have many different looks, depending on how it was shot, developed, and printed or scanned. I do believe this “Fujicolor Analog” recipe mimics the aesthetic of a Fujifilm color negative film, but which exact film, and how handled, is uncertain. What is certain is that this is a very nice film simulation recipe that some of you will love! It’s compatible with the Fujifilm X-Pro3, X100V, X-T4, X-S10, X-E4, X-T30 II cameras.
If you are a Fuji X Weekly Patron, it’s available to you right now on the App!
Example photographs, all camera-made JPEGs captured using this “Fujicolor Analog” film simulation recipe on my Fujifilm X100V:
Noble Fir – Kaysville, UT – Fujifilm X100V
Pine Trunk – Kaysville, UT – Fujifilm X100V
Burly Ladder – Kaysville, UT – Fujifilm X100V
Red Lights – Kaysville, UT – Fujifilm X100V
Utah Reeds – Farmington, UT – Fujifilm X100V
Pine in the Sky – Farmington, UT – Fujifilm X100V
Withering Blooms – Orem, UT – Fujifilm X100V
Peaks Above The Gap – Orem, UT – Fujifilm X100V
Arts – Draper, UT – Fujifilm X100V
Stop Spreading Germs – Draper, UT – Fujifilm X100V
This new film simulation recipe isn’t actually new. It’s been a Patron early-access recipe on the Fuji X Weekly App for awhile, so App Patrons have had the opportunity to shoot with it for many months. It’s been replaced with a different early-access recipe, so now it’s available to everyone! If you are an App Patron, be sure to look for the new early-access recipe.
I call this recipe “Vintage Negative” because it is based on some old photographs that someone shared with me. The pictures were old family prints that this person had found in a box. The film used was unknown, and it’s hard to know just how much of the aesthetic was from the film itself, and how much was from the print, which likely had a color shift from age. If you’re looking for an aged analog aesthetic, this recipe is for you!
Mountain Painted in Sunset Orange – Farmington, UT – Fujifilm X-E4 – “Vintage Negative”
The “Vintage Negative” film simulation recipe is compatible with all X-Trans IV cameras except the X-T3 and X-T30. If you have a Fujifilm X-Pro3, X100V, X-T4, X-S10, X-E4, or X-T30 II camera, you can use this recipe. The newer GFX cameras can likely use it, too, although I’m not certain, and it will likely render the pictures slightly different.
Classic Negative Dynamic Range: DR400 Highlight: +1 Shadow: +2 Color: -3 Noise Reduction: -4 Sharpeness: -4 Clarity: -5 Grain Effect: Strong, Large Color Chrome Effect: Strong Color Chrome Effect Blue: Strong White Balance: 10000K, -6 Red & -5 Blue ISO: Auto, up to ISO 6400 Exposure Compensation: +1/3 to +2/3 (typically)
Example photographs, all camera-made JPEGs using this “Vintage Negative” film simulation recipe on my Fujifilm X100V and Fujifilm X-E4 cameras:
Christmas Star – Kaysville, UT – Fujifilm X100V
Two Ladders – Kaysville, UT – Fujifilm X100V
Pine Needles – Farmington, UT – Fujifilm X100V
Water Tower – Salt Lake City, UT – Fujifilm X100V
Troller Square – Salt Lake City, UT – Fujifilm X100V
Yellow House Evening – Farmington, UT – Fujifilm X100V
Suburban Reed Evening – Farmington, UT – Fujifilm X100V
Clouds Around The Mountain Peak – Farmington, UT – Fujifilm X-E4
Nobody pays me to write the content found on fujixweekly.com. There’s a real cost to operating and maintaining this site, not to mention all the time that I pour into it. If you appreciated this article, please consider making a one-time gift contribution. Thank you!
Filter by White Balance will be a game-changer for many of you. The most obvious use is for finding recipes that match the lighting conditions. Is it sunny? Find a recipe that uses the Daylight White Balance. Is it indoors in mixed lighting? Maybe Auto White Balance would be good. But there’s another way to use Filter by White Balance, which I’ll discuss below, that will make your Fujifilm experience even better!
If your Fujifilm camera is older than the X-Pro3, you cannot save White Balance Shift within the C1-C7 Custom Presets, and each time you change Presets, you have to remember to adjust the WB Shift. It can be a little annoying. However, for each White Balance type, the camera will remember one WB Shift, so if each of your C1-C7 presets uses a different White Balance type, when you switch Presets, you won’t have to adjust the WB Shift. Amazing!
Let’s take a more practical look at this. If you have a Fujifilm X-T3 (for example), we’ll Filter by Camera and select the camera. For the X-T3, you’ll have over 70 recipes to choose from!
Let’s select one recipe to be our C1 in the Custom Settings menu. We’re now going to Filter by White Balance, and tap Auto—there are nearly 40 recipes to choose from! If you find more than one that requires the same WB Shift—Classic Chrome and Velvia both use +1R & -1B, and Velvia v2 and Dramatic Monochrome both use 0R & 0B, just as a couple examples—you can actually use multiple recipes from this White Balance type, and potentially program more than just C1. For this example we’re going to pick just one, perhaps Eterna v3 (interestingly, Agfa Optima 200 shares this same shift, and could be used, too), to be our C1 preset.
For C2 we’re going to select Daylight. There are 12 options to choose from. Kodak Portra 160, Kodak Portra 400, and Kodak Gold 200 all share the same WB Shift, so, in theory, you could program all three of these into your Custom Settings presets. For this, let’s go with Kodak Tri-X 400 to be our C2.
Next, for C3, let’s select Kelvin. You have 15 to choose from. Let’s choose maybe Jeff Davenport Night.
For C4 we’ll go with the Fluorescent 1 White Balance. There are just two options, and we’ll select Kodak Vision3 250D.
It’s the same story for Fluorescent 2: there are only two options. We’ll choose Ektachrome E100G to be our C5 preset.
For C6 we’ll select Incandescent. There’s just one recipe: Eterna Bleach Bypass, so we’ll program that one in.
Lastly, we have C7, and for that we’ll select Shade. There are three options, and we’ll go with Porto 200.
Now we have our C1-C7 Custom Settings presets programmed! C1 is Eterna v3. C2 is Kodak Tri-X 400. C3 is Jeff Davenport Night. C4 is Kodak Vision3 250D. C5 is Ektachrome E100G. C6 is Eterna Bleach Bypass. And C7 is Porto 200. That’s a pretty good set! Since each preset uses a different White Balance type, you won’t have to adjust the WB Shift when you switch presets. For those White Balance types that don’t have very many options, such as Fluorescent 1, Fluorescent 2, etc., if you didn’t like any of the choices, you could alternatively use two recipes that share both the same White Balance and WB Shift (such as the ones mentioned earlier).
You can come up with multiple combinations of these C1-C7 options, and keep track of them using the new colored Stars. Maybe use Green Stars for these seven recipes, and come up with another seven that can be used together and mark them with Blue Stars, and another seven that are marked with Purple Stars. Just an idea.
I hope this all makes sense. Filter by White Balance can be useful in more than one way. If your camera is older than the X-Pro3, this will make your Fujifilm experience more enjoyable, as you won’t have to remember to check the WB Shift each time you change presets. If you don’t have the Fuji X Weekly App, download it now. If you do have the App and it didn’t automatically update, be sure to visit the appropriate App Store and manually update it. If you are not a Fuji X Weekly App Patron, for the best App experience, consider becoming a Patron today!
If your phone or tablet didn’t automatically update the App, be sure to manually update it right away. Depending on your device and how you have it configured, it’s possible that you might have to delete the App and reinstall, but most people shouldn’t have to do that in order to update it. Hopefully for most of you it happened automatically already, and you’re good to go. The App update is in both the Google Play Store for Android and the Apple App Store for iOS.
What’s in this “big” update? Plenty! Some of the things are for everyone, and some of the things are only for Fuji X Weekly App Patrons. Let’s talk about the improvements that are for everyone first, and then we will get to the good stuff that’s for Patrons.
View Sample Pictures Larger
Normal size pictures.
Tap to view pictures larger.
This is a pretty straightforward improvement: tap on a picture to view larger, and tap again to return to normal size. One request that I’ve received many times is the ability to enlarge the sample pictures in each recipe. Now you can! Of course, you can view them even larger (and see more of them) on the website—there’s a link at the bottom of each recipe.
Sort by A-Z, Z-A, Newest-to-Oldest, & Oldest-to-Newest
Before this update, you could only sort the recipes either alphabetically A-Z or chronologically Newest-to-Oldest. Now I’ve added Z-A or Oldest-to-Newest as options. If you know the name of the recipe and it begins on or after the letter N, sorting Z-A might make it quicker to locate. Or if you know that a recipe you are looking for was published awhile ago, sorting Oldest-to-Newest might make more sense. This should make it a little easier and quicker to locate what you are searching for.
Now, to the good stuff!
All of the improvements mentioned below are available for Fuji X Weekly App Patrons. The best App experienced is reserved for Patrons, so if you are not one, consider subscribing today! Simply tap the Gear icon in the App, and then select Become a Patron.
Filter by White Balance or Dynamic Range
There are two new Filter options: White Balance and Dynamic Range. Some users will benefit from Filter by Dynamic Range, but Filter by White Balance is huge! If your Fujifilm camera is older than the X-Pro3, you cannot save White Balance Shift within C1-C7 Custom Presets, and each time you change Presets, you have to remember to adjust the WB Shift. It can be a little annoying. However, for each White Balance type, the camera will remember one WB Shift, so if each of your C1-C7 presets uses a different White Balance type, when you switch Presets, you won’t have to adjust the WB Shift. For many, this is a game-changer!
Favorite with Colored Stars
One really great upgrade is Favoriting with colored Stars. Before, when you tapped the Star to Favorite a recipe, it came in one color (yellow). But now you can choose between five different colors: yellow, red, green, blue, and purple. The benefit of this is that you can use colored Stars to organize recipes. Maybe yellow represents the recipes currently loaded into your camera, red represents the recipes you want to try next, and green represents the ones you tried in the past and really liked. Or maybe yellow is your favorite portrait recipes, green your favorite landscape recipes, and blue your favorite street recipes. Use the colored Stars to categorize the recipes however is meaningful to you. This is a great organizational tool, and, for some, this makes the App a significantly better experience.
Blank Recipe Cards
If you’ve ever created your own film simulation recipe, or if you’ve found some elsewhere that you like (perhaps on the Fuji X Weekly Community Recipes page, such as AstiAmore in the example above), you can now add them to your App! A new feature is blank recipe cards that you fill out. You can even add your own pictures from your camera roll! At some point down the road the idea is that you’ll be able to export, import, and share these custom recipes; however, that ability isn’t in this update—with any luck it will come before summer. Several of you have asked for blank recipe cards, and now you have them! This is a great new feature that many of you will really appreciate.
There’s one other thing that I want to mention: if you tap the Gear icon in the top-left of the App and look way down at the bottom, you will see Shop The Latest Fujifilm Gear. These are affiliate links to B&H and Amazon. If you are shopping for some new gear and you happen to think about it, I’ll be compensated a small amount if you make a purchase using my links. It’s a simple way to support Fuji X Weekly that doesn’t cost you anything.
Below are even more images of the new and improved Fuji X Weekly App!
I want to give a special thanks to Sahand Nayebaziz for all his hard work on this App update! Without him, not only would the App not be nearly as good as it is, but there wouldn’t be a Fuji X Weekly App at all. Thank you so much, Sahand!
Two days ago I published my new Retro Gold film simulation recipe, which is great for “golden hour” photography. That recipe has a lot of contrast in it—I stated in the article that it was similar to slide film or maybe push-processed negative film. A high-contrast recipe works great in situations that are low-contrast. Sometimes when the sun is low, the scenes you encounter aren’t low-contrast, but high contrast. In those cases, the Retro Gold recipe may not be the best choice. Thomas Schwab suggested that I should create a low-contrast version that’s better suited for high-contrast situations—that’s how this recipe, which I call Retro Gold Low Contrast, came to be.
This recipe has more of a color negative film look (Kodak Gold, maybe?). The color cast is perhaps similar to using an enhancing filter (and maybe a polarizer, too). Like the other recipe, this one isn’t intended to mimic any specific film, but it definitely has an analog aesthetic to it.
Yellow Leaf of Autumn – Farmington, UT – Fujifilm X-E4 – “Retro Gold Low Contrast”
Because this “Retro Gold Low Contrast” film simulation recipe uses Clarity and Color Chrome FX Blue, it’s compatible with the Fujifilm X-Pro3, X100V, X-T4, X-S10, X-E4, and X-T30 II cameras. It might also be compatible with the newer GFX cameras, too, although I’m not certain of that. Unfortunately, it’s not compatible with the X-T3 and X-T30.
Classic Chrome Dynamic Range: DR400 Highlight: 0 Shadow: -2 Color: +4 Noise Reduction: -4 Sharpening: 0 Clarity: -3 Grain Effect: Weak, Small Color Chrome Effect: Strong Color Chrome Effect Blue: Strong White Balance: Fluorescent 3 (“Cool White Fluorescent”), +4 Red & -6 Blue ISO: Auto, up to ISO 6400 Exposure Compensation: 0 to -2/3 (typically)
Example photographs, all camera-made JPEGs using this “Retro Gold Low Contrast” film simulation recipe on my Fujifilm X-E4:
Cloudy Ridge – Farmington, UT – Fujifilm X-E4
Cloudy Mountain – Farmington, UT – Fujifilm X-E4
Dressed Warm – Farmington, UT – Fujifilm X-E4
Vines up the Bark – Farmington, UT – Fujifilm X-E4
Long Yellow Leaves – Farmington, UT – Fujifilm X-E4
Nobody pays me to write the content found on fujixweekly.com. There’s a real cost to operating and maintaining this site, not to mention all the time that I pour into it. If you appreciated this article, please consider making a one-time gift contribution. Thank you!
I’ve been asked a few times recently to demonstrate through video how to use the Fuji X Weekly App. How do you get the most out of it? Some people are visual learners, and seeing it done makes much more sense than reading about it. If that’s you, this post is intended to help you.
I don’t currently have any videos that demonstrates this, as my two (below) only give a brief glimpse. They’re promotional videos and not how-to, although you can likely glean the gist of how it all works from them. I’m not really a “video guy” (just lightly dabble, I guess), so it’s not easy for me to whip something up real quick. However, I hope this article is helpful to you, as I share what is on YouTube regarding this. There are several great resources out there.
The SOOC series is a good starting point. For those who may not know, SOOC is a monthly live video series, with each episode focused on a different film simulation recipe. It is a collaboration between Tame Your Fujifilm (Fujifilm X-Photographer Nathalie Boucry) and Fuji X Weekly (Ritchie Roesch). SOOC is a fun and educational experience where we not only talk about Fujifilm camera settings, but also answer your questions and give tips and tricks. Basically, we’re trying to help you master your Fujifilm camera, with a focus on simplifying your photographic workflow.
As a part of this, Nathalie and I discuss and even demonstrate aspects of the Fuji X Weekly App. So if you are trying to understand how to use the App and how to get the most out of it, you without a doubt want to watch these episodes! They’re quite long, so under each video I’ve put a time that you should skip ahead to if you don’t want to watch the whole thing.
Skip to 48:43 & 1:06:30
Skip to 32:32
Skip to 23:58
Skip to 42:46 & 49:43
Skip to 21:00 & 29:20
Those SOOC episodes are great resources, and if you have the time I recommend watching them in their entirety. But if not, just skip ahead to those times under each video. Be sure to tune in on December 9th to catch Episode 06, as we will certainly discuss the App even more!
While I don’t have videos that show how to use the Fuji X Weekly App, other people have made some great videos that demonstrate how to do it! Yea! You’ll find these below—I’m sure they’ll be helpful to you.
Hopefully those above videos are great resources to you and will help you understand how to use the App. For those who prefer written words, check out these articles:
Golden Red Berries – Farmington, UT – Fujifilm X-E4 – “Retro Gold”
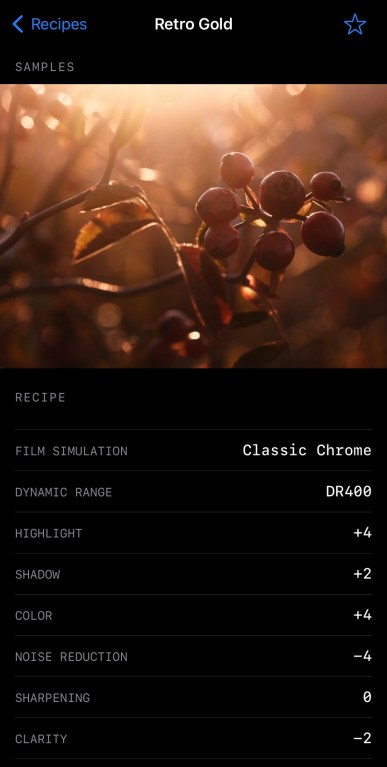
This film simulation recipe began as an attempt to mimc the aesthetic of the Retro Effect on Ricoh GR cameras. There are several reasons why this recipe isn’t a good facsimile to that, but, even so, I really like what I came up with. It has a retro look to it that is somewhat reminiscent of slide film that’s been left in a hot car a little too long (or, perhaps, simply wasn’t stored correctly), and somewhat reminiscent of push-processed negative film, maybe something like Kodak Gold. It’s not intended to mimic any specific film, so any similarities to an analog aesthetic is a happy accident.
Because of its retro-golden look, I’ve named this recipe “Retro Gold.” It’s outstanding in evening light, and pretty good at other times, too. In some ways it reminds me of my Golden Negative recipe, and in some ways it reminds me of my Expired Slide recipe, but it’s not really like either. While you can use it anytime, this is a film simulation recipe that I recommend you try during your next “golden hour” photographic outing.
One Way To The Mountains – Farmington, UT – Fujifilm X-E4 – “Retro Gold”
Because this “Retro Gold” film simulation recipe uses Clarity and Color Chrome FX Blue, it’s compatible with the Fujifilm X-Pro3, X100V, X-T4, X-S10, X-E4, and X-T30 II cameras. It might also be compatible with the newer GFX cameras, too, although I’m not certain of that. Unfortunately, it’s not compatible with the X-T3 and X-T30. If you don’t want to use Clarity because it slows down the camera, an alternative might be to use a diffusion filter, like the 1/8 Black Pro Mist or 5% CineBloom. Another option for this recipe that you are welcome to try is a stronger grain effect. I went with Weak and Small because I wasn’t attempting a particular film look, but it would likely look nice with as much as Strong and Large.
Classic Chrome Dynamic Range: DR400 Highlight: +4 Shadow: +2 Color: +4 Noise Reduction: -4 Sharpening: 0 Clarity: -2 Grain Effect: Weak, Small Color Chrome Effect: Strong Color Chrome Effect Blue: Strong White Balance: Fluorescent 3 (“Cool White Fluorescent”), +4 Red & -6 Blue ISO: Auto, up to ISO 6400 Exposure Compensation: 0 to -2/3 (typically)
Example photographs, all camera-made JPEGs using this “Retro Gold” film simulation recipe on my Fujifilm X-E4 & Fujifilm X100V:
Hazy Evening Berries – Farmington, UT – Fujifilm X-E4
Sunset Red – Farmington, UT – Fujifilm X-E4
Purple Thistle – Farmington, UT – Fujifilm X-E4
Golden November Leaves – Farmington, UT – Fujifilm X-E4
Golden Evening Leaves – Farmington, UT – Fujifilm X-E4
Autumn Yellow Leaf – Farmington, UT – Fujifilm X-E4
Thorns & Leaves – Farmington, UT – Fujifilm X-E4
Boy In The Shadow – Farmington, UT – Fujifilm X-E4
Bokeh Abstract – Farmington, UT – Fujifilm X-E4
Partly Cloudy Sky Reflected – Salt Lake City, UT – Fujifilm X100V
Evening Housetop – Farmington, UT – Fujifilm X-E4
Neighborhood Autumn Leaves – Farmington, UT – Fujifilm X100V
Hidden Neighborhood Evening – Farmington, UT – Fujifilm X100V
Nobody pays me to write the content found on fujixweekly.com. There’s a real cost to operating and maintaining this site, not to mention all the time that I pour into it. If you appreciated this article, please consider making a one-time gift contribution. Thank you!