This new Kodak Portra 400 Warm recipe came about after the Kyle McDougall Portra-Style comparison article. These settings are an attempt to get closer to Kyle’s preset aesthetic. Some film simulation recipes are good for everyday use, some are good only in the right situation. This is one falls into the latter category, I think. This one isn’t for everyone or every situation, but for some people in the right situations, this recipe will be greatly loved! I think it looks best in sunny daylight, but can produce interesting results sometimes in other lighting situations, too.
If you aren’t a Patron, don’t worry. Like all of the early-access recipes, this one will eventually be made available to everyone. Just have patience. If you have the app but aren’t a Patron, yet you want to use this recipe, you can either wait for it to become free or become a Patron and help support the great things that are happening here! Really, Patrons are the ones who are making so much happen because I can’t do it on my own. If you are a Patron, thank you so much for your support!
Beer & Wings – Salt Lake City, UT – Fujifilm X100V – “Kodak Portra 400 Warm”
Bright Yellow House – Farmington, UT – Fujifilm X100V – “Kodak Portra 400 Warm”
Sage Sunset – Antelope Island SP, UT – Fujifilm X100V – “Kodak Portra 400 v2”
One film can have many different looks depending on how it’s shot, developed, scanned or printed. This new Portra 400 film simulation recipe, called Kodak Portra 400 v2, is an alternative aesthetic, created by studying examples of actual Portra 400 film (thanks to Julien Jarry). The “other” Fujifilm X100V Kodak Portra 400 recipe was also created by studying examples of actual film (thanks to Thomas Schwab). They’re both good options for achieving a Portra look, and neither is more “right” than the other.
This isn’t exactly a brand-new recipe. It was published as a Patron early-access recipe on the Fuji X Weekly App back on December 1st, and now another early-access recipe has replaced it, so this one is now available to everyone! You might remember that this Kodak Porta 400 v2 recipe was mentioned in the Kyle McDougall preset comparison article.
Ford Truck – Centerville, UT – Fujifilm X100V – “Kodak Portra 400 v2”
If you like my other Portra recipes, you’re sure to like this one, too. Because it uses Clarity, it slows down the camera considerably. I hope that Fujifilm speeds this up with a firmware update at some point, but in the meantime, if you can, my recommendation is to embrace the slowdown. This recipe is only compatible with the latest Fujifilm X cameras: the X-Pro3, X100V, X-T4 and X-S10.
Classic Chrome Dynamic Range: DR400 Highlight: 0 Shadow: -2 Color: +2 Noise Reduction: -4 Sharpening: -2 Clarity: -2 Grain Effect: Strong, Small Color Chrome Effect: Strong Color Chrome Effect Blue: Weak White Balance: 5200K, +1 Red & -6 Blue ISO: Auto, up to ISO 6400 Exposure Compensation: +1/3 to +1 (typically)
Example photographs, all camera-made JPEGs using this new Kodak Portra 400 v2 film simulation recipe on my Fujifilm X100V:
Stacked Pallets – Farmington, UT – Fujifilm X100V
Now Hiring – Centerville, UT – Fujifilm X100V
Double-Double – Centerville, UT – Fujifilm X100V
Burger Roof – Centerville, UT – Fujifilm X100V
Julien Jarry with RED Camera – Antelope Island SP, UT – Fujifilm X100V
Julien Filming – Antelope Island SP, UT – Fujifilm X100V
Yellow Rabbitbrush – Antelope Island SP, UT – Fujifilm X100V
Frary Peak Peeking – Antelope Island SP, UT – Fujifilm X100V
Desert Brush – Antelope Island SP, UT – Fujifilm X100V
Light Log – Big Fork, MT – Fujifilm X100V
Sunlight Through the Forest Trees – Big Arm, MT – Fujifilm X100V
One Lane Bridge – Big Fork, MT – Fujifilm X100V
String of Lightbulbs – Flathead Lake, MT – Fujifilm X100V
Dock at Night – Flathead Lake, MT – Fujifilm X100V
Moon Over RV – Antelope Island SP, UT – Fujifilm X100V
Sunset RED – Antelope Island SP, UT – Fujifilm X100V
Buffalo Point Sunset – Antelope Island SP, UT – Fujifilm X100V
Nobody pays me to write the content found on fujixweekly.com. There’s a real cost to operating and maintaining this site, not to mention all the time that I pour into it. If you appreciated this article, please consider making a one-time gift contribution. Thank you!
Here’s a quick update: The Android version of the app is being worked on and progress is so far going quite well. I’m hoping that it will be available before March, but there’s still a long ways to go before it’s done, so it’s hard to say for sure when it will be released. The Fuji X Weekly Patrons are the ones who are making this happen, and the Android app would be nowhere close to where it is now without the Patrons. Your support is going to produce some amazing things that would not be possible without you. Thank you, Patrons!
Once the Android version is out, the next big thing is an update that will bring new features and functionality to the app. Some things will be made available to everyone, and some things will be made available only to Patrons, and some current Patron-only features will be unlocked for everyone. I don’t know how long it will take to get the update up and running, but I’m really hoping it can be done before the summer.
The Fuji X Weekly app has been downloaded 20,000 times! That’s incredible! I’m happy to provide this free resource to you, and it will only get better and better! I’m extremely appreciative of all the Patrons, because without your support none of this would be possible. We all owe you a debt of gratitude! I want to give a big “thank you” to those who have downloaded the app, to those who have shared the app on their websites and social media, and especially to all the Patrons!
I thought it would be fun to share a couple of old articles from the Fuji X Weekly blog. I’m digging back in the archives to what I published on this day last year and the year before. I might do this fairly regularly in 2021.
I don’t know if anyone found this post helpful when I published it last year. These tips can be applied to any year, not just 2020. What are the five tips? Read the manual. Understand how your gear works. Invest in experiences. Find the light. Be the person who came back. Obviously to really understand what those tips mean you have to read the article; maybe one or more of them will resonate with you, and will help you improve your pictures in the coming year. The camera pictured above is the Fujifilm X-E1 that I distressed two-and-a-half years ago.
This essay discusses the artist photographer. You might find it interesting. You might find it boring. You might disagree with what I said. Maybe you don’t care at all. If you don’t remember reading it, I invite you, if you think it might be interesting to you and you have a few minutes to spare, to click the link and give it a look. By the way, that bee picture above (which is not a bee) is an in-camera double-exposure that’s a tip of the hat to Rene Magritte.
I believe that it’s often better to spend money on experiences rather than new gear. Sometimes a book can be just as good as an experience; perhaps it can be an experience in and of itself. For Christmas my family gifted me three photography books, each one featuring the legendary photographer Ansel Adams. One of the three books was especially surprising: Polaroid Land Photography by Ansel Adams.
Did you know that Ansel Adams, the renown black-and-white landscape photographer who invented the Zone System and who was celebrated for his darkroom mastery, loved Polaroid photography? I didn’t. I was surprised to learn that one of his well-known Yosemite pictures was a Polaroid (Type 55), and this picture was found in one of the other two books I was gifted. Adams’ Polaroid book is a thorough and highly technical look at instant film. It’s the ultimate guide to Polaroid, at least from 1978 when this second edition was published. I want to share a few quotes from the book, then circle it back to this blog and Fujifilm.
“It is unfortunate that so many photographers have thought of the Land camera as a ‘toy,’ a casual device for ‘fun’ pictures, or, at best, a gadget to make record pictures! The process has revolutionized the art and craft of photography….”
—Ansel Adams
It’s clear right from the beginning of the book that Adams considered the Polaroid camera a serious photographic tool. He felt it was under-appreciated and underutilized by the photographic community at large.
“By making it possible for the photographer to observe his work and his subject simultaneously, and by removing most of the manipulative barriers between the photographer and the photograph, it is hoped that many of the satisfactions of working in the early arts can be brought to a new group of photographers. The process must be concealed from—non-existent for—the photographer, who by definition need think of the art in taking and not in making photographs. In short, all that should be necessary to get a good picture is to take a good picture, and our task is to make that possible.”
—Edwin H Land, co-founder of Polaroid
Adams included that Edward Land quote in Chapter 13, Principles of One-Step Photography, and he immediately followed it with this:
“The effect of one-step processing on both amateur and professional creative photography has been revolutionary.”
—Ansel Adams
Polaroid Land Photography is an extensive user’s manual—Adams referred to it as such many times—yet it is full of inspiration, both in written words and great photography. There is so much that I could quote, but I will refrain myself and add just one more.
“As with all art forms, we must accept the limitations of the medium as well as revel in the advantages.”
—Ansel Adams
I was reading all this as I was simultaneously celebrating the fact that I had so easily finished the pictures of my kids opening their Christmas presents. By finished, I mean finished. I captured the pictures, and in the time it takes most people to load their RAW files onto their PC or Mac, I had already uploaded them to my phone, put them into storage, and shared them to loved ones. Done. It occurred to me that this is the modern equivalent of one-step processing.
Over the last several months I have been pondering why my different film simulation recipes are so popular. Tens of thousands of photographers across the globe, from newbies to experienced pros, are using these camera settings on their Fujifilm cameras. I get feedback daily from people telling me how these recipes have changed their photographic lives. There’s been a very real impact that this blog has had on the photography continuum. Yet the why has been illusive to me, until today.
Polaroid changed photography 50, 60, 70 years ago. The biggest name in photography not only embraced it but called it revolutionary. There are a few parallels to Polaroid cameras and film simulation recipes on Fujifilm X cameras, but the biggest is perhaps one-step processing. Yes, if you shoot RAW+JPEG, you can always reprocess the RAW, but there is fun in not having to do so if you don’t want to. There’s a certain satisfaction, not to mention time saved, in having a completed picture right out of camera that needs no editing, or maybe only some small, quick adjustments. I wonder if Ansel Adams were still around today, if he would embrace the film simulation recipe the same as he did the Polaroid. Honestly, the answer isn’t important, because so many photographers are embracing it, and it’s revolutionizing photography.
This Christmas I thought that I would do something fun for you: the 12 Film Simulation Recipes of Christmas! I took the twelve most popular film simulation recipes this month (based on page views), and captured one picture with each. The subject of every image is the number the recipe ranks. It’s basically a parody of the classic holiday coral The Twelve Days of Christmas, but also an opportunity to share with you which recipes people are using this December.
The top twelve film simulation recipes this month (from most to least popular) are: Kodachrome 64, Kodak Portra 400, Kodak Portra 400, Vintage Kodachrome, Kodachrome II, Classic Chrome, Kodachrome 64, Kodak Portra 800, CineStill 800T, Cine Teal, Fujicolor Superia 800, and Classic Negative. There are some surprises, at least to me. First, no black-and-white recipes made this list; color recipes are more popular than monochrome for some reason. The top eight recipes all use the Classic Chrome film simulation; those named Kodachrome or Portra are widely used. The original Portra 400 is the most popular Portra recipe, despite its difficult white balance requirement. The second film simulation recipe ever published on this website, simply called Classic Chrome, made this list (oldie but goodie?). Only one recipe that uses the Classic Negative film simulation made the top twelve, and just barely; the most popular recipe with the Superia name (Classic Negative is based on Superia) uses PRO Neg. Std.
If you want to sing along, here are the lyrics:
On the 12 Days of Christmas, I snapped with recipes… 12 people limit, 11 with a seven, 10 pm closing, 9 fortune cookies, Ate holiday sweets, 7 metal boxes, 6 holds for swinging, 5 pots for plants, 4 times said no, 3 drink cans, 2 push to cross, And… a face mask with emojis!
12 People Limit – Farmington, UT – Fujifilm X100V – Classic Negative
Back in October I took a quick vacation to Montana. I’ve shared some of those pictures on this website, but many of them I haven’t, because I’ve been busy with other things. Today marks Winter Solstice, which means fall is officially over, yet I’ve finally just now found the time to post some of my autumn pictures from that Montana trip!
All of these pictures were captured with my Fujifilm X100V. The film simulation recipes that I used were Kodak Portra 400 v2 (currently only available on the Fuji X Weekly App for iOS), an experiment (which I had actually forgotten about until I was reviewing these pictures) where I used Classic Negative instead of Classic Chrome with the Kodak Portra 400 v2 recipe (I might have also adjusted the WB Shift a little, I don’t remember), and The Rockwell for a few pictures (I think I might have made an adjustment or two to that recipe on this trip, but, again, I don’t really remember). Most of these pictures were captured with that Classic Negative experiment, and I realize that I need to revisit it, because the results are pretty good!
The Fujifilm X100V is such a great camera to carry around on vacation. It’s small enough that it’s not in the way, yet it’s capable of capturing amazing pictures. It rained while I was there, and the camera survived getting a little wet. The X100V is my favorite travel camera hands down, and I enjoy it immensely. It’s not the right tool for every situation, but it’s the camera that I use most often, especially when on vacation.
Yellow Spots – Big Arm, MT – Fujifilm X100V
Wet Red Leaves – Big Arm, MT – Fujifilm X100V
Turning Red – Big Arm, MT – Fujifilm X100V
Red – Big Fork, MT – Fujifilm X100V
Yellow in the Forest – Big Fork, MT – Fujifilm X100V
Changing to Yellow – Big Fork, MT – Fujifilm X100V
Early Autumn Forest – Big Fork, MT – Fujifilm X100V
Golden Forest – Big Fork, MT – Fujifilm X100V
Light Log – Big Fork, MT – Fujifilm X100V
Sunlight Through The Forest Trees – Big Arm, MT – Fujifilm X100V
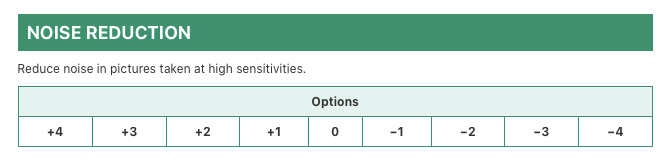
Those with the Fujifilm X-T4 (and also the X-S10) might have noticed that Noise Reduction is no longer in the menu. Instead, there’s something called High ISO NR. What’s the difference? Why the change?
Below is a screenshot of the X-T3 manual (top) and X-T4 manual (bottom):
Notice that they both say the same thing: Reduce noise in pictures taken at high sensitivities. This demonstrates that they’re actually the same thing, just renamed. The X-T4 manual adds a little more info about what Noise Reduction does to a picture, although vaguely.
I don’t know why Fujifilm renamed Noise Reduction to High ISO NR; perhaps it’s a more accurate name, but it seems to have created some confusion. I’ve received several messages from users asking about it. Just know that both are the same exact thing: High ISO NR is Noise Reduction.
A couple years ago I took a closer look at Noise Reduction (and also Sharpening), and concluded that, for the most part, it doesn’t matter what the Noise Reduction is set to unless you pixel peep or print large. My personal opinion is that I like Noise Reduction set to -2, -3 or -4, with the lower setting most preferable. Why? Because the digital noise from Fujifilm X-Trans cameras has a film-grain-like appearance, and doesn’t look like typical digital noise from other camera brands. I like film grain, and I like the digital noise from Fujifilm cameras. That’s just my preference. Besides that, Noise Reduction reduces sharpness and smudges fine details, at least a little—you’ll likely only notice if you look very, very closely. There’s no right or wrong setting—choose whatever you prefer—but I most often set Noise Reduction (or High ISO NR) to the lowest option available, which is -4 on X-Trans IV cameras like the Fujifilm X-T4.
Photography vloggers and bloggers Leigh and Raymond of The Snap Chick (YouTube, Blog, Instagram) just published a video about Fuji X Weekly! Even better, I’m in it! Be sure to watch it if you have 10 minutes to spare. Maybe you can relate to their experience. I love hearing stories where this website (and also now the app) has a real impact on people’s photography. Leave a comment, I’d love to hear your story!
I get asked frequently, “How can I make my digital pictures look more like film?”
My film simulation recipes—made possible by Fujifilm’s commitment to the camera-made JPEG and their long history with film—are a great start for achieving a film-like look. Another step that can go a long way towards achieving an analog aesthetic is the lens that’s attached to the camera. You see, most modern lenses are precision engineered, designed to eliminate flaws as much as possible. They score well on test charts, but often at the expense of character. Modern lenses render photographs differently than vintage lenses; old lenses have flaws, as they weren’t designed with today’s technology or for today’s standards, and these flaws are why they render images uniquely. For (typically) not very much money you can buy antique lenses intended for film cameras, and mount them to your Fujifilm X camera with an adapter—something that I love to do! Cheap third-party lenses often accomplish the same thing, but you’re buying something that’s new (instead of old) and you don’t need an adapter. The Pergear 50mm f/1.8 lens is an inexpensive option for your Fujifilm X camera, and it indeed has character similar to a vintage lens!
I get gift cards sometimes, usually for my birthday or Christmas, and it can be hard to know what to buy myself. In the past I have purchased a Meike 35mm f/1.7 lens and a 7artisans 25mm f/1.8 lens—both are under $100, which is the right price range for those gift cards that I don’t know what to do with. The Pergear 50mm f/1.8, with an MSRP of $79, is in that same category. The Pergear lens has other things in common with the Meike and 7artisans models: click-less aperture rings, seemingly good build quality, similar flaws, and lots of character. You’d almost think that they were made by the same company, but apparently they’re not.
The Pergear 50mm f/1.8 is a 75mm-equivalent manual-focus, manual-aperture prime lens from China. It has 10 rounded aperture blades, 6 elements in 4 groups, a maximum aperture of f/1.8, a minimum aperture of f/16, a minimum focus distance of about 15 inches, and accepts 43mm threaded filters. The aperture and focus rings are both smooth. I do wish that the aperture ring had f-stop clicks, but it doesn’t—not a big deal, though.
Center sharpness is pretty fantastic on the Pergear 50mm f/1.8 lens at all apertures. Corner sharpness is decent-enough when wide open and noticeably improves when stopped down to f/4. There’s some minor vignetting when wide open; it improves when stopped down, yet it never fully goes away, although it’s hardly noticeable at apertures smaller than f/2.8. There’s some noticeable chromatic aberrations in extreme high-contrast light, but is otherwise well controlled. There’s almost no distortion. Bokeh is pretty good thanks to those rounded blades.
The Pergear 50mm f/1.8 has a weird flaw, which can be stunningly beautiful or terribly awful, depending on your tastes and the exact situation: the center of the frame can get a warm haze. It seems to become more pronounced when the aperture is (roughly) f/5.6 and smaller, and when there’s a bright light source somewhere in front of the camera (it can be outside the frame). Sometimes I really love this haze, and it’s almost like having a diffusion filter built into the lens, and sometimes it’s just too pronounced and essentially ruins the picture. Opening up the aperture seems to reduce the effect in those situations where it might be too pronounced. This strange haze is both the reason to buy this lens and the reason not to, depending on your opinion of it. I personally really like it, although I’m happy to have it limited to one lens, which I can choose to use when I want this character in my pictures. To be clear, this haze won’t show up in every picture—there are many situations where it won’t, either because the aperture is too large or because the light isn’t right, and even when it does appear, it’s often very subtle, which is great.
The Pergear 50mm f/1.8 is a good, sharp lens, producing lovely images in most situations. It has character that you just won’t find in most modern lenses. It has quirks, which can be good or bad, depending on the situation and your tastes. It’s all manual, which I like, but can take some practice to get good at if you’ve only ever used auto lenses. The Pergear 50mm f/1.8 lens, when used in conjunction with the Fujifilm JPEG settings, can help you achieve a much-sought-after film-like look from your digital camera. It’s not for everyone, but, for the price, it’s worth a try, especially if you are unsure what to buy with that gift card in your wallet.
This review contains affiliate links, and I will be compensated a small amount if you make a purchase using my links. Amazon $79
Below are camera-made JPEGs that I captured using the Pergear 50mm f/1.8 lens attached to my Fujifilm X-T30. For the color pictures I used my new Kodak Portra 400 v2 recipe (available on the Fuji X Weekly App for iOS), except for the the top picture, which was captured with Velvia, and the two night pictures below that, which were captured with Porto 200 (also available on the app). For the black-and-white pictures I used my Kodak Tri-X 400 recipe. The photographs of the lens (above) were captured with a Fujifilm X100V using my Superia Premium 400 recipe.
Piano Abstract – Farmington, UT – Fujifilm X-T30 & Pergear 50mm f/1.8
Train at Night – Layton, UT – Fujifilm X-T30 & Pergear 50mm f/1.8
Grass in the Frozen Marsh – Farmington, UT – Fujifilm X-T30 & Pergear 50mm f/1.8
Storm Over Frozen Marsh – Farmington, UT – Fujifilm X-T30 & Pergear 50mm f/1.8
Help Fuji X Weekly
Nobody pays me to write the content found on fujixweekly.com. There’s a real cost to operating and maintaining this site, not to mention all the time that I pour into it. If you appreciated this article, please consider making a one-time gift contribution. Thank you!
LomoChrome Metropolis recipe, using the Eterna Bleach Bypass film simulation
My wife has a Fujifilm X-T4, and I was able to borrow it briefly for an experiment with the new Eterna Bleach Bypass film simulation. The X-T4 and the X-S10 are currently the only cameras that have this film simulation. My new LomoChrome Metropolis recipe, which is currently only found on the Fuji X Weekly App for iOS, uses Eterna Bleach Bypass.
I snapped the picture below of my daughter using the Fujifilm X-T4 and the Eterna Bleach Bypass film simulation. Highlight, Shadow and Color were set to 0, using Auto White Balance, and pretty much everything set to defaults.
Eterna Bleach Bypass
I reprocessed the RAW file in-camera, and tried to (in a short period of time) recreate Eterna Bleach Bypass using regular ol’ Eterna. I set Highlight to +4, Shadow to +3, Color to -4, and set a shift of -2 Red and -3 Blue to the Auto White Balance, which roughly gets you close. If I had more time I could get closer, but this was just a quick experiment. The takeaway is that Eterna Bleach Bypass is essentially Eterna but with more contrast and less color saturation, and some other small differences.
“Eterna Bleach Bypass” using Eterna
Below I reprocessed the RAW file in-camera using my Bleach Bypass film simulation recipe that uses Classic Negative. That recipe wasn’t intended to mimic the Eterna Bleach Bypass film simulation, but actual bleach bypassed film. It looks kind of like the new film simulation, but with more contrast and saturation.
“Bleach Bypass” using Classic Negative
There was an interview published recently in Japan where a couple of Fujifilm managers explained a bunch of different things about Fujifilm cameras. Between the translation and my interpretation of that translation, I mistakenly thought that it said a Bleach Bypass look could be achieved using the Provia film simulation with Highlight set to +1, Shadow set to +3 and Color set to -4, so I reprocessed the RAW file in-camera doing this, which is below.
“Bleach Bypass” using Provia?
Obviously that doesn’t look right, so I reread the quote, and realized what it actually said was that the Eterna Bleach Bypass film simulation recipe is intended to mimic cinematic film (for cinematic purposes) that’s skipped the bleach during development. Bleach bypass for still photography is (or often is) not the same—different film and/or different process. What was being said by those Fujifilm managers is to mimic bleach bypass for still photography, use the Eterna Bleach Bypass film simulation (not Provia) with Highlight set to +1, Shadow set to +3, and color Set to -4. An example of that is below.
Eterna Bleach Bypass with more contrast and less saturation
Bleach bypass is a darkroom technique where you skip or limit the bleach during development of color film, which causes it to retain the silver. Results will vary greatly depending on the film used and exactly how you develop it, but generally speaking what you get with bleach bypass is a high-contrast, low-saturation, grainy picture that appears as if a black-and-white and color picture were combined together. This technique is more common for motion picture film than still photography, but some people do bleach bypass with C-41 film.
There’s no one exact aesthetic for bleach bypass. The Eterna Bleach Bypass film simulation is a great starting point, and I plan to experiment more with it and create at least a few different film simulation recipes using it. Classic Negative can also be used, and maybe even Classic Chrome and PRO Neg. Hi (and perhaps others), just depending on the exact bleach bypass look you are after. While more complicated, you can use the double-exposure feature to create a bleach bypass look. There’s not necessarily a right or wrong way, or even a right or wrong look, which makes experimentation more fun. I invite you to pick a film simulation (whether or not your camera has the new Eterna Bleach Bypass film simulation), turn up the contrast and turn down the color saturation, and see what you can create!
People are talking about this blog on YouTube! I recently searched Fuji X Weekly on YouTube, and I was shocked by all of the videos I found. Of course, there’s the official Fuji X Weekly YouTube channel, which you should follow if you don’t already, but I was pleasantly surprised by all of the other videos out there talking about film simulation recipes. There’s a ton! There are even a few videos that talk about the new Fuji X Weekly App! If you have some time and are looking for some good entertainment, browse through the YouTube videos below. If you know of any that I might have missed, share the link in the comments. Enjoy!
The Fuji X Weekly App for iOS has been out for one week! It really has been an amazing seven days.
I want to say Thank You to everyone who has downloaded the app! I hope that it’s a useful tool for your photography. I appreciate everyone who has shared it on their social media. I’m grateful for those who left such positive reviews in the app store! The feedback and suggestions that I’ve received are invaluable. You all are the best part of the Fujifilm community!
I want to give a very special Thank You to those who are Fuji X Weekly Patrons! There’s a little bit of an immediate reward you received because you unlocked some features that give you the best app experience. But, more importantly, is the reward that you don’t yet see! The Fuji X Weekly App, as it is now, is just the beginning. There’s so much more coming, and it’s only possible because of Patrons!
An Android version of the app is being worked on, and I’m concentrating my efforts on getting it out as quickly as possible. It’s coming! But the road is still long, and I can’t say when it will be ready. Because of Fuji X Weekly Patrons, this version of the app will be out more quickly than I originally anticipated. Yea!
Once that’s complete, we will begin working on some updates to the Fuji X Weekly App that will add new features, functionality and other improvements. There will be some really interesting changes, with additions to both the free and Patron sides. The app will become better, and more fun! I can’t give you the details yet, but I can say that you’ll love it and Patrons are the ones making it possible. Thank you!
If you have an iPhone or iPad and haven’t yet downloaded the Fuji X Weekly App, you should go to the app store now and do so! If you have the app and find it useful, let me know in the comments!
The film simulation recipes that Ryan used are Portra 160, Portra 400, Portra 400 v2 (currently available to Fuji X Weekly Patrons on the Fuji X Weekly iOS app), and Portra 800. The two Kyle McDougall presets are Kodak Portra Style Neutral and Kodak Portra Style Warm. Kyle mentions that his presets aren’t intended to strictly mimic Portra film, but are his preference to how he likes his Fujifilm photographs to look based on his experience shooting the film. Portra can have many different looks, not only because there are different stocks that share the name, but also because how it’s shot, developed, and printed or scanned can greatly affect the exact aesthetic.
Let’s look at some pictures!
“Kodak Portra 160”
“Kodak Portra 400”
“Kodak Portra 400 v2”
“Kodak Portra 800”
“Kodak Portra Style Neutral”
“Kodak Portra Style Warm”
“Kodak Portra 160”
“Kodak Portra 400”
“Kodak Portra 400 v2”
“Kodak Portra 800”
“Kodak Portra Style Neutral”
“Kodak Portra Style Warm”
“Kodak Portra 160”
“Kodak Portra 400”
“Kodak Portra 400 v2”
“Kodak Portra 800”
“Kodak Portra Style Neutral”
“Kodak Portra Style Warm”
As you can see, there are some pretty significant differences between each recipe and Kyle McDougall’s Lightroom presets. Kyle’s presets create a bright picture with a strong yellow color cast. Portra can certainly be that way, particularly if overexposed. My first thought is that my Bright Summer (a.k.a. “Preetra 400”) recipe is probably the closest to Kyle’s Portra Style. My second thought is that I need to create a recipe that’s a closer match to Kyle’s presets!
Ryan explained, “At the beginning of this project I got kind of discouraged as the weather was transitioning into fall and was gray and dismal here on the west side of the Cascade’s. Sunlit scenes are what I had in mind. But I did my best to work with what I had, which helped my creativity, and one of those creative positives would be the fall colors that I tried to utilize. I loaded the recipes into my X100V, and when I saw an opportunity to take some images, I would take a pic, change to the next recipe, snap, load the next recipe, etc. In my camera, C2 is Portra 400 v2, C4 is Portra 400, C5 is Portra 160, and C6 is Portra 800. I found that when composing the shot, that exposing +2/3 is what I liked, so I tried exposing that way for all the images, though I can’t remember if I hit it the same every time, but did my best to keep the exposure the same between and for each image taken in a session, trying to keep things uniform. It was neat to see the differences between the different recipes. From what I understand, the different Portra films are unique in their own way. I’d say that the Portra 400 v2 was closest to Kyle’s preset. By the way, that recipe and Portra 160 are my favorites!”
Below are a couple comparisons of the Kodak Portra 400 v2 recipe and Kyle McDougall’s Kodak Portra Style Neutral preset.
“Kodak Portra 400 v2”
“Kodak Portra Style Neutral”
“Kodak Portra 400 v2”
“Kodak Portra Style Neutral”
Here are a couple comparisons of the Portra 160 and Portra 400 v2 recipes:
“Kodak Portra 160”
“Kodak Portra 400 v2”
“Kodak Portra 160”
“Kodak Portra 400 v2”
Thank you again, Ryan, for doing this project and sharing the results! It’s very fascinating, and I’m sure helpful to the Fuji X Weekly community. It’s helpful to me personally!
If you appreciated this article, let myself and Ryan know by leaving a comment!
After publishing film simulation recipes for Superia 100, Superia Xtra 400, Superia 800 and Superia 1600 film stocks, as well as Reala 100 and Luis Costa’s Classic Negative (which are both in the Superia realm), I’ve been asked a few times to create a Superia Premium 400 recipe. I’ve never shot actual Premium 400 film, and had to rely on the internet, which isn’t ideal, especially since there are limited examples for this particular film, but I think these settings are pretty good.
Superia Premium 400 is a variant of Superia Xtra 400, sold only in Japan, intended to better replicate Japanese skin tones. It seems to have more of an orange color-cast. Premium 400 doesn’t have the “4th cyan color layer” that every other Superia film has, and that seems to be the biggest difference between it and Xtra 400. The way that this recipe came about is a Fuji X Weekly reader (sorry, I forgot who, and I can’t find the message) sent me his or her best guess of some settings to replicate Premium 400, and wanted advice on how to improve it. I took a look, made some changes, and sent it back, but it wasn’t right, so I kept working on it. After a couple weeks of experimenting, I settled on these settings, which I’m quite satisfied with.
Amanda’s Camera – Farmington, UT – Fujifilm X100V – “Superia Premium 400”
There are a whole bunch of options for achieving a Superia look with your Fujifilm camera. Even though this recipe is based on a more obscure variation, the results are quite interesting, and I think a lot of people are going to really appreciate it. It’s compatible with the Fujifilm X100V, X-Pro3, X-T4 and X-S10 cameras.
Classic Negative Dynamic Range: DR200 Highlight: -2 Shadow: 0 Color: +4 Noise Reduction: -4 Sharpening: -1 Clarity: -2 Grain Effect: Strong, Small Color Chrome Effect: Strong Color Chrome Effect Blue: Weak White Balance: 4700K, +4 Red & -3 Blue ISO: Auto, up to ISO 6400 Exposure Compensation: +2/3 to +1 (typically)
Example photographs, all camera-made JPEGs using this Superia Premium 400 film simulation recipe on my Fujifilm X100V:
Masked Reflection – Farmington, UT – Fujifilm X100V
Waiting Girl – Farmington, UT – Fujifilm X100V
Shrub & Fountain – Farmington, UT – Fujifilm X100V
Nutcracker – Farmington, UT – Fujifilm X100V
Cinemark Sun – Farmington, UT – Fujifilm X100V
Hill House – Farmington, UT – Fujifilm X100V
Jon on a Bridge – Farmington, UT – Fujifilm X100V
Setting Sun Forest – Farmington, UT – Fujifilm X100V
Rural Fence – Farmington, UT – Fujifilm X100V
Forget Me Knots – Farmington, UT – Fujifilm X100V
Chainlink Berries – Farmington, UT – Fujifilm X100V
Yellow Blackberry Leaf – Farmington, UT – Fujifilm X100V
Rural Autumn Leaves – Farmington, UT – Fujifilm X100V
Late Autumn Sunstar – Farmington, UT – Fujifilm X100V
Neighborhood in Evening Light – Farmington, UT – Fujifilm X100V
Intent – Farmington, UT – Fujifilm X100V
This post contains affiliate links, and if you make a purchase using my links I’ll be compensated a small amount for it.
Nobody pays me to write the content found on fujixweekly.com. There’s a real cost to operating and maintaining this site, not to mention all the time that I pour into it. If you appreciated this article, please consider making a one-time gift contribution. Thank you!
The Fuji X Weekly App is out for iOS! It’s coming to Android, too, but there’s still a lot of work to do. For those waiting for the Android version, I have a big favor: I need to know what Android OS is on your device! I’ve included a survey below. Your answers will help tremendously with the app development, and it’s much appreciated!
On a side note, there’s now an official Fuji X Weekly Facebook page! Please give it a “like” to follow. I’ve been incredibly busy lately (as you can imagine), and I’ve pretty much jumped off of Facebook because it can be such a time thief, but I don’t want to be completely off of it. Facebook is a great way to keep up to date on things and easily share stuff. The Fuji X Weekly Facebook page is my answer to this, and hopefully it can serve a good purpose while also not being too time consuming. I invite you to follow me on Facebook and Instagram!
My wife, Amanda, upgraded her Fujifilm X-T20 to an X-T4! Video-wise, the X-T4 is a huge upgrade; stills-wise, the X-T20 is a solid camera, but the X-T4 is a little better. The picture above shows Amanda with her new camera, captured with my Fujifilm X100V using a new film simulation recipe that I will publish very soon! The Fujifilm X-T4 has two new Auto White Balance options: Auto White Priority and Auto Ambience Priority. What are these? What do they do to your pictures? Let’s take a look!
For Auto White Priority, the manual says, “Choose for whiter whites in scenes lit by incandescent bulbs.” And for Auto Ambience Priority, “Choose for warmer whites in scenes lit by incandescent bulbs.” Essentially, Auto White Priority is the same as Auto White Balance, except it has a cooler tone under artificial light, and Auto Ambience Priority is the same as Auto White Balance, except it has a warmer tone under artificial light. In natural light, all three are the same.
The pictures below show all three Auto White Balance options under natural light (using my Kodak Ultramax recipe). Can you tell which is Auto, Auto White Priority and Auto Ambience Priority?
Which is which? I have no idea! I can’t tell the difference. The three images look identical to me. Even when I closely examined the three full-resolution files, I couldn’t figure it out.
Under artificial light, the differences between Auto, Auto White Priority, and Auto Ambience Priority becomes much more obvious. You can see in the pictures below that Auto White Priority is cooler than standard Auto White Balance, and Auto Ambience Priority is warmer than standard Auto. Take a look!
Auto White Priority
Auto White Balance
Auto Ambience Priority
Of the two new Auto White Balance options, I’m most excited about Auto White Priority, although I think in some situations Auto Ambience Priority might produce nice results. The new LomoChrome Metropolis film simulation recipe that’s on the Fuji X Weekly App requires Auto White Priority, the first recipe to use one of the new White Balance options. I think there’s some good potential for incorporating these new options into new recipes to create different looks. Now if I can just convince my wife to let me borrow her new camera….
The Fuji X Weekly app has the ability, for Patrons, to filter by Camera or Sensor. It might seem most obvious to pick your camera, but that might not be the best choice. Why? Let me explain.
With each recipe, I only included the cameras that are 100% compatible with that recipe. There are many situations where a recipe is 99% compatible. For example, the Fujifilm X-T4, X100V, X-Pro3 and X-S10 aren’t 100% compatible with X-Trans IV recipes intended for the X-T3 and X-T30, despite having the same sensor. Why? Because the X-T3 and X-T30 models don’t have an option for Grain size, so you’ll have to decide for yourself if it should be Small or Large, and also B&W Toning is different. Because of this, recipes like Kodak Gold 200, Eterna, Kodacolor, and many, many, many more won’t show up if you filter by X-Pro3, for example. They will, however, show up if you filter by X-Trans IV sensor. If you have an X-Pro3, if you filter by Sensor instead of Camera, you’ll see a lot more recipes. In fact, you could filter by both X-Trans III and X-Trans IV!
It’s a similar story if you have, for example, a Fujifilm X-E2. X-Trans I and Bayer recipes will work on your camera, but they’ll look a little different. Those recipes won’t show up if you filter by Camera, but they will if you filter by X-Trans I, X-Trans II and Bayer.
If you have an X-Trans III camera, it makes more sense to filter by Camera because all of the recipes that are compatible will appear (including X-Trans IV recipes that are also compatible). If you have an X-Trans IV camera, it makes more sense to filter by Sensor; however, the X-T3 and X-T30 are an exception, and like X-Trans III, it makes more sense to filter by Camera if you have either of these models. X-Trans II is a mixed bag because not every camera has the same film simulations, so if your model doesn’t have Classic Chrome and the PRO Neg. options, it will be better to filter by Camera, but otherwise by Sensor so that you can also access the X-Trans I and Bayer sensors. X-Trans I and Bayer cameras have a similar limitation (not all models have all of the film simulations), so filtering by Camera will reveal what’s for certain compatible, and filtering by Sensor will reveal what may or might not be compatible.
I hope this isn’t too confusing. My recommendation is to try both filtering options, and decide what makes the most sense for you.
The long-awaited Fuji X Weekly app for iOS is now available in the Apple App Store! If you have an iPhone or iPad, go there now and download it, or visit the App Page to learn more.
Check out this promo video that my wife, Amanda, and I made for the app: