If You REALLY Want to be a Photographer, THIS Should be Your First Camera: The Fujifilm X100V (Video)

I share this video with you for three reasons: 1) it’s really good, 2) this website and the Fuji X Weekly App are mentioned in it, and 3) it’s definitely the coolest video that I’ve ever been highlighted in. So be sure to watch it! Also, big thanks to GxAce for the shout-out! You should check out his channel, for sure, because he has many intriguing videos.

You can read my review of the Fujifilm X100V here.

This post contains affiliate links, and if you make a purchase using my links I’ll be compensated a small amount for it.

Fujifilm X100V Black    Amazon   B&H
Fujifilm X100V Silver   Amazon   B&H

Comparing Fujifilm Film Simulation Recipes To Film (Videos)

The Snap Chick YouTube channel recently published a video where they compare actual Kodak Tri-X 400 film with the Kodak Tri-X 400 film simulation recipe. It’s a very fascinating video! If you’re looking for something to do, give it a watch—it’s about 15 minutes long. Definitely worth your time.

While we’re on this topic, check out the two videos below, which compare actual Kodak Portra 400 film with my Kodak Portra 400 recipes (the top video is this Portra 400 recipe, and the second video is this Portra 400 recipe).

New Fujifilm X-Trans III App Patron Early-Access Film Simulation Recipe: Vintage Kodacolor

Large Stone & Tall Grass – Farmington, UT – Fujifilm X-H1 – “Vintage Kodacolor”

The Fuji X Weekly App is free, yet becoming a Fuji X Weekly Patron unlocks the best App experience! One benefit of being a Patron is you get early access to some new film simulation recipes. These early-access recipes will eventually become available free to everyone in time, including this new one. In fact, many early-access recipes have already been publicly published on this blog and the App, so now everyone can use them. Patrons help support Fuji X Weekly and, really, without them there would be no App. So I want to give a special “thank you” to all of the Patrons!

This new Patron early-access recipe is called Vintage Kodacolor. I was inspired by some old Kodacolor puzzles that I stumbled across (did you know that Kodak made jigsaw puzzles?). I’m not completely certain which Kodacolor film was used for these puzzles—possibly Kodacolor II—or how much the printing process affected the aesthetic, or even how much the colors have faded and shifted over time. Whatever the case, this recipe does a pretty good job emulating it, and produces a warm vintage-like aesthetic that’s easy to appreciate. There’s some similarities between this and my Kodacolor II 126 recipe. This “Vintage Kodacolor” recipe is fully compatible with all X-Trans III cameras, plus the Fujifilm X-T3 and X-T30. Those with newer X-Trans IV cameras can use it, too, but you’ll have to decide on Grain size.

If you are a Fuji X Weekly Patron, it’s available to you right now on the App!

Example photographs, all camera-made JPEGs captured using this “Vintage Kodacolor” film simulation recipe on my Fujifilm X-H1:

Vintage Phragmites – Farmington, UT – Fujifilm X-H1
Evening Reeds and Sky – Farmington, UT – Fujifilm X-H1
Three Brown Leaves – Farmington, UT – Fujifilm X-H1
Don’t Approach the Great Blue Heron – Farmington, UT – Fujifilm X-H1
Safe Zone – Farmington, UT – Fujifilm X-H1
Sunset Through The Grass – Farmington, UT – Fujifilm X-H1
Evening Light on the Wood – Farmington, UT – Fujifilm X-H1
Flowers No More – Farmington, UT – Fujifilm X-H1
Metal Door – Farmington, UT – Fujifilm X-H1
Cardboard Architect – Farmington, UT – Fujifilm X-H1
Holiday Horse Rider – Farmington, UT – Fujifilm X-H1

Fujifilm X-H1 (X-Trans III) Film Simulation Recipe: Fujicolor NPL 160 Tungsten

Dusk Lamps – Farmington, UT – Fujifilm X-H1 – “Fujicolor NPL 160 Tungsten”

The Winter Solstice is fast approaching, and for those like me in the Northern Hemisphere, the days are getting shorter and the nights are longer. I find this to be a good opportunity for after-sunset or pre-sunrise photography, but there aren’t very many film simulation recipes for X-Trans III cameras that are specifically intended for this situation—in fact, there’s only one: CineStill 800T (although several others will still do well enough). So I set out to create another night film simulation recipe, because it’s good to have choices.

Unlike the CineStill 800T recipe, I didn’t model this one after any specific film, although it has some fairly close similarities to Fujicolor NPL 160 Pro Tungsten color negative film, which Fujifilm produced from 2000 through 2004. NPL 160 was specifically made for long exposures under artificial light. While I didn’t intend to mimic that film, you wouldn’t know it based on just how close of a match it is. I never used NPL 160 myself, as it wasn’t available in 35mm format, but I did some research on it for this article. It was available in 120 film (also, 4×5 sheets), which could be captured in three ratios (depending on the camera), including square, but 3:2 wasn’t one of those options. You could use 3:2 like I did, or more accurately shoot in the 1:1 ratio, or crop after-the-fact to whatever shape you prefer.

Blue Light Tree – Farmington, UT – Fujifilm X-H1 – “Fujicolor NPL 160 Tungsten”

This Fujicolor NPL 160 Tungsten recipe is compatible with all X-Trans III cameras, so if you have a Fujifilm X-Pro2, X100F, X-E3, X-T20, X-T20, or X-H1, this recipe is for you! It’s also compatible with the X-T3 and X-T30—simply set Color Chrome Effect to Off, and limit the maximum ISO to 6400. For those with newer X-Trans IV cameras, consider using Grain size Small and Clarity set to 0 or even -2. Those with a GFX 50S and GFX 50R can use this recipe, too, although it will look very slightly different. For night photography, I most commonly set exposure compensation to -1/3 or 0, and for daylight photography I most commonly set exposure compensation to +1/3 to +2/3.

PRO Neg. Std
Dynamic Range: DR400
Highlight: -2
Shadow: 0
Color: -2
Sharpening: -1
Noise Reduction: -4
Grain: Weak
White Balance: Fluorescent 3, -6 Red & -3 Blue
ISO: Auto up to ISO 12800
Exposure Compensation: -1/3 to +2/3 (typically)

Example photographs, all camera-made JPEGs captured using this “Fujicolor NPL 160 Tungsten” film simulation recipe on my Fujifilm X-H1:

Sunset Afterglow on Building – Farmington, UT – Fujifilm X-H1
Waffled – Farmington, UT – Fujifilm X-H1
Christmas Tree Outside A Mall – Farmington, UT – Fujifilm X-H1
Lights Wrapped Around A Trunk – Farmington, UT – Fujifilm X-H1
Girl at a Lighted Fountain – Farmington, UT – Fujifilm X-H1
Survivor – Salt Lake City, UT – Fujifilm X-H1
Headless Lampshade – Farmington, UT – Fujifilm X-H1
Stored Clothes – Farmington, UT – Fujifilm X-H1
Crowd Around the Tree – Salt Lake City, UT – Fujifilm X-H1
German Night – Salt Lake City, UT – Fujifilm X-H1
Krampus – Salt Lake City, UT – Fujifilm X-H1
Christkindlmarkt – Salt Lake City, UT – Fujifilm X-H1
Carolers – Farmington, UT – Fujifilm X-H1
ZCMI – Salt Lake City, UT – Fujifilm X-H1
Soaring Over a Neighborhood – Farmington, UT – Fujifilm X-H1

Find this film simulation recipe and many more on the Fuji X Weekly — Film Recipes App!

Help Fuji X Weekly

Nobody pays me to write the content found on fujixweekly.com. There’s a real cost to operating and maintaining this site, not to mention all the time that I pour into it. If you appreciated this article, please consider making a one-time gift contribution. Thank you!

$2.00

SOOC Episode 06 is This Thursday!

Episode 06 of SOOC is this Thursday, December 9, at 9am Pacific Time, 12 PM Eastern! Please note the new time.

For those who may not know, SOOC is a monthly live video series, with each episode focused on a different film simulation recipe. It is a collaboration between Tame Your Fujifilm (Fujifilm X-Photographer Nathalie Boucry) and Fuji X Weekly (Ritchie Roesch). SOOC is a fun and educational experience where we not only talk about Fujifilm camera settings, but also answer your questions and give tips and tricks. Basically, we’re trying to help you master your Fujifilm camera, with a focus on simplifying your photographic workflow. This is an interactive show, so we not only need you to tune in, but your participation is essential to making the episode great.

This month we will discuss the Cross Process film simulation recipe (a fun one, for sure!), as well as look at your photos captured with it—upload your pictures here to be featured in the next video! We’ll also introduce the next recipe. We have a lot of great things planned, and I know you’ll appreciate this one. Episode 06 will be on December 9th, so mark your calendars, and I look forward to seeing you then!

If you missed Episode 05, you can watch it below:

Fujifilm X-E4 Film Simulation Recipe: Kodachrome 25

Autumn on Kodachrome – Layton, UT – Fujifilm X-E4 – “Kodachrome 25”

The Kodachrome name has been used for many different films over the years. The first Kodachrome product was a two-glass-plate color negative that was introduced in 1915. Like all other color photography methods of its time, the results weren’t particularly good and the product not especially successful.

In 1935, Kodak released its next Kodachrome product: a positive color transparency film. This Kodachrome was the first film that produced reasonably accurate colors, and, because of that, was the first commercially successful color film. It became the standard film for color photography for a couple decades, and was even Ansel Adams’ preferred choice for color work. The December 1946 issue of Arizona Highways, which was the first all-color magazine in the world, featured Barry Goldwater’s Kodachrome images. While the most popular Kodachrome during this time was ISO 10, Kodak also produced an ISO 8 version, as well as a Tungsten option in the 1940s.

Kodak made significant improvements to Kodachrome, and in 1961 released Kodachrome II. This film boasted more accurate colors, sharper images, finer grain, and a faster ISO of 25. While it was still somewhat similar to the previous Kodachrome, it was better in pretty much every way. A year later Kodachrome-X was introduced, which had an ISO of 64, and produced more saturation and increased contrast, but was grainier. 

Golden Red Berries – Farmington, UT – Fujifilm X-E4 – “Kodachrome 25”

In 1974, because Kodak created a less-toxic development process, Kodachrome II was replaced by Kodachrome 25 and Kodachrome-X was replaced by Kodachrome 64. This generation of Kodachrome is what most people think of when they picture (pun intended) the film, gracing the pages of magazines like National Geographic. Due to Kodachrome’s sharpness, grain, color, contrast, and archival characteristics, it was a great all-around option that worked well in most circumstance. Steve McCurry, who is perhaps the best-known photographer to extensively use this era of Kodachrome, said of the film, “It has almost a poetic look with beautiful colors that were vibrant and true to what you were shooting.”

This film simulation recipe is intended to mimic Kodachrome 25 color transparency film. I was fortunate to shoot a few rolls of Kodachrome 25. It was a beautiful film, and probably the sharpest color film ever made, but its low ISO made it difficult to use. Kodachrome 64, which was still a low-ISO film, was about 1 2/3 stops faster. The major differences between the two Kodachrome emulsions is that the ISO 25 version was sharper and less grainy, while the ISO 64 version was more contrasty, vibrant and a hair warmer. Both were very similar, though, and it would be hard to spot the differences without a close inspection. Some people preferred the slightly more subtle tones and finer detail of Kodachrome 25, and some preferred the faintly punchier pictures rendered on Kodachrome 64. I liked Kodachrome 64 a little more, and so that’s what I most often used.

Below are a couple examples of this Kodachrome 25 recipe compared to my Kodachrome 64 recipe:

Kodachrome 25 recipe
Kodachrome 64 recipe
Kodachrome 25 recipe
Kodachrome 64 recipe

In the example below, I made massive crops so that you could more easily see the subtle differences in sharpness and grain between the two Kodachrome recipes. The differences in warmth are also more obvious. If the Kodachrome 25 recipe could have a .25 adjustment warmer, and if the Kodachrome 64 recipe could have a .25 adjustment cooler, it would likely be more accurate, but alas we’re limited by what Fujifilm gives us. In the case of this recipe, a Color Chrome FX Blue Medium would be a nice option, but it doesn’t exist.

Kodachrome 25 recipe
Kodachrome 25 crop
Kodachrome 64 crop

When Kodak discontinued Kodachrome in 2009, it shocked the photographic community; however, the deeper blow was that Kodak discontinued the chemicals required to develop it. Even if you had an old roll of the film (which I did), you couldn’t develop it, except as a black-and-white film from a specialty lab. By the end of 2010, the Kodachrome era was officially over for good. Fortunately, if you have a Fujifilm camera, the spirit of Kodachrome still lives.

This Kodachrome 25 recipe is only compatible with the Fujifilm X-T4, X-S10, X-E4, and X-T30 II cameras. You can modify this for the X-Pro3 and X100V by setting Highlight to 0 and Shadow to -1 instead of what it calls for—I don’t like it quite as much, but it’s pretty similar.

Classic Chrome
Dynamic Range: DR400
Highlight: +0.5
Shadow: -0.5
Color: +1
Noise Reduction: -4
Sharpening: +3
Clarity: +3
Grain Effect: Off
Color Chrome Effect: Strong
Color Chrome Effect Blue: Strong
White Balance: Daylight, +2 Red & -4 Blue
ISO: Auto, up to ISO 1600
Exposure Compensation: 0 to +2/3 (typically)

Example photographs, all camera-made JPEGs using this new Kodachrome 25 film simulation recipe on my Fujifilm X-E4:

Pedestrian Bridge – Farmington, UT – Fujifilm X-E4
Empty Stairs – Farmington, UT – Fujifilm X-E4
Red Box – Farmington, UT – Fujifilm X-E4
Locked Fire Box – Farmington, UT – Fujifilm X-E4
Three Bike Boxes – Farmington, UT – Fujifilm X-E4
Trains Can’t Stop – Farmington, UT – Fujifilm X-E4
Ceiling Conduit – Farmington, UT – Fujifilm X-E4
Delivering Boxes – Roy, UT – Fujifilm X-E4
Josh in Shadow – Farmington, UT – Fujifilm X-E4
Orange Leaves – Layton, UT – Fujifilm X-E4
Path Through A Fall Forest – Farmington, UT – Fujifilm X-E4
Golden Light on Mountain – Farmington, UT – Fujifilm X-E4
Last Light on Francis Peak – Farmington, UT – Fujifilm X-E4

Find this film simulation recipe and many more on the Fuji X Weekly — Film Recipes App!

Help Fuji X Weekly

Nobody pays me to write the content found on fujixweekly.com. There’s a real cost to operating and maintaining this site, not to mention all the time that I pour into it. If you appreciated this article, please consider making a one-time gift contribution. Thank you!

$2.00

New Patron Early-Access Film Simulation Recipe: Fujicolor Analog

Cotton On – Farmington, UT – Fujifilm X100V – “Fujicolor Analog”

The Fuji X Weekly App is free, yet becoming a Fuji X Weekly Patron unlocks the best App experience! One benefit of being a Patron is you get early access to some new film simulation recipes. These early-access recipes will eventually become available free to everyone in time, including this new one. In fact, many early-access recipes have already been publicly published on this blog and the App, so now everyone can use them. Patrons help support Fuji X Weekly and, really, without them there would be no App. So I want to give a special “thank you” to all of the Patrons!

This new Patron early-access recipe is called Fujicolor Analog. I was asked to recreate the look of a certain photographer, and I noticed that a lot of their photographs had a Classic Negative aesthetic, so I thought it would be easy to mimic. It turns out that this person shoots a lot of film, including (but not limited to) Fujicolor C200 and various Superia emulsions, as well as digital (but not Fujifilm, as far as I can tell), using RNI and perhaps some other filters or presets. Nothing said what each picture had been captured with, so it became difficult to recreate. After a little frustration, I decided to select only pictures with a certain aesthetic to attempt to emulate. I believe these might have been captured on a Superia emulsion, but they might not have been—they might not even be film! I think I was able to create a pretty close facsimile to this person’s aesthetic… at least one of the many various (but still somewhat similar) looks that this photographer has.

One film can have many different looks, depending on how it was shot, developed, and printed or scanned. I do believe this “Fujicolor Analog” recipe mimics the aesthetic of a Fujifilm color negative film, but which exact film, and how handled, is uncertain. What is certain is that this is a very nice film simulation recipe that some of you will love! It’s compatible with the Fujifilm X-Pro3, X100V, X-T4, X-S10, X-E4, X-T30 II cameras.

If you are a Fuji X Weekly Patron, it’s available to you right now on the App!

Example photographs, all camera-made JPEGs captured using this “Fujicolor Analog” film simulation recipe on my Fujifilm X100V:

Noble Fir – Kaysville, UT – Fujifilm X100V
Pine Trunk – Kaysville, UT – Fujifilm X100V
Burly Ladder – Kaysville, UT – Fujifilm X100V
Red Lights – Kaysville, UT – Fujifilm X100V
Utah Reeds – Farmington, UT – Fujifilm X100V
Pine in the Sky – Farmington, UT – Fujifilm X100V
Withering Blooms – Orem, UT – Fujifilm X100V
Peaks Above The Gap – Orem, UT – Fujifilm X100V
Arts – Draper, UT – Fujifilm X100V
Stop Spreading Germs – Draper, UT – Fujifilm X100V
Pharmacy Lift – Centerville, UT – Fujifilm X100V

Fujifilm X-Trans IV Film Simulation Recipe: Vintage Negative

Vintage Berries – Farmington, UT – Fujifilm X100V – “Vintage Negative”

This new film simulation recipe isn’t actually new. It’s been a Patron early-access recipe on the Fuji X Weekly App for awhile, so App Patrons have had the opportunity to shoot with it for many months. It’s been replaced with a different early-access recipe, so now it’s available to everyone! If you are an App Patron, be sure to look for the new early-access recipe.

I call this recipe “Vintage Negative” because it is based on some old photographs that someone shared with me. The pictures were old family prints that this person had found in a box. The film used was unknown, and it’s hard to know just how much of the aesthetic was from the film itself, and how much was from the print, which likely had a color shift from age. If you’re looking for an aged analog aesthetic, this recipe is for you!

Mountain Painted in Sunset Orange – Farmington, UT – Fujifilm X-E4 – “Vintage Negative”

The “Vintage Negative” film simulation recipe is compatible with all X-Trans IV cameras except the X-T3 and X-T30. If you have a Fujifilm X-Pro3, X100V, X-T4, X-S10, X-E4, or X-T30 II camera, you can use this recipe. The newer GFX cameras can likely use it, too, although I’m not certain, and it will likely render the pictures slightly different.

Classic Negative
Dynamic Range: DR400
Highlight: +1
Shadow: +2
Color: -3
Noise Reduction: -4
Sharpeness: -4
Clarity: -5
Grain Effect: Strong, Large
Color Chrome Effect: Strong
Color Chrome Effect Blue: Strong
White Balance: 10000K, -6 Red & -5 Blue
ISO: Auto, up to ISO 6400
Exposure Compensation: +1/3 to +2/3 (typically)

Example photographs, all camera-made JPEGs using this “Vintage Negative” film simulation recipe on my Fujifilm X100V and Fujifilm X-E4 cameras:

Christmas Star – Kaysville, UT – Fujifilm X100V
Two Ladders – Kaysville, UT – Fujifilm X100V
Pine Needles – Farmington, UT – Fujifilm X100V
Water Tower – Salt Lake City, UT – Fujifilm X100V
Troller Square – Salt Lake City, UT – Fujifilm X100V
Yellow House Evening – Farmington, UT – Fujifilm X100V
Suburban Reed Evening – Farmington, UT – Fujifilm X100V
Clouds Around The Mountain Peak – Farmington, UT – Fujifilm X-E4
Sunset Thistles – Farmington, UT – Fujifilm X-E4
Phragmites Shoot – Farmington, UT –

Find this film simulation recipe and many more on the Fuji X Weekly — Film Recipes App!

Help Fuji X Weekly

Nobody pays me to write the content found on fujixweekly.com. There’s a real cost to operating and maintaining this site, not to mention all the time that I pour into it. If you appreciated this article, please consider making a one-time gift contribution. Thank you!

$2.00

FXW App: Filter by White Balance — How To Use This New Feature

The Fuji X Weekly App was updated just yesterday, and I want to discuss one of the new features that I think will be heavily used: Filter by White Balance! This feature is unlocked by becoming a Fuji X Weekly App Patron.

Filter by White Balance will be a game-changer for many of you. The most obvious use is for finding recipes that match the lighting conditions. Is it sunny? Find a recipe that uses the Daylight White Balance. Is it indoors in mixed lighting? Maybe Auto White Balance would be good. But there’s another way to use Filter by White Balance, which I’ll discuss below, that will make your Fujifilm experience even better!

If your Fujifilm camera is older than the X-Pro3, you cannot save White Balance Shift within the C1-C7 Custom Presets, and each time you change Presets, you have to remember to adjust the WB Shift. It can be a little annoying. However, for each White Balance type, the camera will remember one WB Shift, so if each of your C1-C7 presets uses a different White Balance type, when you switch Presets, you won’t have to adjust the WB Shift. Amazing!

Let’s take a more practical look at this. If you have a Fujifilm X-T3 (for example), we’ll Filter by Camera and select the camera. For the X-T3, you’ll have over 70 recipes to choose from!

Let’s select one recipe to be our C1 in the Custom Settings menu. We’re now going to Filter by White Balance, and tap Auto—there are nearly 40 recipes to choose from! If you find more than one that requires the same WB Shift—Classic Chrome and Velvia both use +1R & -1B, and Velvia v2 and Dramatic Monochrome both use 0R & 0B, just as a couple examples—you can actually use multiple recipes from this White Balance type, and potentially program more than just C1. For this example we’re going to pick just one, perhaps Eterna v3 (interestingly, Agfa Optima 200 shares this same shift, and could be used, too), to be our C1 preset.

For C2 we’re going to select Daylight. There are 12 options to choose from. Kodak Portra 160, Kodak Portra 400, and Kodak Gold 200 all share the same WB Shift, so, in theory, you could program all three of these into your Custom Settings presets. For this, let’s go with Kodak Tri-X 400 to be our C2.

Next, for C3, let’s select Kelvin. You have 15 to choose from. Let’s choose maybe Jeff Davenport Night.

For C4 we’ll go with the Fluorescent 1 White Balance. There are just two options, and we’ll select Kodak Vision3 250D.

It’s the same story for Fluorescent 2: there are only two options. We’ll choose Ektachrome E100G to be our C5 preset.

For C6 we’ll select Incandescent. There’s just one recipe: Eterna Bleach Bypass, so we’ll program that one in.

Lastly, we have C7, and for that we’ll select Shade. There are three options, and we’ll go with Porto 200.

Now we have our C1-C7 Custom Settings presets programmed! C1 is Eterna v3. C2 is Kodak Tri-X 400. C3 is Jeff Davenport Night. C4 is Kodak Vision3 250D. C5 is Ektachrome E100G. C6 is Eterna Bleach Bypass. And C7 is Porto 200. That’s a pretty good set! Since each preset uses a different White Balance type, you won’t have to adjust the WB Shift when you switch presets. For those White Balance types that don’t have very many options, such as Fluorescent 1, Fluorescent 2, etc., if you didn’t like any of the choices, you could alternatively use two recipes that share both the same White Balance and WB Shift (such as the ones mentioned earlier).

You can come up with multiple combinations of these C1-C7 options, and keep track of them using the new colored Stars. Maybe use Green Stars for these seven recipes, and come up with another seven that can be used together and mark them with Blue Stars, and another seven that are marked with Purple Stars. Just an idea.

I hope this all makes sense. Filter by White Balance can be useful in more than one way. If your camera is older than the X-Pro3, this will make your Fujifilm experience more enjoyable, as you won’t have to remember to check the WB Shift each time you change presets. If you don’t have the Fuji X Weekly App, download it now. If you do have the App and it didn’t automatically update, be sure to visit the appropriate App Store and manually update it. If you are not a Fuji X Weekly App Patron, for the best App experience, consider becoming a Patron today!

Available Now: The Fuji X Weekly App Update!

The big Fuji X Weekly App update is available right now!

If your phone or tablet didn’t automatically update the App, be sure to manually update it right away. Depending on your device and how you have it configured, it’s possible that you might have to delete the App and reinstall, but most people shouldn’t have to do that in order to update it. Hopefully for most of you it happened automatically already, and you’re good to go. The App update is in both the Google Play Store for Android and the Apple App Store for iOS.

What’s in this “big” update? Plenty! Some of the things are for everyone, and some of the things are only for Fuji X Weekly App Patrons. Let’s talk about the improvements that are for everyone first, and then we will get to the good stuff that’s for Patrons.

View Sample Pictures Larger

Normal size pictures.
Tap to view pictures larger.

This is a pretty straightforward improvement: tap on a picture to view larger, and tap again to return to normal size. One request that I’ve received many times is the ability to enlarge the sample pictures in each recipe. Now you can! Of course, you can view them even larger (and see more of them) on the website—there’s a link at the bottom of each recipe.

Sort by A-Z, Z-A, Newest-to-Oldest, & Oldest-to-Newest

Before this update, you could only sort the recipes either alphabetically A-Z or chronologically Newest-to-Oldest. Now I’ve added Z-A or Oldest-to-Newest as options. If you know the name of the recipe and it begins on or after the letter N, sorting Z-A might make it quicker to locate. Or if you know that a recipe you are looking for was published awhile ago, sorting Oldest-to-Newest might make more sense. This should make it a little easier and quicker to locate what you are searching for.

Now, to the good stuff!

All of the improvements mentioned below are available for Fuji X Weekly App Patrons. The best App experienced is reserved for Patrons, so if you are not one, consider subscribing today! Simply tap the Gear icon in the App, and then select Become a Patron.

Filter by White Balance or Dynamic Range

There are two new Filter options: White Balance and Dynamic Range. Some users will benefit from Filter by Dynamic Range, but Filter by White Balance is huge! If your Fujifilm camera is older than the X-Pro3, you cannot save White Balance Shift within C1-C7 Custom Presets, and each time you change Presets, you have to remember to adjust the WB Shift. It can be a little annoying. However, for each White Balance type, the camera will remember one WB Shift, so if each of your C1-C7 presets uses a different White Balance type, when you switch Presets, you won’t have to adjust the WB Shift. For many, this is a game-changer!

Favorite with Colored Stars

One really great upgrade is Favoriting with colored Stars. Before, when you tapped the Star to Favorite a recipe, it came in one color (yellow). But now you can choose between five different colors: yellow, red, green, blue, and purple. The benefit of this is that you can use colored Stars to organize recipes. Maybe yellow represents the recipes currently loaded into your camera, red represents the recipes you want to try next, and green represents the ones you tried in the past and really liked. Or maybe yellow is your favorite portrait recipes, green your favorite landscape recipes, and blue your favorite street recipes. Use the colored Stars to categorize the recipes however is meaningful to you. This is a great organizational tool, and, for some, this makes the App a significantly better experience.

Blank Recipe Cards

If you’ve ever created your own film simulation recipe, or if you’ve found some elsewhere that you like (perhaps on the Fuji X Weekly Community Recipes page, such as AstiAmore in the example above), you can now add them to your App! A new feature is blank recipe cards that you fill out. You can even add your own pictures from your camera roll! At some point down the road the idea is that you’ll be able to export, import, and share these custom recipes; however, that ability isn’t in this update—with any luck it will come before summer. Several of you have asked for blank recipe cards, and now you have them! This is a great new feature that many of you will really appreciate.

There’s one other thing that I want to mention: if you tap the Gear icon in the top-left of the App and look way down at the bottom, you will see Shop The Latest Fujifilm Gear. These are affiliate links to B&H and Amazon. If you are shopping for some new gear and you happen to think about it, I’ll be compensated a small amount if you make a purchase using my links. It’s a simple way to support Fuji X Weekly that doesn’t cost you anything.

Below are even more images of the new and improved Fuji X Weekly App!

I want to give a special thanks to Sahand Nayebaziz for all his hard work on this App update! Without him, not only would the App not be nearly as good as it is, but there wouldn’t be a Fuji X Weekly App at all. Thank you so much, Sahand!

Fujifilm X-Trans IV Film Simulation Recipe: Retro Gold Low Contrast

Purple Mountain – Farmington, UT – Fujifilm X-E4 – “Retro Gold Low Contrast”

Two days ago I published my new Retro Gold film simulation recipe, which is great for “golden hour” photography. That recipe has a lot of contrast in it—I stated in the article that it was similar to slide film or maybe push-processed negative film. A high-contrast recipe works great in situations that are low-contrast. Sometimes when the sun is low, the scenes you encounter aren’t low-contrast, but high contrast. In those cases, the Retro Gold recipe may not be the best choice. Thomas Schwab suggested that I should create a low-contrast version that’s better suited for high-contrast situations—that’s how this recipe, which I call Retro Gold Low Contrast, came to be.

This recipe has more of a color negative film look (Kodak Gold, maybe?). The color cast is perhaps similar to using an enhancing filter (and maybe a polarizer, too). Like the other recipe, this one isn’t intended to mimic any specific film, but it definitely has an analog aesthetic to it.

Yellow Leaf of Autumn – Farmington, UT – Fujifilm X-E4 – “Retro Gold Low Contrast”

Because this “Retro Gold Low Contrast” film simulation recipe uses Clarity and Color Chrome FX Blue, it’s compatible with the Fujifilm X-Pro3, X100V, X-T4, X-S10, X-E4, and X-T30 II cameras. It might also be compatible with the newer GFX cameras, too, although I’m not certain of that. Unfortunately, it’s not compatible with the X-T3 and X-T30.

Classic Chrome
Dynamic Range: DR400
Highlight: 0
Shadow: -2
Color: +4
Noise Reduction: -4
Sharpening: 0
Clarity: -3
Grain Effect: Weak, Small
Color Chrome Effect: Strong
Color Chrome Effect Blue: Strong
White Balance: Fluorescent 3 (“Cool White Fluorescent”), +4 Red & -6 Blue
ISO: Auto, up to ISO 6400
Exposure Compensation: 0 to -2/3 (typically)

Example photographs, all camera-made JPEGs using this “Retro Gold Low Contrast” film simulation recipe on my Fujifilm X-E4:

Cloudy Ridge – Farmington, UT – Fujifilm X-E4
Cloudy Mountain – Farmington, UT – Fujifilm X-E4
Dressed Warm – Farmington, UT – Fujifilm X-E4
Vines up the Bark – Farmington, UT – Fujifilm X-E4
Long Yellow Leaves – Farmington, UT – Fujifilm X-E4
Country Red – Farmington, UT – Fujifilm X-E4
November Red – Farmington, UT – Fujifilm X-E4
Orange Haze – Farmington, UT – Fujifilm X-E4
Orange Mountain – Farmington, UT – Fujifilm X-E4

Find this film simulation recipe and many more on the Fuji X Weekly — Film Recipes App!

Help Fuji X Weekly

Nobody pays me to write the content found on fujixweekly.com. There’s a real cost to operating and maintaining this site, not to mention all the time that I pour into it. If you appreciated this article, please consider making a one-time gift contribution. Thank you!

$2.00

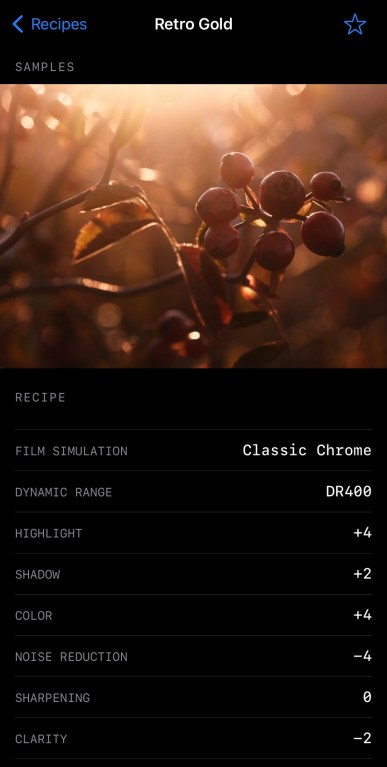
Fujifilm X-Trans IV Film Simulation Recipe: Retro Gold

Golden Red Berries – Farmington, UT – Fujifilm X-E4 – “Retro Gold”

This film simulation recipe began as an attempt to mimc the aesthetic of the Retro Effect on Ricoh GR cameras. There are several reasons why this recipe isn’t a good facsimile to that, but, even so, I really like what I came up with. It has a retro look to it that is somewhat reminiscent of slide film that’s been left in a hot car a little too long (or, perhaps, simply wasn’t stored correctly), and somewhat reminiscent of push-processed negative film, maybe something like Kodak Gold. It’s not intended to mimic any specific film, so any similarities to an analog aesthetic is a happy accident.

Because of its retro-golden look, I’ve named this recipe “Retro Gold.” It’s outstanding in evening light, and pretty good at other times, too. In some ways it reminds me of my Golden Negative recipe, and in some ways it reminds me of my Expired Slide recipe, but it’s not really like either. While you can use it anytime, this is a film simulation recipe that I recommend you try during your next “golden hour” photographic outing.

One Way To The Mountains – Farmington, UT – Fujifilm X-E4 – “Retro Gold”

Because this “Retro Gold” film simulation recipe uses Clarity and Color Chrome FX Blue, it’s compatible with the Fujifilm X-Pro3, X100V, X-T4, X-S10, X-E4, and X-T30 II cameras. It might also be compatible with the newer GFX cameras, too, although I’m not certain of that. Unfortunately, it’s not compatible with the X-T3 and X-T30. If you don’t want to use Clarity because it slows down the camera, an alternative might be to use a diffusion filter, like the 1/8 Black Pro Mist or 5% CineBloom. Another option for this recipe that you are welcome to try is a stronger grain effect. I went with Weak and Small because I wasn’t attempting a particular film look, but it would likely look nice with as much as Strong and Large.

Classic Chrome
Dynamic Range: DR400
Highlight: +4
Shadow: +2
Color: +4
Noise Reduction: -4
Sharpening: 0
Clarity: -2
Grain Effect: Weak, Small
Color Chrome Effect: Strong
Color Chrome Effect Blue: Strong
White Balance: Fluorescent 3 (“Cool White Fluorescent”), +4 Red & -6 Blue
ISO: Auto, up to ISO 6400
Exposure Compensation: 0 to -2/3 (typically)

Example photographs, all camera-made JPEGs using this “Retro Gold” film simulation recipe on my Fujifilm X-E4 & Fujifilm X100V:

Hazy Evening Berries – Farmington, UT – Fujifilm X-E4
Sunset Red – Farmington, UT – Fujifilm X-E4
Purple Thistle – Farmington, UT – Fujifilm X-E4
Golden November Leaves – Farmington, UT – Fujifilm X-E4
Golden Evening Leaves – Farmington, UT – Fujifilm X-E4
Autumn Yellow Leaf – Farmington, UT – Fujifilm X-E4
Thorns & Leaves – Farmington, UT – Fujifilm X-E4
Boy In The Shadow – Farmington, UT – Fujifilm X-E4
Bokeh Abstract – Farmington, UT – Fujifilm X-E4
Partly Cloudy Sky Reflected – Salt Lake City, UT – Fujifilm X100V
Evening Housetop – Farmington, UT – Fujifilm X-E4
Neighborhood Autumn Leaves – Farmington, UT – Fujifilm X100V
Hidden Neighborhood Evening – Farmington, UT – Fujifilm X100V
Marshland – Layton, UT – Fujifilm X100V
Sunset Mountains– Farmington, UT – Fujifilm X-E4

Find this film simulation recipe and many more on the Fuji X Weekly — Film Recipes App!

Help Fuji X Weekly

Nobody pays me to write the content found on fujixweekly.com. There’s a real cost to operating and maintaining this site, not to mention all the time that I pour into it. If you appreciated this article, please consider making a one-time gift contribution. Thank you!

$2.00

SOOC – SE01E05 – Agfa Optima 200

Episode 05 of SOOC was yesterday—I had a great time, and I hope you did, too. I want to give a big “Thank You” to everyone who tuned in and participated—you are the ones who make these episodes great! If you missed it when it was live, you can still watch it (above). We had some technical difficulties (related to a power outage) at the beginning, so (as of this moment) the show doesn’t start until about the 8-minute-mark. We’ll get this cleaned up shortly, but for now, just skip ahead a few minutes. Despite the problems at the start, a hundreds of you tuned in—I hope you learned something, that you were inspired, and/or that it was entertaining enough to make it worthwhile. Asking for nearly two hours of your time is a lot, and we really appreciate everyone who journeyed along with us!

For those who may not know, SOOC is a monthly live video series, with each episode focused on a different film simulation recipe. It is a collaboration between Tame Your Fujifilm (Fujifilm X-Photographer Nathalie Boucry) and Fuji X Weekly (Ritchie Roesch). SOOC is a fun and educational experience where we not only talk about Fujifilm camera settings, but also answer your questions and give tips and tricks. Basically, we’re trying to help you master your Fujifilm camera, with a focus on simplifying your photographic workflow.

In this month’s episode we discussed my Agfa Optima 200 film simulation recipe, and viewed the wonderful pictures that you captured with this recipe. We also introduced the next recipe: Cross ProcessUpload your pictures here to be featured in the next video! Episode 06 will be on December 9th, so mark your calendars, and I look forward to seeing you then!

If you haven’t watched the previous episodes, then get yourself comfortable, grab a beverage of choice, and click the links below!

Episode 01: Introduction

Episode 02: Kodachrome II

Episode 03: Fujicolor C200

Episode 04: Kodacolor

Episode 05: Agfa Optima 200

Also, be sure to check out the Viewer’s Images slideshows!

Viewer’s Images: Kodachrome II

Viewer’s Images: Fujicolor C200

Viewer’s Images: Kodacolor

SOOC Season 01 Episode 05 Is Today!

Episode 05 of SOOC is live today! The time has been changed to 11 AM Pacific, 2 PM Eastern (7 PM UTC).

SOOC is a monthly live video series, with each episode focused on a different film simulation recipe. It is a collaboration between Tame Your Fujifilm (Fujifilm X-Photographer Nathalie Boucry) and Fuji X Weekly (Ritchie Roesch). SOOC is a fun and educational experience where we not only talk about Fujifilm camera settings, but also answer your questions and give tips and tricks. Basically, we’re trying to help you master your Fujifilm camera, with a focus on simplifying your photographic workflow. This is an interactive show, so we not only need you to tune in, but your participation is essential to making the episode great.

In this month’s episode we will discuss the Agfa Optima 200 recipe, and we’ll take a look at your pictures captured with this recipe. We’ll also introduce the next recipe. We have a lot of great things planned, and I know you’ll appreciate this episode. See you soon!

SOOC Episode 05 Rescheduled Slightly

SOOC Episode 05 is tomorrow, but it has been rescheduled slightly. It was announced to be 10 AM Pacific, 1 PM Eastern, but it has been pushed back an hour, and will now be 11 AM Pacific and 2 PM Eastern. I hope this isn’t too much of an inconvenience for you.

The delay is actually two hours in South Africa (due to a scheduled power outage), but since South Africa, like Arizona, doesn’t observe Daylight Savings, the delay will be only one hour for those who moved their clocks back an hour (and two hours for those who didn’t). It’s actually a good thing that this delay happened, or else I would have been an hour late for the broadcast tomorrow, which would have started before I expected it to—yikes! So it’s a blessing in disguise.

I hope to see you tomorrow!

Fujifilm X-Trans III + X-T3 & X-T30 Patron Early-Access Film Simulation Recipe: Ektachrome E100GX

Pink Rose Blossom – Ogden, UT – Fujifilm X-T30

I wanted to make another recipe that uses the Fluorescent 2 (or “warm white fluorescent”) white balance. Why? Because this is a very underutilized and under appreciated option. I have only four other recipes that use it—Provia 400, Fujicolor Super HG, Super HG Astia, and Fujichrome Sensia 100—and those are all very good recipes. I didn’t have any specific film in mind when I made this, I was simply attempting something that looked good.

After shooting with it awhile, and looking at the pictures, the results looked familiar, but I couldn’t put a finger on it. I started digging through my old pictures, and wasn’t finding anything. Then I stumbled on a few Kodak Ektachrome E100GX frames, and the results were similar.

Ektachrome E100GX was a color transparency film made by Kodak from 2001-2009, and is what replaced E100SW. It was known for vibrant saturation, a warm color cast, and fine grain. It wasn’t quite as warm, vibrant, or sharp as E100SW, but overall very similar, yet with finer grain. Some people thought it was better than E100SW, some people thought it was worse. I liked E100SW a bit better, but E100GX was still a good film, particularly if you wanted something warm, colorful, and contrasty, but not overly so.

Intelligent Children – Bountiful, UT – Fujifilm X-T30 – “Ektachrome E100GX”

The Fuji X Weekly app is free, yet becoming a Fuji X Weekly Patron unlocks the best app experience! One benefit of being a Patron is you get early access to some new film simulation recipes. These early-access recipes will eventually become available free to everyone in time, including this new one. In fact, many early-access recipes have already been publicly published on this blog and the app, so now everyone can use them. Patrons help support Fuji X Weekly and, really, without them there would be no app. So I want to give a special “thank you” to all of the Patrons!

This recipe is compatible with Fujifilm X-Trans III, X-T3 and X-T30 cameras. If you are a Fuji X Weekly Patron, it’s available to you right now on the app!

Example photographs, all camera-made JPEGs captured using this “Ektachrome E100GX” film simulation recipe on my Fujifilm X-T30:

Yellow Glow of Iowa – Bountiful, UT – Fujifilm X-T30
Sunlight Reflected on Window – Bountiful, UT – Fujifilm X-T30
Dark Red Tree & Partly Cloudy Sky – Ogden, UT – Fujifilm X-T30
Dead Leaves in a Dry Drinking Fountain – Bountiful, UT – Fujifilm X-T30
Small Waterfall – Ogden, UT – Fujifilm X-T30
Forest Graffiti – Ogden, UT – Fujifilm X-T30
Growing Out of the Side – Ogden, UT – Fujifilm X-T30
Two Boys Going Down a Trail – Ogden, UT – Fujifilm X-T30
Autumn Trunks – Ogden, UT – Fujifilm X-T30 – “Ektachrome E100GX”
Backlit Yellow Leaf – Ogden, UT – Fujifilm X-T30
Rose in the Garden – Ogden, UT – Fujifilm X-T30
Bright Bloom – Ogden, UT – Fujifilm X-T30 –
Rose Clump – Ogden, UT – Fujifilm X-T30
Wagon Duty – Ogden, UT – Fujifilm X-T30
Pines in Autumn – Ogden, UT – Fujifilm X-T30
Reflection in the River – Ogden, UT – Fujifilm X-T30
Left – Bountiful, UT – Fujifilm X-T30

Fujifilm X-Trans III + X-T3 & X-T30 Film Simulation Recipe: Porto 200

Yellow Bike – Farmington, UT – Fujifilm X-T30 – “Porto 200”

The name of this recipe is not a typo. Awhile back I was asked to make a film simulation recipe for Fujifilm X-Trans II cameras that mimic the aesthetic of photographer João Falcão. I was able to create an X-Trans II recipe that was fairly close, although perhaps not exact. Certainly if you like João’s aesthetic, you’ll appreciate those settings. I called that recipe Porto 200 because Porto is the city in Portugal where João is from. While Porto means “port” I think it has a nice film-stock-like name, similar to “Portra” for example. While there is no film called Porto 200, I decided to use the name anyway.

This Porto 200 recipe is an adaptation of the X-Trans II settings for X-Trans III, plus X-T3 and X-T30, cameras. It’s got a great Kodak-like print-film analog aesthetic. If you have a Fujifilm X-Trans III camera, or the X-T3 or X-T30, I invite you to give it a try. This recipe was one of the original Patron Early-Access recipes on the Fuji X Weekly App, but now it is available to everyone, since a different Early-Access recipe has replaced it—if you are a Patron, be sure to look for it on the App!

Winter Trees – Layton, UT – Fujifilm X-T30 – “Porto 200”

PRO Neg. Std
Dynamic Range: DR200
Highlight: -1
Shadow: 0
Color: 0
Color Chrome Effect: Off or N/A
Sharpness: 0
Noise Reduction: -4
Grain Effect: Weak
White Balance: Shade, 0 Red & -4 Blue
ISO: Auto up to ISO 6400
Exposure Compensation: +1/3 to +2/3 (typically)

Sample photographs, all camera-made JPEGs, captured with a Fujifilm X-T30 using this Porto 200 film simulation recipe:

Monumental – Bountiful, UT – Fujifilm X-T30
Bike in Waiting – Bountiful, UT – Fujifilm X-T30
Yellow Jacket – Bountiful, UT – Fujifilm X-T30
Studio 10 – Bountiful, UT – Fujifilm X-T30
Brick Reflections – Bountiful, UT – Fujifilm X-T30
Opposite Directions – Bountiful, UT – Fujifilm X-T30
Reflecting on Empty Spaces – Bountiful, UT – Fujifilm X-T30
Windshield Bokeh – Farmington, UT – Fujifilm X-T30
Do Not McEnter – Roy, UT – Fujifilm X-T30
Night Train – Clinton, UT – Fujifilm X-T30

Find this film simulation recipe and nearly 200 more on the Fuji X Weekly — Film Recipes App!

Help Fuji X Weekly

Nobody pays me to write the content found on fujixweekly.com. There’s a real cost to operating and maintaining this site, not to mention all the time that I pour into it. If you appreciated this article, please consider making a one-time gift contribution. Thank you!

$2.00

Sneak Peek: Fuji X Weekly App Update

The Fuji X Weekly App is a free mobile film simulation recipe library containing over 175 recipes for Fujifilm cameras! It’s available on both Apple and Android. This is an essential tool to accompany Fujifilm X cameras, so if you don’t have the App, you should go download it now.

Coming very soon is a large update to the Fuji X Weekly App, and I want to give you a sneak peek of what’s in store for you!

Before I begin, however, I want to talk briefly about the benefits of a becoming an App Patron. The Fuji X Weekly App is free, but advanced features are unlocked for Patrons, including Filtering, Favoriting, and early-access to some new recipes. The best App experience is reserved for Patrons.

There are two reasons why I bring this up. First, many of the App update improvements apply to Patron features, and those using the App for free won’t have access to these. The update is big for Patrons, and small for those who are not. Second, I’ve had several people tell me that I need to do a better job selling the Patron subscription because they were unaware of how much better the App is when you become a Patron. “I didn’t know what I was missing,” a couple people recently told me. If you want to get the most out of the Fuji X Weekly App, including the things we’re going to talk about below, you should become a Patron today!

That’s the entirety of my sales pitch (I’m a terrible salesman). Now to the App update sneak peek!

Favoriting & Filtering

One really great upgrade that’s coming is Favoriting on steroids. Before, when you tapped the Star to Favorite a recipe, it came in one color (yellow). But very soon you will be able to choose between five different colors: yellow, red, green, blue, and purple.

The benefit of this is that you can use colored Stars to organize recipes. Maybe yellow represents the recipes currently loaded into your camera, red represents the recipes you want to try next, and green represents the ones you tried in the past and really liked. Or maybe yellow is your favorite portrait recipes, green your favorite landscape recipes, and blue your favorite street recipes. Use the colored Stars to categorize the recipes however is meaningful to you. This will be a great organizational tool, and, for some, this is going to make the App a significantly better experience.

Another awesome App improvement that’s coming is Filter by White Balance. For many, this will be a game-changer. This is going to be the feature for some that makes the Patron subscription worthwhile! Why? Because if your Fujifilm camera is older than the X-Pro3, you cannot save White Balance Shift within C1-C7 Custom Presets, and each time you change Presets, you have to remember to adjust the WB Shift. It can be a little annoying. However, for each White Balance type, the camera will remember one WB Shift, so if each of your C1-C7 presets uses a different White Balance type, when you switch Presets, you won’t have to adjust the WB Shift.

In the App, select Filter by Camera and choose your model—let’s say you have an X-H1. Then Filter by White Balance. Start with Auto, and choose one of those recipes to be your C1 Custom Preset. There are a couple of these recipes that share the same WB Shift, so you could, if you wanted, use more than one, just as long as the WB Shift is the same. Then choose Daylight, and pick one of those recipes to be C2. Again, there are a couple that share the same WB Shift, so you could pick more than one, just as long as the WB Shift is the same. Next is Shade, and there’s just one recipe (right now, anyway) to choose from, so that could be C3. Then select Kelvin, and pick one of those recipes to be C4. Fluorescent 1 is next, and there’s only one recipe to choose from, so that could be C5. Same for Fluorescent 2, and that could be C6. Ditto for Incandescent, and that could be C7. If you picked two Auto and two Daylight recipes (that shared the same WB Shift), then you could skip two of the White Balance options that only have one recipe.

Using Filter by White Balance to help you select recipes for your C1-C7 Custom Presets will make your shooting experience more enjoyable because you won’t have to remember to adjust the WB Shift each time you change to a different Custom Preset.

Custom Recipe (Blank Recipe Cards)

If you’ve ever created your own film simulation recipe, or if you’ve found some elsewhere that you like (perhaps on the Fuji X Weekly Community Recipes page), you will soon be able to add them to your App! A new feature will be blank recipe cards that you fill out. You will even be able to add your own pictures from your camera roll! At some point down the road the idea is that you’ll be able to export, import, and share these custom recipes (that ability won’t be in this update). Several of you have asked for blank recipe cards, and soon you’ll have them! This will be a fun new feature that some of you will really appreciate.

There are, of course, a number of other smaller improvements that are coming with the App update—this is just a sneak peek at three of the bigger ones. With any luck, the update should be out before the end of the month. Oh, and we’ve already begun working on the following update (for sometime next year) that will include a number of other great new features and improvements.

Fujifilm Instax Link Wide Printer

Fujifilm recently released the new Instax Link Wide instant film printer. This is the first printer for larger Instax film, called Wide Instant Film. For those who shoot Instax, this is pretty big news!

A lot of people never print their pictures, and most images are quickly forgotten. A fun way to get tangible photographs is to print them on Instax film. Keep them in a photo book. Display them on a cork-board or refrigerator. Give them to friends and family. You can even print the pictures with a QR-code on them, and turn your images into unique business cards!

A great thing that you can do with this printer is use film simulation recipes on your Fujifilm X camera, and then print those pictures on Instax film. Fujifilm X-Photographer Nathalie Boucry did just that (which you can see in the image below)—she used my Agfa Optima 200 recipe on her Fujifilm X camera, and then, using the Instax Link Wide printer, made instant film prints from the images that she captured with the recipe. Amazing!

Photo by Nathalie Boucry

Some of you might be surprised to learn that I have an Instax Mini 40 that I occasionally use. Instant film photography is fun, but I don’t consider it a “serious” endeavor; however, the Wide printer does make for the intriguing union between recipes and instant film. There’s certainly the prospect of a compelling art project.

Nathalie and I discussed the Instax Link Wide printer in SOOC Episode 04. A short excerpt of this segment can be found in the video below. If you are interested in this printer, be sure to watch the video!

This post contains affiliate links, and if you make a purchase using my links I’ll be compensated a small amount for it.

The Fujifilm Instax Link Wide Printer retails for $150.
B&H Amazon

How To: In-Camera RAW Reprocessing on Fujifilm Cameras

In the above video, I (Ritchie Roesch, Fuji X Weekly) walk Nathalie Boucry (Tame Your Fujifilm) through reprocessing a RAW file in-camera on a Fujifilm X-T3. If you’ve ever wondered how to do it, this clip is for you! The film simulation recipe demonstrated in the video is the Eterna recipe.

This is actually an excerpt (“SoundBite” is what we’re calling it) from SOOC Episode 04. In addition to film simulation recipes, this is the kind of stuff that we discuss during our live broadcast. If you haven’t yet tuned in—well, you’ve got a lot of catching up to do! They’re long videos, but hopefully there’s something, perhaps even multiple somethings, in each episode that make it worth your time. Nathalie and I do this for your benefit—something positive for the community, with the goal of simply helping other photographers. Whether you are new or experienced, I hope that each episode of SOOC has something for you.

Also, SOOC Episode 05 is this Thursday (November 18th) at 10 AM Pacific Time, 1 PM Eastern Time. This is an interactive program, so, in addition to tuning in, we need you to participate. Mark your calendar now, and I’ll see you on Thursday!