I wanted to make another recipe that uses the Fluorescent 2 (or “warm white fluorescent”) white balance. Why? Because this is a very underutilized and under appreciated option. I have only four other recipes that use it—Provia 400, Fujicolor Super HG, Super HG Astia, and Fujichrome Sensia 100—and those are all very good recipes. I didn’t have any specific film in mind when I made this, I was simply attempting something that looked good.
After shooting with it awhile, and looking at the pictures, the results looked familiar, but I couldn’t put a finger on it. I started digging through my old pictures, and wasn’t finding anything. Then I stumbled on a few Kodak Ektachrome E100GX frames, and the results were similar.
Ektachrome E100GX was a color transparency film made by Kodak from 2001-2009, and is what replaced E100SW. It was known for vibrant saturation, a warm color cast, and fine grain. It wasn’t quite as warm, vibrant, or sharp as E100SW, but overall very similar, yet with finer grain. Some people thought it was better than E100SW, some people thought it was worse. I liked E100SW a bit better, but E100GX was still a good film, particularly if you wanted something warm, colorful, and contrasty, but not overly so.
Intelligent Children – Bountiful, UT – Fujifilm X-T30 – “Ektachrome E100GX”
The Fuji X Weekly app is free, yet becoming a Fuji X Weekly Patron unlocks the best app experience! One benefit of being a Patron is you get early access to some new film simulation recipes. These early-access recipes will eventually become available free to everyone in time, including this new one. In fact, many early-access recipes have already been publicly published on this blog and the app, so now everyone can use them. Patrons help support Fuji X Weekly and, really, without them there would be no app. So I want to give a special “thank you” to all of the Patrons!
This recipe is compatible with Fujifilm X-Trans III, X-T3 and X-T30 cameras. If you are a Fuji X Weekly Patron, it’s available to you right now on the app!
Example photographs, all camera-made JPEGs captured using this “Ektachrome E100GX” film simulation recipe on my Fujifilm X-T30:
Yellow Glow of Iowa – Bountiful, UT – Fujifilm X-T30
Sunlight Reflected on Window – Bountiful, UT – Fujifilm X-T30
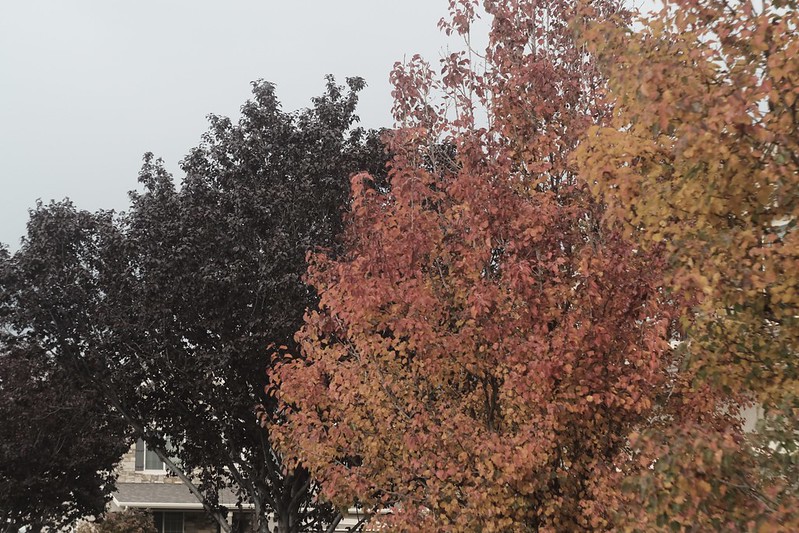
Dark Red Tree & Partly Cloudy Sky – Ogden, UT – Fujifilm X-T30
Dead Leaves in a Dry Drinking Fountain – Bountiful, UT – Fujifilm X-T30
Small Waterfall – Ogden, UT – Fujifilm X-T30
Forest Graffiti – Ogden, UT – Fujifilm X-T30
Growing Out of the Side – Ogden, UT – Fujifilm X-T30
Two Boys Going Down a Trail – Ogden, UT – Fujifilm X-T30
Yellow Bike – Farmington, UT – Fujifilm X-T30 – “Porto 200”
The name of this recipe is not a typo. Awhile back I was asked to make a film simulation recipe for Fujifilm X-Trans II cameras that mimic the aesthetic of photographer João Falcão. I was able to create an X-Trans II recipe that was fairly close, although perhaps not exact. Certainly if you like João’s aesthetic, you’ll appreciate those settings. I called that recipe Porto 200 because Porto is the city in Portugal where João is from. While Porto means “port” I think it has a nice film-stock-like name, similar to “Portra” for example. While there is no film called Porto 200, I decided to use the name anyway.
This Porto 200 recipe is an adaptation of the X-Trans II settings for X-Trans III, plus X-T3 and X-T30, cameras. It’s got a great Kodak-like print-film analog aesthetic. If you have a Fujifilm X-Trans III camera, or the X-T3 or X-T30, I invite you to give it a try. This recipe was one of the original Patron Early-Access recipes on the Fuji X Weekly App, but now it is available to everyone, since a different Early-Access recipe has replaced it—if you are a Patron, be sure to look for it on the App!
Winter Trees – Layton, UT – Fujifilm X-T30 – “Porto 200”
PRO Neg. Std Dynamic Range: DR200 Highlight: -1 Shadow: 0 Color: 0 Color Chrome Effect: Off or N/A Sharpness: 0 Noise Reduction: -4 Grain Effect: Weak White Balance: Shade, 0 Red & -4 Blue ISO: Auto up to ISO 6400 Exposure Compensation: +1/3 to +2/3 (typically)
Sample photographs, all camera-made JPEGs, captured with a Fujifilm X-T30 using this Porto 200 film simulation recipe:
Monumental – Bountiful, UT – Fujifilm X-T30
Bike in Waiting – Bountiful, UT – Fujifilm X-T30
Yellow Jacket – Bountiful, UT – Fujifilm X-T30
Studio 10 – Bountiful, UT – Fujifilm X-T30
Brick Reflections – Bountiful, UT – Fujifilm X-T30
Opposite Directions – Bountiful, UT – Fujifilm X-T30
Reflecting on Empty Spaces – Bountiful, UT – Fujifilm X-T30
Windshield Bokeh – Farmington, UT – Fujifilm X-T30
Nobody pays me to write the content found on fujixweekly.com. There’s a real cost to operating and maintaining this site, not to mention all the time that I pour into it. If you appreciated this article, please consider making a one-time gift contribution. Thank you!
The Fuji X Weekly App is a free mobile film simulation recipe library containing over 175 recipes for Fujifilm cameras! It’s available on both Apple and Android. This is an essential tool to accompany Fujifilm X cameras, so if you don’t have the App, you should go download it now.
Coming very soon is a large update to the Fuji X Weekly App, and I want to give you a sneak peek of what’s in store for you!
There are two reasons why I bring this up. First, many of the App update improvements apply to Patron features, and those using the App for free won’t have access to these. The update is big for Patrons, and small for those who are not. Second, I’ve had several people tell me that I need to do a better job selling the Patron subscription because they were unaware of how much better the App is when you become a Patron. “I didn’t know what I was missing,” a couple people recently told me. If you want to get the most out of the Fuji X Weekly App, including the things we’re going to talk about below, you should become a Patron today!
That’s the entirety of my sales pitch (I’m a terrible salesman). Now to the App update sneak peek!
Favoriting & Filtering
One really great upgrade that’s coming is Favoriting on steroids. Before, when you tapped the Star to Favorite a recipe, it came in one color (yellow). But very soon you will be able to choose between five different colors: yellow, red, green, blue, and purple.
The benefit of this is that you can use colored Stars to organize recipes. Maybe yellow represents the recipes currently loaded into your camera, red represents the recipes you want to try next, and green represents the ones you tried in the past and really liked. Or maybe yellow is your favorite portrait recipes, green your favorite landscape recipes, and blue your favorite street recipes. Use the colored Stars to categorize the recipes however is meaningful to you. This will be a great organizational tool, and, for some, this is going to make the App a significantly better experience.
Another awesome App improvement that’s coming is Filter by White Balance. For many, this will be a game-changer. This is going to be the feature for some that makes the Patron subscription worthwhile! Why? Because if your Fujifilm camera is older than the X-Pro3, you cannot save White Balance Shift within C1-C7 Custom Presets, and each time you change Presets, you have to remember to adjust the WB Shift. It can be a little annoying. However, for each White Balance type, the camera will remember one WB Shift, so if each of your C1-C7 presets uses a different White Balance type, when you switch Presets, you won’t have to adjust the WB Shift.
In the App, select Filter by Camera and choose your model—let’s say you have an X-H1. Then Filter by White Balance. Start with Auto, and choose one of those recipes to be your C1 Custom Preset. There are a couple of these recipes that share the same WB Shift, so you could, if you wanted, use more than one, just as long as the WB Shift is the same. Then choose Daylight, and pick one of those recipes to be C2. Again, there are a couple that share the same WB Shift, so you could pick more than one, just as long as the WB Shift is the same. Next is Shade, and there’s just one recipe (right now, anyway) to choose from, so that could be C3. Then select Kelvin, and pick one of those recipes to be C4. Fluorescent 1 is next, and there’s only one recipe to choose from, so that could be C5. Same for Fluorescent 2, and that could be C6. Ditto for Incandescent, and that could be C7. If you picked two Auto and two Daylight recipes (that shared the same WB Shift), then you could skip two of the White Balance options that only have one recipe.
Using Filter by White Balance to help you select recipes for your C1-C7 Custom Presets will make your shooting experience more enjoyable because you won’t have to remember to adjust the WB Shift each time you change to a different Custom Preset.
Custom Recipe (Blank Recipe Cards)
If you’ve ever created your own film simulation recipe, or if you’ve found some elsewhere that you like (perhaps on the Fuji X Weekly Community Recipes page), you will soon be able to add them to your App! A new feature will be blank recipe cards that you fill out. You will even be able to add your own pictures from your camera roll! At some point down the road the idea is that you’ll be able to export, import, and share these custom recipes (that ability won’t be in this update). Several of you have asked for blank recipe cards, and soon you’ll have them! This will be a fun new feature that some of you will really appreciate.
There are, of course, a number of other smaller improvements that are coming with the App update—this is just a sneak peek at three of the bigger ones. With any luck, the update should be out before the end of the month. Oh, and we’ve already begun working on the following update (for sometime next year) that will include a number of other great new features and improvements.
Lately I’ve been really enjoying the new Eterna Bleach Bypass film simulation found on the Fujifilm X-T4, X-S10, X-E4, and X-T30 II cameras. It occurred to me that those with “older” cameras, like X-Trans III and the X-T30 and X-T3, are missing out, so I wanted to do something about it. Now back in May I created a recipe for these cameras called Chrome Bypass that sort of fulfills this, but it wasn’t an attempt necessarily at mimicking the Eterna Bleach Bypass film simulation; however, I used it as a starting point for this recipe. After much adjusting and experimenting, I decided that this was the closest that I could get to Eterna Bleach Bypass for those without it.
The Eterna Bleach Bypass film simulation is intended to resemble cinematic film that’s had the bleach skipped during development. It has low-saturation and high-contrast, and almost a silvery aesthetic. This recipe isn’t a 100% match to the film simulation, but it’s as close as you’re likely to get. And it produces some really nice results—I very much enjoyed using it!
This recipe is intended for those who have a Fujifilm X-Pro2, X100F, X-E3, X-H1, X-T2, X-T20, X-T30, or X-T3 camera. If you have an X-Pro3 or X100V, you can use this recipe, too, but you’ll have to decide what Grain size you want (either Small or Large). Those with an X-T4, X-S10, X-E4, or X-T30 II can also use this recipe (after deciding on Grain size), but I would recommend the Ferrania Solaris FG 400, Muted Color, Silver Summer, or LomoChrome Metropolis recipes instead, which use the Eterna Bleach Bypass film simulation.
PRO Neg. Std Dynamic Range: DR400 Highlight: +3 Shadow: +3 Color: -4 Color Chrome Effect: Off or N/A Sharpness: 0 Noise Reduction: -4 Grain Effect: Weak White Balance: Incandescent, +8 Red & -9 Blue ISO: Auto up to ISO 6400 Exposure Compensation: 0 to +2/3 (typically)
Sample photographs, all camera-made JPEGs, captured with a Fujifilm X-T30 using this “Eterna Bleach Bypass” film simulation recipe:
Warning Falling Bike – Farmington, UT – Fujifilm X-T30
Lost Mouse Hat – Layton, UT – Fujifilm X-T30
November Leaves – Fruit Heights, UT – Fujifilm X-T30
Leaves Along the Autumn Path – Fruit Heights, UT – Fujifilm X-T30
Path Covered in Autumn Leaves – Fruit Heights, UT – Fujifilm X-T30
Fallen Tree Across the Gap – Fruit Heights, UT – Fujifilm X-T30
Yellow Leaves in the Forest – Fruit Heights, UT – Fujifilm X-T30
Red Leaves in the Forest – Fruit Heights, UT – Fujifilm X-T30
Little Red Berries Dangling – Layton, UT – Fujifilm X-T30
Nobody pays me to write the content found on fujixweekly.com. There’s a real cost to operating and maintaining this site, not to mention all the time that I pour into it. If you appreciated this article, please consider making a one-time gift contribution. Thank you!
Light on the Rock – Farmington, UT – Fujifilm X-E4 – “Ferrania Solaris FG 400”
Ferrania is an Italian film manufacturer that’s been making photographic film since the 1920’s. For a long time they were owned by 3M. They were perhaps best known for producing films for “generic” brands, but they also had their own products that they sold. One Ferrania brand line was called Solaris, a color negative emulsion available in ISO 100, 200, and 400 varieties. The history of the Solaris line is a little vague. There have been a number of different versions produced from perhaps the 1980’s until very recently, and some of these had significantly different aesthetics. This recipe seems to be close to Ferrania Solaris FG 400, which was sold in the late-1990’s and early-2000s. It was known for having a lot of contrast (for a color negative film), low saturation, and a slight warm cast (a bit unusual for a European film). Ferrania Solaris FG 400 Plus, which came out later, definitely had a different look (more similar to Superia), and this recipe is not a close match for that emulsion.
I didn’t set out to mimic the look of Ferrania Solaris FG 400—it just so happens to look like it. This recipe is actually Kodak Portra 400 v2 (and also Vintage Vibes) except with the Eterna Bleach Bypass film simulation (instead of Classic Chrome and Classic Negative, respectively). Those two recipes are personal favorites, so it’s not too surprising that simply changing the film simulation produces good results. This recipe does a good job of (unintentionally) mimicking Ferrania Solaris FG 400, but one flaw is that it’s a bit too warm (compared to the film), and it’s more like shooting the film with a warming filter attached to the lens (a common technique when shooting film).
Bike in the Steely Sky – Farmington, UT – Fujifilm X-E4
Because this recipe uses the Eterna Bleach Bypass film simulation, it’s only compatible with the Fujifilm X-T4, X-S10, X-E4, and X-T30 II cameras. As a reminder, Clarity slows the camera down considerably, as it takes a noticeable moment to save the exposure to the card. You could, alternatively, instead of Clarity, use a diffusion filter, such as the 5% CineBloom filter or 1/8 Black Pro Mist, with this recipe.
Eterna Bleach Bypass Dynamic Range: DR400 Highlight: 0 Shadow: -2 Color: +2 Noise Reduction: -4 Sharpening: -2 Clarity: -2 Grain Effect: Strong, Small Color Chrome Effect: Strong Color Chrome Effect Blue: Weak White Balance: 5200K, +1 Red & -6 Blue ISO: Auto, up to ISO 6400 Exposure Compensation: +1/3 to +1 (typically)
Example photographs, all camera-made JPEGs using this new Eterna Bleach Bypass film simulation recipe on my Fujifilm X-E4:
Wet Berries 1 – Farmington, UT – Fujifilm X-E4
Wet Berries 2 – Farmington, UT – Fujifilm X-E4
BrightLeaves in a Dark Forest – Fruit Heights, UT – Fujifilm X-E4
Pumpkin & Stem – Farmington, UT – Fujifilm X-E4
Leaves Around A Tree – Farmington, UT – Fujifilm X-E4
Leaves of Autumn – Fruit Heights, UT – Fujifilm X-E4
Dead Leaf – Fruit Heights, UT – Fujifilm X-E4
Blackberry Bush Under Tree Trunks – Farmington, UT – Fujifilm X-E4
Heart of Nature – Fruit Heights, UT – Fujifilm X-E4
Girl in the Forest – Fruit Heights, UT – Fujifilm X-E4
Girl with Pumpkin Head – Fruit Heights, UT – Fujifilm X-E4
Plant on Books – Farmington, UT – Fujifilm X-E4
Shelf Decor – Farmington, UT – Fujifilm X-E4
Clouds Around The Mountain – Layton, UT – Fujifilm X-E4
Hill & Storm – Farmington, UT – Fujifilm X-E4
Francis Peak Peeking – Farmington, UT – Fujifilm X-E4
Nobody pays me to write the content found on fujixweekly.com. There’s a real cost to operating and maintaining this site, not to mention all the time that I pour into it. If you appreciated this article, please consider making a one-time gift contribution. Thank you!
One benefit of becoming a Fuji X Weekly App Patron is that you get early-access to some new film simulation recipes. There are, of course, a number of reasons why you should become a Fuji X Weekly Patron, including Early-Access Recipes—perhaps the best benefit might be the ability to quickly and easily find the recipes that are compatible with your camera. The best App experience is reserved for Patrons.
Currently there are 10 Early Access Recipes on the App. Right now these recipes are only available to Patrons, but they will eventually become free to everyone as new Early-Access Recipes replace them. Several are due to be replaced soon, so this list will probably look significantly different before the end of the year.
Let’s take a look at the current 10 Patron Early-Access Recipes!
This recipe is intended to resemble CineStill 800T film, which is Tungsten balanced. Film can have many different aesthetics, depending on how it’s shot, developed, scanned or printed, and viewed, and this recipe is modeled after one particular look from this film. It’s good for night photography, but can produce interesting results in other light conditions.
Snow on the Stormy Mountain – Farmington, UT – Fujifilm X-E4
Empty Harmons Fuel Stop – Farmington, UT – Fujifilm X-E4
Ready To Go Nowhere – Farmington, UT – Fujifilm X-E4
This is essentially the same CineStill 800T recipe above, but adapted for use on the X-Pro3 and X100V cameras. They’re nearly identical, yet very subtly different. Those with an X-T4, X-S10, X-E4, and X-T30 II camera can use it, too, and you get to decide if you like this recipe or the one above better.
This recipe resembles expired Kodacolor VR film. This film dates back to the early 1980’s, and is a predecessor to ColorPlus 200. A great option for a vintage analog aesthetic.
Inside City Creek – Salt Lake City, UT – Fujifilm X-T30
Stones & Glass Ceiling – Salt Lake City, UT – Fujifilm X-T30
I described this one as an “artist’s recipe” because it produces a look similar to famed Hudson River School painter Albert Bierstadt, particularly his Yosemite paintings. It’s one of my absolute favorites!
Sentinel & Merced – Yosemite NP, CA – Fujifilm X100V
Yosemite Creek – Yosemite NP, CA – Fujifilm X100V
El Cap & Merced – Yosemite NP, CA – Fujifilm X100V
This recipe was modeled after some old photographs that someone shared with me. In the right conditions it can produce incredibly excellent vintage results.
Vintage Berries – Farmington, UT – Fujifilm X100V
Water Tower – Salt Lake City, UT – Fujifilm X100V
Suburban Reed Evening – Farmington, UT – Fujifilm X100V
The name is not a typo. Nor is there a film called “Porto 200.” But there is an X-Trans II recipe called Porto 200 (named after Porto, Portugal), and this is an adaptation of it for X-Trans III plus X-T3 and X-T30 cameras.
Pumpkin – Farmington, UT – Fujifilm X-T1 – “Kodacolor 200”
For this recipe, I was attempting to recreate a Kodak Portra 400 NC aesthetic. A couple of decades ago, Portra (both the ISO 160 and ISO 400 emulsions) came in two versions: NC (“Neutral Color”) and VC (“Vivid Color”). Kodak later revised the film to be something in-between the two, which they simply called Portra 160 and Portra 400. This recipe is, I believe, in the general ballpark of Portra 400 NC, but not exactly right; however, I like the results anyway. So if this recipe is close to Kodak Portra 400 NC, why did I call it Kodacolor 200? Because I think it is actually a little closer to Kodacolor 200, which is a variety of Kodacolor VR, and related to ColorPlus 200. I wouldn’t call it an exact match to Kodacolor 200, but that’s the film this is most likely closest to. If you want a Portra 400 NC or Kodacolor 200 aesthetic, this recipe is relatively similar to both.
There’s a fair amount of contrast produced by this recipe, which looks really good in conditions without harsh light. In bright daylight, the contrast might be a little too much, perhaps more closely resembling push-processed film, or (to a lessor extent) even bleach-bypassed Portra. On bright days, you might consider dropping both Shadow and Highlight to +1 if you find it to be too contrasty. I believe this film simulation recipe produces its best results when the sun is a little obscured, but not heavy overcast; however, it’s possible to get good results in many different circumstances. If your X-Trans II camera has Classic Chrome, I invite you to give this recipe a try—it’s a great high-contrast, low saturation option.
Power Pole Cup – Farmington, UT – Fujifilm X-T1 – “Kodacolor 200”
Classic Chrome Dynamic Range: DR200 Highlight: +2 (Hard) Shadow: +2 (Hard) Color: -2 (Low) Sharpness: -1 (Medium-Soft) Noise Reduction: -2 (Low) White Balance: 3200K, +8 Red & -8 Blue ISO: Auto up to ISO 3200 Exposure Compensation: 0 to +2/3 (typically)
Example photographs, all camera-made JPEGs captured on my Fujifilm X-T1 using this Kodacolor 200 film simulation recipe:
Phragmites – Farmington, UT – Fujifilm X-T1
Touch of Red – Salt Lake City, UT – Fujifilm X-T1
Pumpkin Stem – Farmington, UT – Fujifilm X-T1
Autumn Shrub – Farmington, UT – Fujifilm X-T1
Ground Leaves – Farmington, UT – Fujifilm X-T1
Neighborhood Autumn Tree – Farmington, UT – Fujifilm X-T1
Creek Path in Autumn – Farmington, UT – Fujifilm X-T1
Nobody pays me to write the content found on fujixweekly.com. There’s a real cost to operating and maintaining this site, not to mention all the time that I pour into it. If you appreciated this article, please consider making a one-time gift contribution. Thank you!
Elite Chrome 200 was a “high-ISO” color transparency film made by Kodak during the 1990’s and into the mid-2000’s. It was one of those films you could find at most corner drug stores, and you typically would chose it if you ran out of film while out-and-about and needed something. Elite Chrome was a low-budget Ektachrome film. A rumor that I remember about Elite Chrome 200 is that it was actually Ektachrome E200 that didn’t pass the quality control inspection, but I have no idea if that was true or not. Interestingly, Kodak claimed that Elite Chrome 200 was the lowest-contrast ISO 200 reversal film on the market. Because of how it responded to C-41 chemistry, it was a popular option for cross-processing.
I shot several rolls of Elite Chrome 200 film back in the day. Unfortunately, Ektachrome had a tendency to fade over time—it’s not an especially great archival film. I actually made a recipe mimicking faded Elite Chrome 200. This recipe is more like if the film wasn’t faded. I wasn’t intentionally intending to recreate Elite Chrome—in fact, I stumbled into this recipe when I used Classic Chrome instead of Classic Negative with my Fujicolor Superia 800 recipe. I was pretty shocked by just how good it looked! Sometimes changing the film simulation can produce good results, and sometimes (like when Omar Gonzalez used Classic Chrome instead of Classic Negative with my Agfa Vista recipe) it doesn’t produce good results. Fortunately for you, this is an example of when it works, and it just so happens by chance to resemble Elite Chrome 200 film.
The Fallen – Fruit Heights, UT – Fujifilm X-E4 – “Elite Chrome 200”
This film simulation recipe is compatible with all X-Trans IV cameras, except for the X-T3 and X-T30. If you have an X-Pro3, X100V, X-T4, X-S10, X-E4, or X-T30 II, this recipe is completely compatible with your camera. If you do have an X-T3 or X-T30 and want to use this recipe, you’ll have to ignore Grain Size (set it to Strong), ignore Color Chrome FX Blue, and ignore Clarity. In lieu of Clarity, use a diffusion filter, such as a 10% CineBloom or 1/4 Black Pro Mist.
Classic Chrome Dynamic Range: DR400 Highlight: -1 Shadow: +1 Color: -1 Noise Reduction: -4 Sharpening: -1 Clarity: -4 Grain Effect: Strong, Large Color Chrome Effect: Strong Color Chrome Effect Blue: Weak White Balance: Daylight, -1 Red & -3 Blue ISO: Auto, up to ISO 6400 Exposure Compensation: +1/3 to +2/3 (typically)
Example photographs, all camera-made JPEGs using this Elite Chrome 200 film simulation recipe on my Fujifilm X-E4 & Fujifilm X100V:
Pumpkin Head – Fruit Heights, UT – Fujifilm X-E4
Colorful Fall Trees – Farmington, UT – Fujifilm X100V
Little Yellow Leaf – Fruit Heights, UT – Fujifilm X-E4
October Tree Trunks – Fruit Heights, UT – Fujifilm X-E4
Sunlight In The Golden Forest – Fruit Heights, UT – Fujifilm X-E4
Autumn Forest Light – Fruit Heights, UT – Fujifilm X-E4
Autumn Woods – Fruit Heights, UT – Fujifilm X-E4
Autumn Creek – Fruit Heights, UT – Fujifilm X-E4
Late October Leaves – Fruit Heights, UT – Fujifilm X-E4
Raindrops on a Branch – Farmington, UT – Fujifilm X100V
Leaves on Old Fallen Tree – Fruit Heights, UT – Fujifilm X-E4
Jo in the Forest – Fruit Heights, UT – Fujifilm X-E4
Happy Johanna – Farmington, UT – Fujifilm X-E4
Evening Interstate – Farmington, UT – Fujifilm X100V
Nobody pays me to write the content found on fujixweekly.com. There’s a real cost to operating and maintaining this site, not to mention all the time that I pour into it. If you appreciated this article, please consider making a one-time gift contribution. Thank you!
Red Mountain – Farmington, UT – Fujifilm X-T30 – “Eterna v3”
This film simulation recipe began as an attempt to recreate a certain look. It wasn’t successful, and I didn’t like the look of it, but it sat as a C3 preset on my Fujifilm X-T30 for many months. Recently I decided to revisit this preset, and, after a couple of quick adjustments, I had something that I liked. Unfortunately, it doesn’t mimic the aesthetic that I was asked to recreate. Fortunately, it looks pretty good nonetheless, so I’m making it an official recipe.
What does this film simulation recipe resemble? There are some similarities to Eterna 250D developed using the ECN-2 process, but it’s not an exact match. Maybe push-processed Eterna 250D? I’m still not sure, as I didn’t find very many examples to compare it to. Since I wasn’t sure what to call this recipe, I named it Eterna v3. The original Eterna recipe can be found here and the Eterna v2 recipe can be found here.
Yellow Path – Fruit Heights, UT – Fujifilm X-T30 – “Eterna v3”
While I think this recipe does well enough in many circumstances, it seems to be best suited for sunny days, including “golden hour” photography. This recipe isn’t directly compatible with the Fujifilm X-H1 because it uses Color Chrome Effect; however, if you want to use it on the X-H1, simply ignore CCE and try it anyway—it will look slightly different, but you might like it anyway. For “newer” X-Trans IV cameras, like the X-Pro3, X100V, X-T4, X-S10, X-E4, and X-T30 II, you’ll have to decide what Grain Size to select—either Small or Large—but otherwise this recipe is compatible with your camera.
Eterna Dynamic Range: DR400 Highlight: +2 Shadow: +3 Color: +4 Noise Reduction: -4 Sharpening: -2 Grain Effect: Strong Color Chrome Effect: Strong White Balance: Auto, -1 Red & -1 Blue ISO: Auto up to ISO 6400 Exposure Compensation: +1/3 to +2/3
Below are all camera-made JPEGs captured using this Eterna v3 Film Simulation recipe on my Fujifilm X-T30 camera:
Girl on Playground Swing – Farmington, UT – Fujifilm X-T30
Red Playground Structure – Farmington, UT – Fujifilm X-T30
Caution for Falling Bicycles – Farmington, UT – Fujifilm X-T30
Yellow Leaves at a Park – Farmington, UT – Fujifilm X-T30
Yellow Leaves on the Ground – Fruit Heights, UT – Fujifilm X-T30
Nobody pays me to write the content found on fujixweekly.com. There’s a real cost to operating and maintaining this site, not to mention all the time that I pour into it. If you appreciated this article, please consider making a one-time gift contribution. Thank you!
Digital photography is convenient. You can review your pictures immediately after they’re captured—no waiting for rolls of film to come back from the lab. You can manipulate the images as much as you’d like in software to achieve any aesthetic that you can dream of. You can get extremely clean, sharp, bright, and vibrant pictures with extraordinary dynamic range that just wasn’t possible in the film era. Perfect pictures are prevalent today—a wonder of contemporary photography, no doubt.
Sometimes I think that digital photography is too good, too flawless, too sterile. Perfect pictures can be perfectly boring. Pulitzer-Prize winning author John Updike stated, “Perfectionism is the enemy of creation.” I think that statement is true in multiple aspects. For example, if you are working hard to create perfect pictures, you will not create very many images. I think, also, that creativity is rarely born out of perfectionism. Creativity is serendipitous. It’s not calculated. Scott Adams (of Dilbert fame) wrote, “Creativity is allowing yourself to make mistakes. Art is knowing which ones to keep.”
With film photography, mistakes happen fairly frequently. You don’t know what you have until you have it sometime later. There are a lot of variables that can affect the outcome, which are sometimes out of your control. Occasionally you accidentally and unknowingly discovery something extraordinary. There’s a lot of uncertainty, and when you fortuitously stumble upon something interesting, there’s a lot of joy in that. Film photography is imperfect—it has flaws—and, because of that, it is rewarding. This is one reason why there’s a resurgence of interest in analog pictures.
Film photography is inconvenient. The serendipity of it is fascinating, but I prefer the instant reward of digital. I’m not patient enough anymore for analog. Don’t get me wrong, I shot film for many years. I prefer how film looks, but digital is more consistent, convenient, cheaper (after the initial investment is made), and quicker, so I choose digital. But what if it is possible to get the best of both worlds? What if you could get the “film look” from your digital camera? What if you could do it without editing. Straight-out-of-camera. No Lightroom or Photoshop needed. Would you try it?
What exactly is the so-called film look? That’s actually a difficult question to answer, because one film can have many different aesthetics, depending on how it was shot, developed, scanned and/or printed, and viewed. There have been hundreds of different films available over the years, each with unique characteristics. Film can have so many different looks that it could take a lifetime to try and describe them all.
Most simplistically, the film look can be defined as a picture that looks like it was shot on film, but really the answer is more elusive than that. The best way to understand it would be to look at pictures captured with film. Find prints from the 1990’s or 1980’s. Photographic paper (and film, too) fades over time, so the further back you go, the more likely it will appear degraded. Maybe that’s something you prefer? There are as many different film looks as there are tastes, and there’s certainly not a one-size-fits-all answer to what exactly film looks like.
Captured on Elite Chrome 200 color reversal film that has faded.
The biggest difference between film and digital is how highlights are handled. With film, there’s a gradation to white that’s often graceful, but with digital it is much more abrupt. Shadows can also sometimes be more gradual and graceful with film than digital, but definitely not to the same extent as highlights, and definitely not always. Another difference is that film grain is usually considered more beautiful and artful than digital noise. With film photography, there are sometimes surprises that stem from gear (or film) imperfections that don’t typically happen naturally with digital capture. Beyond that, digital images can be effectively manipulated in post-editing to resemble film photographs, especially in the era of Lightroom presets and software filters.
There are two responses that I expect to receive. First, someone will say, “Shoot film if you want the film look.” Nobody is going to argue against that, but this article is not about merely getting the film look—it’s about getting the film look from your digital camera, because digital is more convenient. Second, a person will argue, “I can easily get this look with software, so why bother doing it in-camera?” Getting the look straight-out-of-camera saves time, simplifies the photographic process, and makes capturing pictures even more enjoyable. There’s no right or wrong way to do things—I’m just discussing one method, which you may or may not appreciate. If you enjoy post-processing, that’s great! I personally don’t enjoy it, so I go about things differently, which works for me.
1. Shoot A Fujifilm Camera
Fujifilm X-E4.
Fujifilm X-T30.
Fujifilm X100V.
Step One to achieve the film look from your digital photos without the need to edit is to buy a Fujifilm camera. Which one? It doesn’t matter. If you already own one, you can skip ahead to Step Two.
Why do you need a Fujifilm camera? Why not a Canon, Sony, or Nikon? Because Fujifilm has, in my opinion, the best JPEG engine in the industry. They’ve used their vast experience with film to give their digital cameras an analog soul. In other words, Fujifilm has made it easier than any other brand to get a film look out-of-camera. Could you do it with another brand? Sure—I created JPEG settings for film looks on Ricoh GR cameras. You can do something similar with other brands, but, in my experience, Fujifilm gives you more and better tools to do this. The best brand for achieving a film look that doesn’t require post-processing is Fujifilm, so that is why you need a Fujifilm camera.
I’ll recommend the Fujifilm X100V or Fujifilm X-E4, both of which I own and use often. I also own a Fujifilm X-T30, Fujifilm X-T1, and Fujifilm X-Pro1, and those are very capable cameras, too. Additionally, I’ve shot with a Fujifilm X100F, Fujifilm X-Pro2, Fujifilm X-T20, Fujifilm XQ1, Fujifilm XF10, Fujifilm X-T200, Fujifim X-A3, Fujifilm X-E1, and Fujifilm X-M1. It doesn’t matter which model you buy, but, if you can afford it, I would go for one the newer models (X-Pro3, X100V, X-T4, X-S10, X-E4, or X-T30 II), because they have more JPEG options, and it’s possible to get more looks out of those cameras. Don’t worry if a new camera is out of your reach, as there are many quality used options that are affordable.
Film simulation recipes are JPEG camera settings that allow you to get a certain look straight-out-of-camera. They’re basically a customization of the stock film simulations that come with the camera, adjusted to achieve various aesthetics. I’ve published over 175 film simulation recipes for Fujifilm cameras, most based on (or inspired by) classic film stocks. They’re free and easy to use. I even created a film simulation recipe app for both Apple and Android! If you have a Fujifilm camera, you should have the app on your phone. Film simulation recipes go a very long ways towards achieving a film look in-camera. Programming a recipe into your camera is kind of like loading a roll of film, except that you can capture as many frames as you wish on each roll, and change the film anytime you want.
There are a lot of wonderful options to choose from, including Kodachrome 64, Kodak Portra 400, Kodak Tri-X 400, Fujicolor C200, Fujicolor Pro 400H, AgfaChrome RS 100, and so many more! There are nearly 200 of them on this website, plus some more on the Community Recipes page. No matter your Fujifilm X camera, there are some great film simulation recipe options for you to use. I even have a number of unusual recipes, like Cross Process, Expired Slide, and Faded Negative, intended to mimic some alternative analog aesthetics. The three example pictures above are unedited (aside from, perhaps, some minor cropping), just to give you a brief taste of what recipes look like.
3.Use Diffusion Filters
10% CineBloom.
5% CineBloom.
5% CineBloom.
As I already mentioned, the biggest difference between digital images and film photographs are how highlights are handled (and, to a lesser extent, shadows). Diffusion filters help with this. They take the “digital edge” off of your pictures by bending a small percentage of the light that passes through the filter, which causes it to be defocused. The images remain sharp, but a slight haziness is added, especially in the highlights, which produces a more graceful gradation to white.
There are various types of diffusion filters by a few different brands. I recommend Black Pro Mist filters by Tiffen or CineBloom filters by Moment. You want the effect to be subtle, so I suggest a 1/8 or 1/4 Black Pro Mist—I used a 1/4 in the picture at the very top of this article—or a 5% or 10% CineBloom, which I used in the three pictures above; however, I have seen some good results with the stronger options (1/2 Black Pro Mist and 20% CineBloom). A slight effect from a diffusion filter in the right situations can subtly improve a photograph’s analog appearance.
I love using vintage lenses on my Fujifilm cameras, because they often have flaws that give pictures character. Some of the charm of analog photography stems from imperfect gear—that serendipity I mentioned earlier is often from flawed glass. Modern lenses are precision engineered and meant to give you perfect pictures. But they can be too good and too sharp. They’re great if you photograph test charts, but vintage lenses often have seemingly magical qualities that make real-world pictures better, and definitely more film-like. A lot of time you can find these old lenses for pretty cheap, but you do need an adaptor to attach them to your Fujifilm camera.
If you don’t want to buy used gear and adaptors, a great alternative is to get yourself some inexpensive manual lenses, like the Pergear 50mm f/1.8, 7artisans 50mm f/1.8, and Meike 35mm f/1.7. There are, of course, lots more manual options like these, many of which have flaws and character similar to vintage lenses, except that they’re brand-new and don’t need adaptors. Manual lenses are trickier to use, especially if you don’t have much experience with them, but I find them to be a rewarding, delivering wonderfully imperfect photographs.
With digital photography, you have many tools to make sure your focus is spot-on; if you are unsure that you precisely nailed it, you can immediately review the image and zoom in to make sure, and retake if necessary. With film photography, not only are the focus tools much more limited, you don’t even know if you got it exactly right until the film comes back from the lab. If you study classic photography, you’ll notice that many iconic pictures didn’t spot-on nail the focus. You’ll even notice this in old movies and television shows, too. It was common, and nobody cared. It has become a small part of the film look.
Worry more about composition and storytelling, and less about getting perfect focus. In fact, my recommendation is to not review the LCD after each shot to check. Take the picture, and if you got focus perfect, great! And if you didn’t, don’t let the imperfection bother you, but celebrate that a little softness can be a part of the analog aesthetic. A little blur is not always bad, especially if the picture is otherwise interesting or compelling.
One of the big differences between digital and film is that film has lovely silver grain while digital has ugly noise. Grain can be ugly, too, but digital noise is generally regarded as undesirable, and usually it is, while grain is general regarded as artful. Fujifilm has programmed their cameras in such a way that the noise has a more film-grain-like appearance than other brands. It’s definitely not an exact match to any film grain, but it’s certainly better than typical ugly noise. So why not incorporate it into your pictures?
A lot of photographers are afraid to use high ISOs. Back in the film days, I remember that ISO 400 was considered to be a high-ISO film. Some people thought you were nuts if you used an ISO 800 or 1600 film. ISO 3200 film was only for the most daring, or for use under extreme circumstances. Early digital cameras were pretty bad at higher ISOs, too, but camera technology has made incredible progress, and now cameras are pretty darn good at high ISO photography. I routinely use up to ISO 6400 for color photography, and even higher for black-and-white. Those ultra-high ISOs just weren’t possible or practical 10 or so years ago. Now combine high-ISO photography with Fujifilm faux grain (found on X-Trans III & X-Trans IV cameras), and the pictures begin to appear a little less digital and a bit more film-like.
Transparency film often requires a very precise exposure because there’s very little latitude for overexposure or underexposure. Negative film often has a much greater latitude—generally speaking it can tolerate more overexposure than underexposure. Each film is different. But here’s the thing: you don’t know if you got it right until later when the film is developed. In the moment you don’t know for sure if the exposure is really correct. With experience you can get pretty good, and exposure bracketing can help (not something you want to do all of the time because you’ll go through your film too quickly), but it’s almost a guarantee that you’ll end up with a few overexposed or underexposed frames. Sometimes this can affect the aesthetic or mood of the image, and by chance your picture is actually more interesting because of your mistake—that analog serendipity again. If you discover something you really like, you might even begin to do it on purpose (like overexposing Fujicolor Pro 400H by several stops).
Your digital camera has many great tools to help you get the exposure perfectly correct, which is great. And if you don’t get it right, you can know right away, and capture another exposure if need be, or fix it later by adjusting the RAW file. However, purposefully not getting the exposure just right, whether by overexposing or underexposing, is a good way to mimic the film experience, and sometimes you’ll get an unexpected result, which can be a very happy accident. I wouldn’t do this all of the time, but occasionally it is a fun and fruitful exercise.
Step One, which is using a Fujifilm camera, and Step Two, which is using film simulation recipes, are the most critical of these seven tips. You could use Ricoh GR cameras instead of Fujifilm, but I definitely recommend using Fujifilm. Step Three through Step Seven are optional, and they aren’t necessarily intended to be used all together or all of the time, although you certainly can if you want. Pick a couple of them—perhaps diffusion filter and vintage lens or high-ISO and underexposure—and see what results you get.
There are two things that I’d like for you to get out of this article. First, you don’t need software or editing apps to achieve an analog aesthetic. You can do it in-camera. All of the pictures in this article are unedited (except for some minor cropping). This saves you a whole bunch of time, and you might even find the process more fun. Second, I hope that this article inspires you to try something new. Don’t be afraid to experiment. Mistakes can be highly rewarding, and you might even discover something extraordinary.
A few more example photograph:
Vintage Color recipe & 1/4 Black Pro Mist filter.
Fujicolor Pro 400H recipe & 1/4 Black Pro Mist filter.
Nobody pays me to write the content found on fujixweekly.com. There’s a real cost to operating and maintaining this site, not to mention all the time that I pour into it. If you appreciated this article, please consider making a one-time gift contribution. Thank you!
I’ve received feedback from a number of Fuji X Weekly App users with this suggestion: explain better the benefits of becoming a Patron. I’ve heard stories like, “I’ve had the app for awhile, but I didn’t realize how much better it was when you subscribe. I wish I’d known this months ago!” Let me lay out for you the benefits of becoming a Fuji X Weekly App Patron.
First, before I get too far into this, let me briefly explain what the App is and why you should go download it right now, if you don’t already have it on your phone. The Fuji X Weekly App is a mobile film simulation recipe library containing over 175 recipes for Fujifilm cameras. Film simulation recipes are JPEG settings that allow you to achieve various looks, many based on classic film stocks, straight-out-of-camera without the need to edit. These settings save you time, simplify the photographic process, and make capturing pictures even more enjoyable. If you own a Fujifilm camera, you should try these recipes and have the App on your phone. So take a moment right now to download the Fuji X Weekly App if you don’t already have it.
My film simulation recipes are completely free, and the Fuji X Weekly App is also free. There is absolutely no cost to you. It’s my gift to the Fujifilm community—it’s a real honor if you find it beneficial to your photography, as I’m happy to be helpful.
Within the App there is an option to become a Fuji X Weekly Patron (click the gear icon), which is $19.99 (USD + tax) for an annual subscription. Why should you subscribe? What benefits do Patrons get?
Becoming a Patron unlocks the best App experience.
This app does have some advanced features that can be unlocked by becoming a Fuji X Weekly Patron! These advanced features include filtering by sensor or camera, as well as by film simulation or color/B&W, and the ability to favorite recipes for quick access. Let’s take a closer look at the benefits of these features.
Filtering
If you are using the free version of the App, you have to look at each recipe individually to discover which cameras it is compatible with. For example, if you open the Agfa Optima 200 recipe on the App and scroll down a little, it lists all of the fully compatible cameras that this recipe will work on. If your camera is listed, you can use the recipe, and if your camera isn’t listed, you probably need to keep looking. Alternatively, you could cross-reference the recipes using this website, which are sorted by sensor, as a method for narrowing your search.
There is an easier way, if you are a Fuji X Weekly App Patron.
If your camera is, let’s say, a Fujifilm X-S10, you can Filter By Sensor, and select X-Trans IV, and you’ll find the Agfa Optima 200 recipe in the list, because that recipe is compatible with X-Trans IV cameras. If your camera is, let’s say, an X-E3, you can Filter By Sensor, and you’ll find the Agfa Optima 200 recipe in that list, too, because that recipe is also compatible with X-Trans III cameras. Another option is to Filter By Camera. You might think that the Agfa Optima 200 recipe would still show up—and it will for the X-E3—but it won’t show up for the X-S10. Why? Because that recipe isn’t fully compatible with all X-Trans IV cameras, and the X-S10 is one of those that the recipe won’t fully work with; however, it’s 99% compatible, so with one change you can use it. You see, newer X-Trans IV cameras have Grain Size (either Small or Large) that you must choose, a feature not found on older X-Trans IV and X-Trans III cameras, so that’s why it is only 99% compatible.
You have two options to narrow down the recipes that you can use—Sensor or Camera—and understanding these tools can help you find the recipe that you’re looking for. If you want a recipe that is 100% compatible with your camera, then Filter By Camera is what you want to use. Note that you can only choose one camera. If you want to find the most recipes that will work with your camera, but perhaps some aren’t 100% compatible (like Agfa Optima 200 on the X-S10) and you might have to make a choice on a setting (like Grain Size), or accept that it might produce a slightly different look (more on this in a moment), or you might even have to sort through some non-compatible recipes, then Filter By Sensor is what you want to use. Note that you can choose as many sensors as you’d like. If you have an X-S10 and if you Filter By Camera, you’ll find over 60 recipes that are 100% compatible with your camera. If you Filter By Sensor, choosing X-Trans III, X-Trans IV, and GFX, you’ll find over 140! Yes, you can use those 140+ recipes, but that’s a lot to go through.
Other cameras are in a similar situation. Bayer sensor cameras only have six recipes, but you can also use X-Trans I and X-Trans II recipes, although the results will be slightly different. You might like it, you might not, but you won’t know unless you try. If you Filter By Sensor and choose X-Trans I, X-Trans II, and Bayer, you’ll find nearly 40 recipes that will work on your Bayer camera. It’s a similar story if you have an X-Trans II camera. For GFX, many X-Trans IV recipes are compatible with GFX, but will render just slightly different. The bottom line is that you can Filter By Camera and get a limited list of fully compatible recipes that will look as intended on your camera, or you can Filter By Sensor (and even select multiple sensors) and potentially get a much bigger list of recipes that may or may not be good options for your camera model—you get to decide how adventurous you want to be.
In many cases, no matter if you Filter By Sensor or Filter By Camera, there’s still going to be a lot of recipes to choose from, and it can be overwhelming. That’s where Filter By Simulation or Filter By Color/BW comes in handy. If you know that you want a B&W recipe, you can remove all of the color recipes from the list, and if you know that you want a color recipe, you can remove all of the B&W recipes from the list. If you know that you want a Classic Chrome recipe, you can display only those that use Classic Chrome, or if you know that you want an Eterna recipe, you can display only those that use Eterna. These are great tools to really narrow down your search, which will save you time!
Fuji X Weekly App Patrons have a much easier time finding the recipes that they’re looking for. Yes, you could scroll through 175+ recipes individually to find the ones for your camera, or you can use the Filter options to quickly locate exactly what you want, and only Patrons can do that.
Favoriting
Another wonderful tool that is unlocked by becoming a Patron is the ability to Favorite recipes. Once you’ve narrowed down your list with the Filtering options, you can “Star” recipes, and they’ll show up at the top of the list. To Favorite a recipe, with the recipe open, tap the star in the upper-right corner. The Filtering options apply to Favorite recipes, which is demonstrated in the above screenshots. What’s great about this is that, if you have multiple generations of sensors, say X-Trans II and X-Trans III, you can Favorite recipes for both, and when you Filter for your X-Trans II camera, only X-Trans II recipes will show up, and the X-Trans III recipes that you put a Star on won’t display, and vice versa. You can use the Favorite tool to keep track of the recipes that you currently have programmed into your camera, or to list the ones that you want to someday try, or to note the ones that you’ve used and you really like.
Becoming a Patron unlocks early-access recipes.
Fuji X Weekly Patrons also get early access to some new film simulation recipes! There are currently 10 “early-access” film simulation recipes on the App (marked by an aperture symbol), that only Patrons can view. These recipes will eventually be free to everyone, but right now they’re only available to Patrons. As new early-access recipes are cycled into the App for Patrons, the others will be made available to all. My favorite Patron early-access recipes currently on the App are Vintage Color, Old Kodak, Pushed CineStill 800T, Kodacolor VR, and Vintage Negative. Getting early-access to some new film simulation recipes is a fun reward for your support.
Becoming a Patron supports Fuji X Weekly
Nothing is free. My film simulation recipes are free to you, both on this website and on the App, but that doesn’t mean that they’re free—it just means someone else is paying for it. As you can imagine, creating and maintaining an app isn’t cheap. Same for a website. Creating and sharing these recipes takes a lot of time and effort and sometimes even money. All of this is to say that Patrons support the App and website and future film simulation recipes and more! Their support leads to other great things, too, like the Community Recipes page, and even recipes for Ricoh cameras. Patrons partner with Fuji X Weekly for the benefit of the Fujifilm community and beyond, and without their support all of these great things, including the App, wouldn’t happen. Also, if you found film simulation recipes and the app useful to your photography, this is a great way to show your appreciation.
I want to give a big “thank you” to all of the Fuji X Weekly App Patrons! If you’re not already, consider becoming a Patron today.
To conclude, Fuji X Weekly Patrons unlock some great tools for the best app experience, plus they get early-access to some new recipes while supporting Fuji X Weekly for the benefit of the Fujifilm community and more. It’s a win-win!
I want to mention here at the very end of this article that we’re busy building a big App update that will add some great new functions and features. We’re working hard to get this update out before December, and with any luck it will happen. I think you’ll really appreciate these improvements, as they’ll make the Fuji X Weekly App even better!
Episode 04 of SOOC was this morning. I want to give a big “Thank You” to everyone who tuned in and participated—you are the ones who make these episodes great! If you missed it when it was live, you can still watch it (above). We ran a little long (almost two hours!), but I hope you learned something, that you were inspired, and/or that it was entertaining enough to make it worthwhile. Asking for two hours of your time is a lot, and we really appreciate everyone who journeyed along with us today!
For those who may not know, SOOC is a monthly live video series, with each episode focused on a different film simulation recipe. It is a collaboration between Tame Your Fujifilm (Fujifilm X-Photographer Nathalie Boucry) and Fuji X Weekly (Ritchie Roesch). SOOC is a fun and educational experience where we not only talk about Fujifilm camera settings, but also answer your questions and give tips and tricks. Basically, we’re trying to help you master your Fujifilm camera, with a focus on simplifying your photographic workflow.
In this month’s episode we discussed my Kodacolor film simulation recipe, and viewed the wonderful pictures that you captured with this recipe. We also introduced the next recipe: Agfa Optima 200. Upload your pictures here to be featured in the next video! Episode 05 will be on November 18th, so mark your calendars, and I look forward to seeing you then!
If you appreciated Episode 04, be sure to hit the “thumbs up” button on YouTube. Also, help us spread the word by sharing the video on your social media accounts. Thanks so much!
Episode 04 of SOOC is live today! Join Fujifilm X-Photographer Nathalie Boucry (Tame Your Fujifilm) and Ritchie Roesch (Fuji X Weekly) as we discuss the Kodacolor film simulation recipe and so much more! This will be both educational and entertaining, and well worth your time. SOOC is an interactive program, so we need your participation! I personally invite you to tune in at 10 AM Pacific Time, 1 PM Eastern—if you are not sure what time it will be where you’re at, you can use this time zone converter. I hope to see you soon!
City Roses – Farmington, UT – Fujifilm X100V – “Pushed CineStill 800T”
The Fuji X Weekly app is free, yet becoming a Fuji X Weekly Patron unlocks the best app experience! One benefit of being a Patron is you get early access to some new film simulation recipes. These early-access recipes will eventually become available free to everyone in time, including this new one. In fact, many early-access recipes have already been publicly published on this blog and the app, so now everyone can use them. Patrons help support Fuji X Weekly and, really, without them there would be no app. So I want to give a special “thank you” to all of the Patrons!
A few days back I published a Patron early-access recipe called “Pushed CineStill 800T” that was compatible with the Fujifilm X-T4, X-S10, X-E4, and X-T30 II cameras, and I immediately received requests for an alternate version for the X100V and X-Pro3. I was able to get pretty darn close! While this new Patron early-access recipe is for those with an X100V or X-Pro3, it is also compatible with the X-T4, X-S10, X-E4, and X-T30 II, and if you have one of those cameras you will have to decide which version to use—even though they’re both nearly identical, you might prefer one over the other.
Both recipes mimic the look of push-processedCineStill 800T film. To create this aesthetic, I studied overcast daytime examples of the film, and, interestingly enough, it did quite well at night, too; however, I do believe it more faithfully mimics the film in cloudy daytime conditions—it does produce nice results in daylight or night, so feel free to use it anytime. Film can look different depending on how it is shot, developed, printed, or scanned. This recipe doesn’t replicate pushed CineStill 800T film under all circumstances, but in certain conditions it’s a good facsimile. I really like how this one looks, and I think some of you will really appreciate it, too!
If you are a Fuji X Weekly Patron, it’s available to you right now on the app!
Example photographs, all camera-made JPEGs captured using this “Pushed CineStill 800T” film simulation recipe:
Gas Pumps at Night – Farmington, UT – Fujifilm X-E4
Nighttime Neighborhood – Farmington, UT – Fujifilm X-E4
Night Walkway – Farmington, UT – Fujifilm X-E4
Nighttime Flowerpot – Farmington, UT – Fujifilm X-E4
A Fuji X Weekly reader asked me to mimic the look of some photographs that he shared with me. These were digital pictures that had been edited with software, but he was hoping to achieve this look straight-out-of-camera, if at all possible. It turns out that it is possible (although I only had three images to study, so I’m not completely certain this is an exact match, but I believe it is pretty close); however, it requires the Eterna Bleach Bypass film simulation, which, unfortunately, his camera does not have. If your camera does have Eterna Bleach Bypass, than you are fortunate because you can use this very interesting recipe!
What film does this recipe most closely mimic? The most similar film might be the (now discontinued) Konica Impresa 50, although it is certainly not an exact match. There are also some similarities to Portra that’s had the bleach skipped, although I wouldn’t say that this is an exact match for that, either. I don’t think this film simulation recipe is a faithful facsimile of any film, yet it produces a nice analog aesthetic anyway. It has strong contrast and very muted colors—almost monochrome. In a way, it’s the closest thing to black-and-white in color photography.
First Light on the Ridge – Farmington, UT – Fujifilm X-E4 – “Muted Color”
This recipe is only compatible with the Fujifilm X-E4, X-S10, X-E4, and X-T30 II cameras. If you have one of those cameras, I invite you to give this recipe a try! I know that it will be an instant favorite for some of you.
Eterna Bleach Bypass Dynamic Range: DR400 Highlight: -0.5 Shadow: +1 Color: -4 Noise Reduction: -4 Sharpening: 0 Clarity: -2 Grain Effect: Weak, Small Color Chrome Effect: Strong Color Chrome Effect Blue: Weak White Balance: Auto, +3 Red & -8 Blue ISO: Auto, up to ISO 6400 Exposure Compensation: 0 to +2/3 (typically)
Example photographs, all camera-made JPEGs captured using this “Muted Color” film simulation recipe on my Fujifilm X-E4:
Girl in Beanie – Farmington, UT – Fujifilm X-E4
Just Hangin’ Around – Farmington, UT – Fujifilm X-E4
At the Schoolyard – Farmington, UT – Fujifilm X-E4
Monkey Bars – Farmington, UT – Fujifilm X-E4
Neighborhood Fire Hydrant – Farmington, UT – Fujifilm X-E4
Grass & Leaves – Farmington, UT – Fujifilm X-E4
Berry Bush – Farmington, UT – Fujifilm X-E4
Pink Rose – Farmington, UT – Fujifilm X-E4
Single Rose – Farmington, UT – Fujifilm X-E4
Red Leaf – Farmington, UT – Fujifilm X-E4
Cross – Farmington, UT – Fujifilm X-E4
Mountain Trees in Autumn – Layton, UT – Fujifilm X-E4
Nobody pays me to write the content found on fujixweekly.com. There’s a real cost to operating and maintaining this site, not to mention all the time that I pour into it. If you appreciated this article, please consider making a one-time gift contribution. Thank you!
Snow on the Stormy Mountain – Farmington, UT – Fujifilm X-E4 – “Pushed CineStill 800T”
The Fuji X Weekly app is free, yet becoming a Fuji X Weekly Patron unlocks the best app experience! One benefit of being a Patron is you get early access to some new film simulation recipes. These early-access recipes will eventually become available free to everyone in time, including this new one. In fact, many early-access recipes have already been publicly published on this blog and the app, so now everyone can use them. Patrons help support Fuji X Weekly and, really, without them there would be no app. So I want to give a special “thank you” to all of the Patrons!
This new Patron early-access recipe is called “Pushed CineStill 800T” and is compatible with the Fujifilm X-T4, X-S10, X-E4, and X-T30 II X-Trans IV cameras. It mimics the look of push-processed CineStill 800T film. To create this aesthetic, I studied overcast daytime examples of the film, and, interestingly enough, it did quite well at night, too; however, I do believe it more faithfully mimics the film in cloudy daytime conditions—it does produce nice results in daylight or night, so feel free to use it anytime. Film can look different depending on how it is shot, developed, printed, or scanned. This recipe doesn’t replicate pushed CineStill 800T film under all circumstances, but in certain conditions it’s a good facsimile. I really like how this one looks, and I think some of you will really appreciate it, too!
If you are a Fuji X Weekly Patron, it’s available to you right now on the app!
Example photographs, all camera-made JPEGs captured using this “Pushed CineStill 800T” film simulation recipe:
Book & Minolta – Farmington, UT – Fujifilm X-E4
Happy Birthday Wish – Farmington, UT – Fujifilm X-E4
Ready To Go Nowhere – Farmington, UT – Fujifilm X-E4
Pipe Door – Farmington, UT – Fujifilm X-E4
Night Urban Path – Farmington, UT – Fujifilm X-E4
Empty Parking Garage – Salt Lake City, UT – Fujifilm X-E4
Empty Harmons Fuel Stop – Farmington, UT – Fujifilm X-E4
Night Hydrant – Farmington, UT – Fujifilm X-E4
Wet White Blooms – Farmington, UT – Fujifilm X-E4
Little Wild Berries – Farmington, UT – Fujifilm X-E4
Clouds Building Over Green Ridge – Farmington, UT – Fujifilm X-E4
Pumpkins In A Patch – Farmington, UT – Fujifilm X-E4
Wrong Way Shadow – Farmington, UT – Fujifilm X-E4 – “Silver Summer”
This film simulation recipe, called Silver Summer, was a Patron early-access recipe on the Fuji X Weekly App, and Patrons have had access to it since July. One benefit of being an app Patrons is that you get early-access to some new film simulation recipes, and this was one of them, but now it is available to everyone, since a different early-access recipe is now on the app. The Silver Summer recipe has some unintentional similarities to Lomography Cine 200, but it’s definitely not an exact match. I wasn’t intending to mimic a specific film, but a specific aesthetic that I was asked to create. While it’s not modeled after a specific film, it definitely has an analog look. I really like how this one turned out, and I think some of you will really appreciate it, too!
I found that this recipe is particularly well suited for sunny days. It uses the Eterna Bleach Bypass film simulation, and produces a silvery look similarly to film that’s had the bleach skipped. If you are looking for a film-like-look that’s a bit “different” than what everyone else is shooting, this is a recipe you’ll want to try.
This film simulation recipe is compatible with the Fujifilm X-T4, X-S10, X-E4, and X-T30 II X-Trans IV cameras. Unfortunately, because it requires Eterna Bleach Bypass, it’s not compatible with the X100V or X-Pro3, and because it uses Clarity and Color Chrome FX Blue, it’s not compatible with the X-T3 or -T30.
Eterna Bleach Bypass Dynamic Range: DR400 Highlight: -1 Shadow: +1 Color: +4 Noise Reduction: -4 Sharpening: -2 Clarity: -3 Grain Effect: Strong, Small Color Chrome Effect: Strong Color Chrome Effect Blue: Strong White Balance: 5300K, -3 Red & -6 Blue ISO: Auto, up to ISO 6400 Exposure Compensation: +1/3 to +1 (typically)
Example photographs, all camera-made JPEGs captured using this “Silver Summer” film simulation recipe on my Fujifilm X-E4:
Bee on a Thistle – Farmington, UT – Fujifilm X-E4
Lily – Sundance, UT – Fujifilm X-E4
Tree Branch and Creek – Sundance, UT – Fujifilm X-E4
Nobody pays me to write the content found on fujixweekly.com. There’s a real cost to operating and maintaining this site, not to mention all the time that I pour into it. If you appreciated this article, please consider making a one-time gift contribution. Thank you!
Kodachrome They give us those nice bright colors They give us the greens of summer Makes you think all the world’s a sunny day
Kodachrome is probably the most iconic photographic film ever made. It was legendary, and many people saw the world through its colors. Kodak produced Kodachrome film from 1935 through 2009, when, to the dismay of photographers around the world, it was suddenly discontinued.
The Kodachrome name has been used for many different films over the years. The first Kodachrome product was a two-glass-plate color negative that was introduced in 1915. Like all other color photography methods of its time, the results weren’t particularly good and the product not especially successful.
In 1935, Kodak released its next Kodachrome product: a positive color transparency film. This Kodachrome was the first film that produced reasonably accurate colors, and, because of that, was the first commercially successful color film. It became the standard film for color photography for a couple decades, and was even Ansel Adams’ preferred choice for color work. The December 1946 issue of Arizona Highways, which was the first all-color magazine in the world, featured Barry Goldwater’s Kodachrome images. While the most popular Kodachrome during this time was ISO 10, Kodak also produced an ISO 8 version, as well as a Tungsten option in the 1940s.
Kodak made significant improvements to Kodachrome, and in 1961 released Kodachrome II. This film boasted more accurate colors, sharper images, finer grain, and a faster ISO of 25. While it was still somewhat similar to the previous Kodachrome, it was better in pretty much every way. A year later Kodachrome-X was introduced, which had an ISO of 64, and produced more saturation and increased contrast, but was grainier. Kodachrome for cinema had an ISO of 40, and would continue to be ISO 40 until 2009 when Kodak discontinued Kodachrome.
There was a movement in the early-1970s to end Kodachrome because the process to develop it was very toxic. Kodachrome is actually a black-and-white film with color added during development, which you can imagine isn’t a simple procedure. Instead of discontinuing their most popular color film, Kodak made a new version that required a less-toxic (but still toxic) and less complicated (but still complicated) development process. This appeased those who wanted the film gone, but the new version of Kodachrome was not initially well received by all photographers, some of whom liked the old version better. William Eggleston, for example, who used Kodachrome extensively in his early career, wasn’t a fan of the new version, and used other films instead.
In 1974, because of the new less-toxic development process, Kodachrome II was replaced by Kodachrome 25 and Kodachrome-X was replaced by Kodachrome 64. They also introduced Kodachrome 200, a high-ISO version. This generation of Kodachrome is what most people think of when they picture (pun intended) the film, gracing the pages of magazines like National Geographic. Due to Kodachrome’s sharpness, grain, color, contrast, and archival characteristics, it was a great all-around option that worked well in most circumstance. Steve McCurry, who is perhaps the best-known photographer to extensively use this era of Kodachrome, said of the film, “It has almost a poetic look with beautiful colors that were vibrant and true to what you were shooting.”
When Kodak discontinued Kodachrome in 2009, it shocked the photographic community; however, the deeper blow was that Kodak discontinued the chemicals required to develop it. Even if you had an old roll of the film (which I did), you couldn’t develop it, except as a black-and-white film from a specialty lab. By the end of 2010, the Kodachrome era was officially over for good.
Captured using real Kodachrome 64 35mm color transparency film on a Canon AE-1.
I shot many rolls of Kodachrome 64, and a few rolls of Kodachrome 25. My favorite was Kodachrome 64 because it had more contrast and more saturated colors—while it was a little less true-to-life, it produced bolder pictures more like Paul Simon’s description. It was a sad day for me when Kodak discontinued it. At that time, I was just getting into digital photography; in retrospect I wish that I had paused on digital and exposed a few more rolls of Kodachrome, just for the joy of it.
Paul Simon shot his Kodachrome on a Nikon camera, and I shot mine on a well-used Canon AE-1. Even though the film is long gone, I now shoot “Kodachrome” on a Fujifilm X100V and an X-E4. Yes, Kodachrome lives, thanks to Fujifilm’s great JPEG output! I’ve created film simulation recipes that mimic Kodachrome 64. While they’re not a 100% perfect match, considering the limited options and parameters that are available in-camera, they’re surprisingly accurate to the film. They certainly attain the “memory color” that Fujifilm’s managers often talk about. Ah, the irony of achieving a Kodachrome look on a Fujifilm camera is not lost on me!
I’ve actually published over 150 recipes (which you can fin on the Fuji X Weekly app) for Fujifilm cameras, many of which are based on film stocks. Using film simulation recipes, no matter the Fujifilm camera you have, allows you to get straight-out-of-camera pictures that appear as if they were post-processed—or, even better, shot on film instead of digital. This is obviously a big time-saver, but can also be more fun.
Captured using the Kodachrome 64 film simulation recipe on a Fujifilm X100V
Whenever I go out to photograph, I always have at least one Fujifilm camera with me, loaded with seven film simulation recipes. My favorite color recipe is Kodak Portra 400 v2, and my favorite black-and-white recipe is Kodak Tri-X 400. Some recipes aren’t modeled after specific films, but produce an analog aesthetic anyway, such as my Xpro ’62 recipe, which has a vintage cross-processed look, and my Positive Film recipe, which is intended to mimic Saul Leiter’s style. I like to load a few of my favorite recipes into my camera before going out, and the remaining presets are often experimental recipes that I’m working on, as I’m always creating new ones.
Kodachrome 64 is one of those recipes that I find myself often programing into my camera—that is, if it isn’t already a C1-C7 preset from my last outing! It has the right amount of nostalgia, delivering those “nice bright colors” and “greens of summer” that “makes you think all the world’s a sunny day.” I can’t help but think, if Paul Simon picked up a Fujifilm camera today to take a photograph, the Kodachrome 64 recipe would be his favorite, and perhaps he’d even write a song about it.
I call this recipe “Pulled Fujicolor Superia” because it is similar to Fujicolor Superia Xtra 400 film that’s been pulled one stop. Of course, how any emulsion is shot, developed, printed and/or scanned has an impact on its aesthetic, and one film can have many different looks. I didn’t set out to recreate the look of pulled Superia film, but, in fact, it does look surprisingly close to some examples I found. It’s better to be lucky than good, right? I wouldn’t say that this is 100% spot-on for pulled Superia 400 film, but it’s not far off at all.
Break – Salt Lake City, UT – Fujifilm X100V – “Pulled Fujicolor Superia”
Because this recipe uses the Classic Negative film simulation, Clarity, and Color Chrome Effect Blue, it is compatible with the Fujifilm X-Pro3, X100V, X-T4, X-S10, X-E4, and X-T30 II cameras. I think it works best on sunny days, but I did use it with some success in overcast and indoor situations.
Classic Negative Dynamic Range: D-Range Priority Strong Color: +3 Noise Reduction: -4 Sharpening: -2 Clarity: +2 Grain Effect: Weak, Small Color Chrome Effect: Strong Color Chrome Effect Blue: Strong White Balance: Daylight, -4 Red & -2 Blue ISO: Auto, up to ISO 6400 Exposure Compensation: 0 to +2/3 (typically)
Example photographs, all camera-made JPEGs using this “Pulled Fujicolor Superia” film simulation recipe on my Fujifilm X100V:
Packed Parking Garage – Salt Lake City, UT – Fujifilm X100V
Dee’s – Salt Lake City, UT – Fujifilm X100V
Salt Lake Shoreland Preserve Boardwalk – Layton, UT – Fujifilm X100V
Wetland Grass & Mountains – Layton, UT – Fujifilm X100V
Grass – Layton, UT – Fujifilm X100V
Fence & Hidden Building – Layton, UT – Fujifilm X100V
Playing Pokemon – Layton, UT – Fujifilm X100V
Looking Through Binoculars – Layton, UT – Fujifilm X100V
My Four Kids – Layton, UT – Fujifilm X100V
Jonathan at f/3.6 – Farmington, UT – Fujifilm X100V
Yellow & Green Grass – Farmington, UT – Fujifilm X100V
Pops of Fall – Fruit Heights, UT – Fujifilm X100V
A Little Splash of Autumn – Fruit Heights, UT – Fujifilm X100V
Nobody pays me to write the content found on fujixweekly.com. There’s a real cost to operating and maintaining this site, not to mention all the time that I pour into it. If you appreciated this article, please consider making a one-time gift contribution. Thank you!
Thomas Schwab sent me an X-Trans I recipe to try, which he calls Punchy Velvia. Whenever Thomas sends me a recipe to try, I’m always excited to program it into the camera, because they’re often great. He’s a friend, and has a good eye for Fujifilm settings. He created the X-Trans I Kodachrome I and Kodachrome II recipes. Thank you, Thomas, for sending this!
I recently went on a hike with this new recipe programmed into my Fujifilm X-Pro1. My kids were with me, and my daughter, Joy, ended up shooting with the camera much more than I did. A couple of these pictures were captured by me, but most were captured by her. This recipe was a great option for photographing the vibrant colors we encountered. For colorful scenes where you want punchy pictures, this recipe or Vivid Color are the ones to use.
Yellow Oak – Farmington, UT – Fujifilm X-Pro1 – “Punchy Velvia”
If you have an X-E1, X-Pro1, or X-M1, be sure to give this recipe a try. You can also use this recipe on X-Trans II and Bayer cameras, but the results will be slightly different; however, feel free to it anyway, because you might like the results.
Velvia Dynamic Range: DR400 Highlight: +2 (Hard) Shadow: +2 (Hard) Color: +2 (High) Sharpness: +2 (Hard) Noise Reduction: -2 (Low) White Balance: Daylight/Fine, 0 Red & 0 Blue ISO: Auto, up to ISO 3200 Exposure Compensation: 0 to +2/3 (typically)
Example photographs, all camera-made JPEGs captured by Joy using this “Punchy Velvia” film simulation recipe on my Fujifilm X-Pro1:
Rock Outcrop – Farmington, UT – Fujifilm X-Pro1 – Photo by Joy Roesch
Boulder in the Forest – Farmington, UT – Fujifilm X-Pro1 – Photo by Joy Roesch
Mountain Forest – Farmington, UT – Fujifilm X-Pro1 – Photo by Joy Roesch
Branches and Blue – Farmington, UT – Fujifilm X-Pro1 – Photo by Joy Roesch
One Leaf Turned – Farmington, UT – Fujifilm X-Pro1 – Photo by Joy Roesch
Oak Leaves – Farmington, UT – Fujifilm X-Pro1 – Photo by Joy Roesch
Backlit Autumn Tree – Farmington, UT – Fujifilm X-Pro1 – Photo by Joy Roesch
Autumn Trees – Farmington, UT – Fujifilm X-Pro1 – Photo by Joy Roesch
Nobody pays me to write the content found on fujixweekly.com. There’s a real cost to operating and maintaining this site, not to mention all the time that I pour into it. If you appreciated this article, please consider making a one-time gift contribution. Thank you!